Oh, hello there! Grab a mug, find your favorite comfy spot, and let’s chat about bringing more of that lovely Korthalsella disticha into your garden. I’ve spent countless hours with these fascinating plants over the past two decades, and let me tell you, propagating them is a truly satisfying endeavor. There’s something so special about nurturing a tiny new life into existence, all from a piece of the parent plant.
Why Korthalsella disticha is Worth the Effort
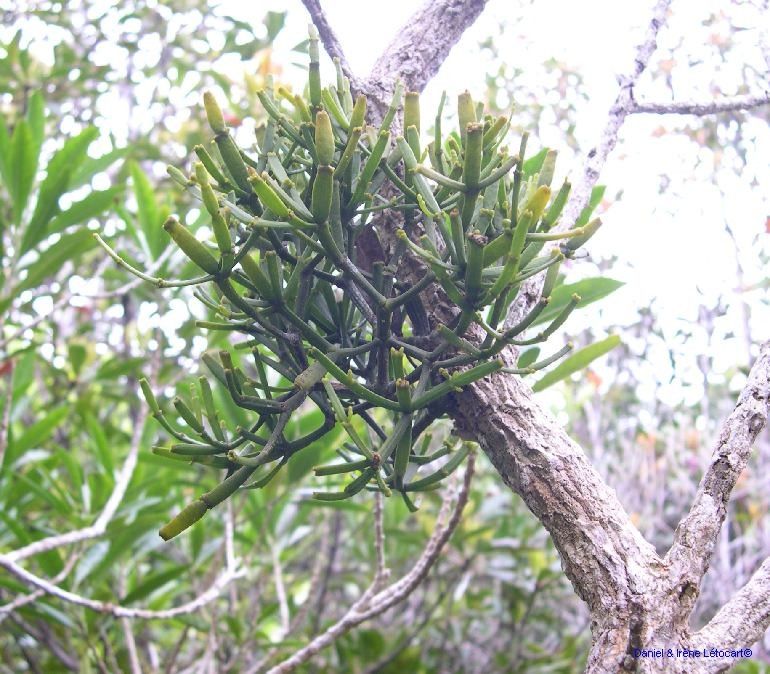
Korthalsella disticha, often called the “twiggy mistletoe” or “false mistletoe,” might not be the showstopper with vibrant blooms, but its unique, almost architectural form is its charm. The delicate, segmented stems create a lovely texture, and they bring a touch of the wild into even the most manicured spaces. Propagating it is a wonderful way to share its understated beauty with friends or simply to fill out your own collection. Now, if you’re a brand-new gardener, I’ll be honest – Korthalsella disticha might present a slight learning curve. It’s not difficult, but it does appreciate a bit of specific attention. Think of it as a delightful puzzle to solve!
The Sweet Spot for Starting
For the best chance of success, you want to take your cuttings during the active growing season. For most of us, that means late spring through summer. The plant is full of energy then, and the new growth is more vigorous, which translates to a higher strike rate for your propagations. Avoid trying this when the plant is dormant in winter.
Your Propagation Toolkit
Here’s what you’ll want to have on hand:
- Sharp Pruning Shears or a Clean Knife: Vital for making clean cuts without crushing the stems.
- Rooting Hormone (Optional but Recommended): A little powder or gel can give your cuttings a significant boost. Look for one formulated for softwood or semi-hardwood cuttings.
- Well-Draining Potting Mix: I like a mix of equal parts perlite, coco coir, and a bit of coarse sand. Regular potting soil can hold too much moisture, which is the enemy here.
- Small Pots or Trays with Drainage Holes: Recycled yogurt containers or small nursery pots work perfectly.
- Plastic Bags or a Propagator with a Lid: To create a humid environment around your cuttings.
- Water: For use in water propagation.
Bringing New Life: Propagation Methods
Korthalsella disticha is quite adaptable, and I’ve found success with a couple of methods.
Stem Cuttings
This is my go-to for Korthalsella disticha.
- Select Your Cuttings: Look for healthy, non-flowering stems that are about 4-6 inches long. Choose stems that are somewhat firm but not woody.
- Make the Cut: Using your sharp pruners, make a clean cut just below a node (where a leaf or branch emerges from the stem). Take several cuttings if you can; not all of them will take.
- Prepare the Cuttings: Gently remove the lower leaves. If your stems have larger, leaf-like structures, you might need to trim those back by half to reduce water loss.
- Apply Rooting Hormone: Dip the cut end into your rooting hormone, tapping off any excess.
- Plant Your Cuttings: Create small holes in your prepared potting mix with a pencil or your finger. Insert the cut end of each cutting into the holes, ensuring the nodes where you removed the leaves are below the soil surface. Gently firm the soil around them.
- Water Gently: Water lightly to settle the soil.
Water Propagation
This method is wonderfully visual and surprisingly effective for Korthalsella disticha.
- Take Your Cuttings: Follow steps 1 and 2 from the stem cutting method.
- Remove Lower Leaves: Just like with soil cuttings, remove the lower leaves that would sit in the water.
- Place in Water: Put your prepared cuttings in a clean jar or glass filled with fresh water. Make sure no leaves are submerged in the water. Leaves sitting in water will rot.
- Find a Good Spot: Place the jar in bright, indirect light. Change the water every few days to keep it fresh.
The “Secret Sauce”: My Insider Tips
- Don’t Overwater the Soil: This is probably the most common mistake. Korthalsella disticha cuttings hate soggy feet. The goal is consistently moist, not wet. I often mist the surface lightly every couple of days if the soil looks dry.
- Bottom Heat is Your Friend: If you can provide gentle bottom heat (around 70-75°F or 21-24°C), it will significantly speed up root development. A heat mat designed for seedlings works wonders.
- Be Patient with the Hormone: If you’re using rooting hormone, make sure it’s fresh. Older hormone loses its potency. And again, tap off the excess; too much can actually inhibit rooting.
Aftercare and When Things Go Wrong
Once your cuttings have developed a healthy root system (you’ll see roots peeking out the drainage holes, or new growth appearing in water propagation), it’s time for them to transition.
- Transplanting from Water: Carefully pot your rooted cuttings into your well-draining mix. Water them in gently.
- Transplanting from Soil: Pot them up into slightly larger containers with fresh potting mix.
- Keep Watering Carefully: Continue to keep the soil lightly moist. Avoid letting them dry out completely, but also steer clear of waterlogging.
- Watch for Rot: The most common sign of failure is rot. If your cuttings turn black and mushy, it’s a sign of too much moisture and poor air circulation. Unfortunately, there’s usually no coming back from this.
- Wilting: Some minor wilting as they establish is normal, especially if they were a bit dry. Keep an eye on it, but don’t panic immediately.
Enjoy the Journey
Propagating Korthalsella disticha is a journey, not a race. There will be times when some cuttings don’t make it, and that’s perfectly okay. Every gardener has experienced it. The key is to observe, learn, and keep trying. Seeing those first tiny roots emerge, or a new stem unfurl, is one of the most rewarding moments in gardening. Happy propagating, and I hope you’re soon surrounded by your own beautiful Korthalsella disticha!
Resource:
https://identify.plantnet.org/k-world-flora/species/Korthalsella%20disticha%20(Endl.)%20Engl./data