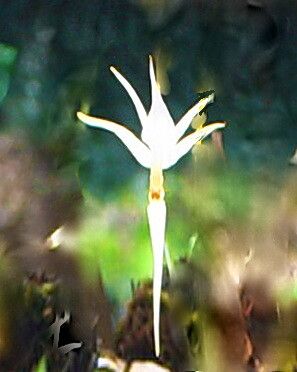
Hello fellow plant lovers! Today, we’re diving into the wonderful world of Jumellea stenophylla. If you’re drawn to its unique beauty and the satisfaction of growing your own, you’ve come to the right place. I’ve been growing and propagating plants for two decades, and I can tell you, adding more of these delightful specimens to your collection is incredibly rewarding. Jumellea stenophylla can be a bit of a particular plant when it comes to propagation, so I wouldn’t call it a beginner’s absolute first project, but with a little care and patience, you’ll find success.
The Best Time to Start
Timing is everything, isn’t it? For Jumellea stenophylla, the sweet spot for propagation is during its active growing season. Think late spring through early summer. The plant is full of energy then, which significantly boosts your chances of getting those cuttings to root. Avoid propagating when the plant is stressed, like during extreme heat or if it’s just come out of a dormant period.
Supplies You’ll Need
Don’t worry, you don’t need a fancy laboratory! Here’s what I usually gather before I start:
- Sharp, clean pruning shears or a knife: Sterilize them with rubbing alcohol before and after use. This is crucial!
- Rooting hormone: A powder or gel can really help nudge those roots along. My favorites are those with IBA.
- Well-draining potting mix: I like to use a blend of peat moss or coco coir, perlite, and a bit of orchid bark. Something that won’t stay soggy is key.
- Small pots or trays: Clean, with drainage holes, of course.
- Plastic bags or a propagation dome: To create a humid microclimate.
- Water: For misting and, if you choose, a clear jar.
- A comfy spot with bright, indirect light: No direct sunbeams, please!
Propagation Methods
Let’s get our hands dirty! Jumellea stenophylla is best propagated through stem cuttings or, if you have an established plant, division.
Stem Cuttings: This is my go-to method.
- Take your cuttings: Select healthy, new growth that isn’t flowering. Aim for cuttings about 4-6 inches long. Make your cut just below a leaf node (where the leaf attaches to the stem).
- Prepare the cutting: Gently remove the lower leaves, leaving just a few at the top. You want to expose a bit of the stem for rooting.
- Apply rooting hormone: Dip the cut end into your rooting hormone, tapping off any excess.
- Plant the cutting: Make a small hole in your prepared potting mix with your finger or a pencil. Insert the cutting, ensuring the node is covered. Gently firm the soil around it.
- Create humidity: Water the pot lightly. Then, cover the pot with a clear plastic bag (a few holes poked in it are fine) or place it under a propagation dome. This traps moisture.
- Placement: Put the pot in a warm spot with bright, indirect light.
Division: If your plant has grown large and started to produce multiple growth points, division is a good option.
- Gently remove from pot: Carefully take your Jumellea stenophylla out of its current container.
- Examine the root ball: Gently brush away some of the old soil to see where the plant naturally divides. You’re looking for separate clumps with their own roots.
- Separate the divisions: Using a clean, sharp knife or even just your hands, gently pull or cut the plant into smaller sections. Make sure each section has a good amount of roots.
- Pot them up: Plant each division in its own pot with fresh, well-draining soil. Water them in well.
The “Secret Sauce” (Pro Tips)
Here are a few tricks I’ve learned over the years that really make a difference:
- Bottom Heat is Your Friend: If you want to speed things up, placing your cuttings on a propagation mat set to a gentle warmth (around 70-75°F) is a game-changer. It encourages root development from below.
- Don’t Over-Mist: While humidity is important, too much water sitting on the leaves can lead to fungal issues. I’ll mist the air around the cuttings and the soil when it starts to feel dry, rather than drenching the foliage itself.
- Be Patient with Leaf Drop: It’s normal for a lower leaf or two to yellow and drop off after you take a cutting. Don’t panic! As long as the main stem looks healthy and the buds are still green, it’s usually just the plant shedding what it doesn’t need to support root growth.
Aftercare & Troubleshooting
Once you see roots emerging (you might see them through the drainage holes or a gentle tug might reveal resistance), it’s time to transition.
- Acclimatize: Slowly remove the plastic bag or dome over a week or so, allowing the new plant to adjust to normal humidity levels.
- Watering: Water when the top inch of soil feels dry. Avoid letting it sit in soggy conditions, as this is the quickest way to invite root rot.
- Light: Continue to provide bright, indirect light.
- Troubleshooting:
- Yellowing Leaves: If multiple leaves are yellowing and dropping, it could be too much water, too little light, or shock. Assess your watering schedule first.
- Mushy Stem: This is a clear sign of rot. Unfortunately, if the stem becomes mushy, it’s often too late to save. Try to identify the cause (usually overwatering) and learn from it for your next attempt.
- No Roots: If after several weeks you see no signs of rooting, the cutting might not have been viable, or conditions weren’t ideal. Don’t get discouraged; sometimes it takes a few tries.
A Warm Farewell
Propagating plants like Jumellea stenophylla is more than just creating new life; it’s a journey. It’s about observing, learning, and connecting with these beautiful green beings. Be patient with yourself and the process. Every gardener has lost cuttings; it’s part of the learning curve. Enjoy the quiet moments of tending to your new plants, and soon you’ll have more of these beauties to share! Happy growing!
Resource: