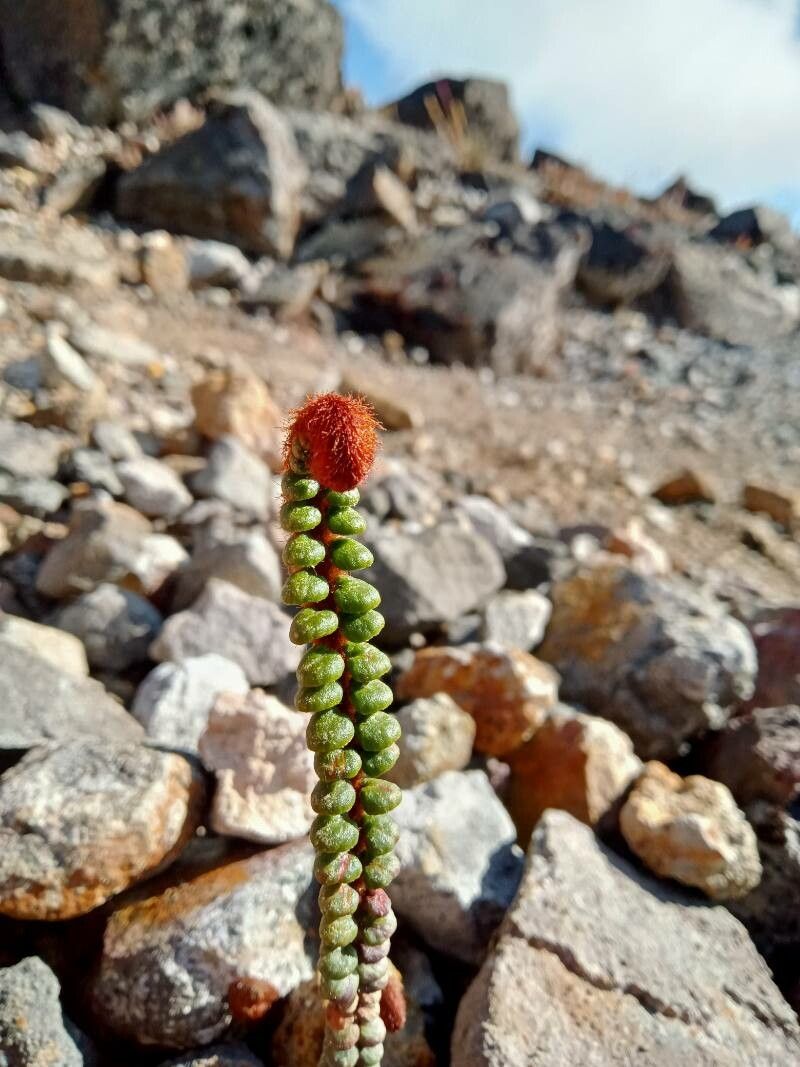
Hello there, fellow plant enthusiasts! I’m so excited to chat with you today about a truly special fern: Jamesonia cinnamomea. You might know it better as the “Cinnamon Fern,” and honestly, the name just hints at its beauty. Its fronds are a rusty, coppery brown when they first unfurl, reminiscent of cinnamon sticks, before maturing into that gorgeous, deep green. It’s a real showstopper that adds a touch of wild elegance to any shady corner. If you’ve ever admired one, you’ll know that propagating this beauty is a wonderfully rewarding endeavor. While it’s not the absolute easiest plant for a complete beginner, with a little guidance and patience, you’ll be well on your way to success.
The Best Time to Start
My favorite time for propagating Jamesonia cinnamomea is in late spring or early summer. This is when the plant is actively growing and has plenty of energy. You’ll see new fiddleheads emerging, and those are perfect candidates for taking cuttings. Waiting until the weather has truly warmed up and settled after the last frost is key.
Supplies You’ll Need
Before we get our hands dirty, let’s gather our tools:
- Sharp, clean pruning shears or a sharp knife: For making clean cuts.
- Potting mix: A well-draining, peaty mix is ideal. I often use a blend of equal parts peat moss and perlite or orchid bark.
- Small pots or trays: Clean containers for your cuttings. Drainage holes are a must!
- Rooting hormone (optional but recommended): A powder or liquid rooting hormone can significantly boost your success rate.
- Plastic bags or a propagation dome: To create a humid environment.
- Water: For misting and watering.
- Small pebbles or grit (optional): For added drainage at the bottom of pots.
Propagation Methods
Jamesonia cinnamomea is best propagated through stem cuttings or division. Let’s dive into how you can do it.
Stem Cuttings
This is my go-to method for increasing my cinnamon fern collection.
- Select your cuttings: Look for healthy, vigorous stems that are actively growing. You want stems that have at least two to three fronds and are not yet woody. Make sure they are from the current season’s growth.
- Make the cut: Using your sharp shears, cut a stem about 4-6 inches long. Try to make the cut just below a node (where a frond attaches to the stem).
- Prepare the cutting: Gently remove the lower fronds, leaving just the top two or three. This helps the cutting direct its energy into root production rather than supporting too much foliage. If you have very large fronds, you can even cut them in half lengthwise to reduce moisture loss.
- Apply rooting hormone (if using): Dip the cut end of the stem into the rooting hormone, tapping off any excess.
- Pot it up: Fill your small pots with your prepared, moistened potting mix. Make a small hole in the center of the mix with your finger or a pencil.
- Plant the cutting: Insert the prepared stem into the hole, ensuring the nodes where you removed the leaves are buried. Gently firm the soil around the stem.
- Create humidity: Water the soil gently to settle it around the stem. Then, cover the pot with a plastic bag (making sure the fronds don’t touch the inside of the bag) or place it under a propagation dome. Open it briefly each day to allow for air circulation.
- Find a good spot: Place the pot in a warm, bright location, but avoid direct sunlight. Consistent warmth is very important.
Division
If you have a mature plant that’s looking a bit crowded, division is a great option.
- Timing is key: The best time for this is early spring, just as new growth is starting.
- Gently unpot: Carefully remove the entire plant from its pot.
- Examine the root ball: You’re looking for natural divisions – sections of the plant with their own set of roots and emerging fronds.
- Make the split: Using your hands or a clean trowel, gently pull or cut the root ball apart into smaller sections. Try to ensure each division has a good amount of roots and at least one or two healthy fronds.
- Pot up the divisions: Pot each new division into its own container with fresh, moist, well-draining potting mix.
- Water and provide TLC: Water thoroughly and place them in a sheltered spot with bright, indirect light.
The “Secret Sauce” (Pro Tips)
Here are a couple of little tricks I’ve learned over the years that often make a big difference:
- Bottom Heat is Your Friend: I can’t stress this enough! For stem cuttings, placing the pots on a gentle heat mat can dramatically speed up root formation. Ferns love consistent warmth, and bottom heat mimics their natural growing conditions.
- Don’t Drown Your Cuttings: When watering your cuttings, aim for evenly moist, not soggy, soil. Overwatering is the fastest way to invite rot. If you notice standing water, pour it out immediately.
- Mist with Care: While humidity is vital, avoid getting the fronds constantly wet. This can encourage fungal issues. Mist the air around the cutting and the soil surface if needed, or rely on the humidity dome/plastic bag to do the job.
Aftercare & Troubleshooting
Once your cuttings have established roots, you can begin to gradually acclimate them to lower humidity. This might mean slowly opening the plastic bag wider over a week or two, or removing the propagation dome for longer periods. Continue to keep them in bright, indirect light and water when the top inch of soil feels dry.
The biggest challenge you might face is rot. If your cutting looks mushy, dark, or has a foul smell, it’s likely rotted and unfortunately, you’ll have to discard it and try again. This usually happens due to overwatering or poor air circulation. Also, wilting leaves can be a sign of a few things: insufficient humidity, the cutting being too dry, or it simply hasn’t rooted yet and is struggling. Keep an eye on that soil moisture!
A Little Encouragement
Propagating plants is a journey, and each cutting is a new adventure. Be patient with your Jamesonia cinnamomea. It might take several weeks, even a few months, for those roots to develop. Don’t get discouraged if not every cutting takes. Just enjoy the process, learn from each attempt, and celebrate those first tiny roots when they appear. Happy gardening!
Resource:
https://identify.plantnet.org/k-world-flora/species/Jamesonia%20cinnamomea%20Kunze/data