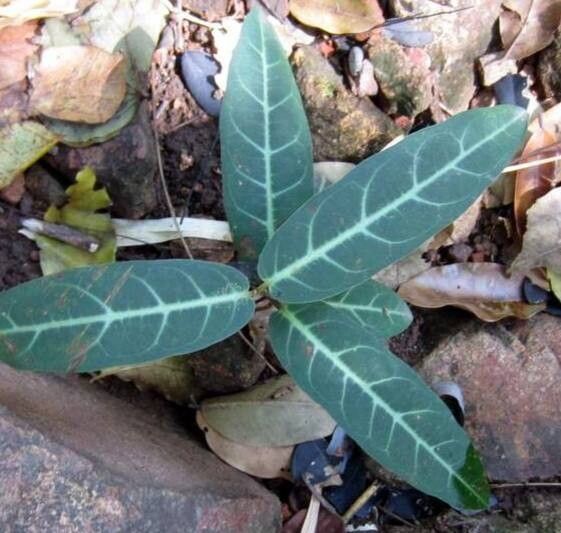
Oh, Hemidesmus indicus! What a wonderful plant to focus on. I’ve spent years with this beauty, and let me tell you, it’s a little gem. Its delicate white flowers have this subtle, sweet scent that just fills the evening air. Plus, it’s got this lovely sprawling habit that can gracefully weave through a garden bed or spill out of a pot. For me, coaxing a new Hemidesmus into existence from a parent plant is one of life’s simple, yet deeply satisfying pleasures. It’s not an intimidating plant to propagate, even for those just starting out. You’ve got this!
The Best Time to Start
When it comes to Hemidesmus indicus, I’ve found that the spring and early summer are your best friends. This is when the plant is really hitting its stride, pushing out new, vigorous growth. Starting a propagation project when the plant is actively growing gives your cuttings the best chance of rooting quickly and successfully. Think of it as giving them a healthy head start in life!
Supplies You’ll Need
Here’s what I always have on hand to make sure my Hemidesmus propagation efforts go smoothly:
- Sharp Pruning Shears or a Clean Knife: For making clean cuts. Dull tools can damage the stems and invite disease.
- Potting Mix: A well-draining mix is crucial. I usually combine equal parts peat moss or coco coir with perlite and some coarse sand. This ensures aeration and prevents waterlogging, which these plants really dislike.
- Small Pots or Seed Trays: Clean, empty containers for your cuttings. Make sure they have drainage holes!
- Rooting Hormone (Optional but Recommended): A powdered or liquid rooting hormone can significantly boost your success rate, especially for cuttings that can be a bit stubborn.
- Watering Can with a Fine Rose: For gentle watering.
- Plastic Bag or Propagator Lid: To create a humid environment around your cuttings.
- Labels and Pen: To keep track of what you’ve planted and when.
Propagation Methods
Hemidesmus indicus is wonderfully versatile, and I have a few favorite ways to get more plants.
Stem Cuttings (My Go-To)
This is my most reliable method for Hemidesmus indicus.
- Take Cuttings: Look for healthy, non-flowering stems that are about 4-6 inches long. Use your sharp shears to make a clean cut just below a leaf node (where the leaf attaches to the stem).
- Prepare the Cuttings: Gently remove the lower leaves, leaving just a couple of sets at the top. This prevents them from rotting in the soil. If the leaves are quite large, you can even pinch them in half to reduce water loss.
- Apply Rooting Hormone: Dip the cut end of each cutting into your rooting hormone powder, tapping off any excess.
- Plant Them Up: Fill your small pots with your prepared potting mix. Make a small hole with your finger or a pencil, and carefully insert the cutting. Firm the soil gently around the stem to ensure good contact.
- Water Gently: Water the soil thoroughly but gently.
- Create Humidity: Cover the pots with a plastic bag, a propagator lid, or place them in a clear plastic container. This traps moisture around the leaves.
Water Propagation (A Visual Treat)
This method is a bit more hands-off and lets you watch the magic happen.
- Select and Cut: Just like with stem cuttings, choose healthy, non-flowering stems. Cut them about 4-6 inches long, making sure to cut below a leaf node.
- Remove Lower Leaves: Take off all the leaves that would fall below the water line.
- Place in Water: Put your cuttings into a clean jar or glass filled with clean water. Make sure no leaves are submerged – they will rot if they are.
- Find a Spot: Place the container in a bright spot, but out of direct, harsh sunlight.
- Change Water Regularly: Change the water every few days to keep it fresh and prevent bacterial growth. You’ll start to see tiny white roots emerge from the nodes.
- Pot Up When Ready: Once the roots are about an inch long, you can carefully transplant them into small pots filled with your well-draining potting mix.
The “Secret Sauce” (Pro Tips)
Here are a couple of little tricks I’ve picked up over the years that can really make a difference:
- Bottom Heat: If you have the space, placing your pots on a gentle heat mat can work wonders. It encourages the roots to develop more quickly from the bottom up, which is exactly what we want. Just a little warmth can speed things along considerably.
- Don’t Be Afraid to Experiment with Stem Types: While I favor the new, soft growth for cuttings, I’ve also had success with slightly more mature, semi-hardwood cuttings taken in late spring or early summer. These might take a bit longer to root, but they can often be more robust. Just be sure to treat them with a bit more rooting hormone.
- Sterilize Everything: This is a big one! Before you start, make sure your pots, shears, and any tools are clean and sterile. A quick wipe with rubbing alcohol or hot soapy water can prevent any nasty fungal or bacterial infections from hitching a ride on your cuttings.
Aftercare & Troubleshooting
Once your Hemidesmus cuttings have started to show signs of life – you might see new leaf growth or feel a gentle tug when you lightly pull on the stem – it’s time to adjust their care.
- Acclimatize: Gradually introduce your newly rooted cuttings to normal room humidity. Poke a few holes in your plastic bag or lift the propagator lid for short periods each day, slowly increasing the time over a week.
- Watering: Water consistently, allowing the top inch of soil to dry out between waterings. Avoid letting them sit in soggy conditions.
- Light: Continue to provide bright, indirect light. As they grow stronger, they can tolerate a little more direct morning sun.
Common problems usually stem from too much moisture. Rot is the biggest enemy. If you see your cuttings wilting dramatically and the stem feels mushy, it’s likely rot. Try to salvage any healthy parts and start again, paying extra attention to soil drainage and humidity levels. Lack of rooting is usually due to insufficient humidity, poor cutting quality, or lack of time. Patience is key!
A Encouraging Closing
So there you have it! Propagating Hemidesmus indicus is a really rewarding journey. Don’t be discouraged if your first attempt isn’t a runaway success. Gardening is all about observation, learning, and trying again. Enjoy the process of nurturing these little bits of plant life, and before you know it, you’ll have a whole garden full of these fragrant beauties. Happy growing!
Resource:
https://identify.plantnet.org/k-world-flora/species/Hemidesmus%20indicus%20(L.)%20R.Br./data