Oh, hello there! It’s so lovely to connect with you. Today, we’re diving into the fascinating world of Helminthostachys zeylanica, also known by its rather charming common name, the Wrist Fern.
Why Embrace the Wrist Fern?
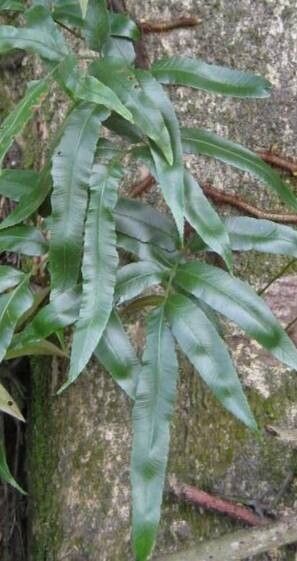
I have to tell you, the Wrist Fern is a truly unique beauty. Its fronds have this wonderfully leathery texture, and they unfurl in such an architectural way. It’s a fern that adds a touch of the exotic without demanding a jungle greenhouse. Propagating it is such a rewarding journey. You get to witness new life emerge from something familiar, and frankly, it’s a fantastic way to share these treasures with fellow plant lovers. Now, I won’t sugarcoat it completely – propagating Helminthostachys zeylanica can be a little bit trickier than your average spider plant, but with a bit of attention and the right approach, it’s absolutely achievable, even if you’re just dipping your toes into propagation waters.
When to Get Your Hands Dirty
The absolute best time to embark on propagating your Wrist Fern is during its active growing season. For most of us, this means spring and early summer. You’ll notice the plant is putting out fresh, vibrant new fronds. This is when the plant is full of vigor and has plenty of energy to dedicate to growing those precious roots. Trying to propagate when the plant is dormant is like asking it to run a marathon with no breakfast – it’s just not going to go so well!
Gearing Up for Success
Before we get started, let’s make sure you have everything you need. Having your supplies at the ready makes the whole process so much smoother.
- Sharp, clean pruning shears or a sharp knife: You want to make clean cuts to avoid damaging the plant. Sterilize them with rubbing alcohol between cuts to prevent disease.
- Well-draining potting mix: I like to use a mix of equal parts orchid bark, perlite, and peat moss. It needs to stay moist but not soggy.
- Small pots or containers: Choose pots with drainage holes, of course. Terra cotta pots are great because they allow the soil to breathe.
- Rooting hormone powder or gel (optional but recommended): This can give your cuttings a little boost.
- Plastic bag or clear dome: This creates a humid environment for your cuttings.
- Watering can with a fine rose: For gentle watering.
- Spray bottle: For misting.
Let’s Get Propagating!
The most reliable way to propagate Helminthostachys zeylanica is through division. This method works best when your plant has grown substantial enough to have multiple crowns or rhizomes.
- Gently remove the plant from its pot. If it’s been in the same pot for a while, it might be a bit root-bound. Loosen the soil gently around the edges.
- Inspect the rhizome. You’re looking for distinct sections of the rhizome, or where new growth points (crowns) are clearly emerging.
- Carefully divide the rhizome. Using your clean knife or shears, slice through the rhizome between the crowns. Make sure each division has at least one healthy leaf and some intact roots attached. Don’t be afraid if a few roots break; just try to minimize it.
- Inspect the cut surface. If you see any sign of rot or disease, you can lightly dust that cut with a fungicide powder.
- Pot up your new divisions. Plant each division in its own small pot filled with your well-draining potting mix. Plant them so the top of the rhizome is just at or slightly above the soil surface.
- Water gently. Give them a good initial watering to settle the soil, but avoid waterlogging.
- Create a humid environment. Place a clear plastic bag or a propagation dome over the pot. Make sure the leaves do not touch the plastic. You can use stakes to keep the bag elevated.
My “Secret Sauce” for Extra Success
Here are a couple of things I always do that seem to make a real difference with my Wrist Ferns:
- Bottom Heat is Your Friend: Ferns, especially when they’re trying to root, really appreciate a little warmth from below. A propagation mat set on a low setting can significantly speed up the rooting process. It mimics the warmth of the soil in a tropical environment.
- Don’t Overwater – Ever! I know I said to water gently, but I mean it. The biggest killer of new plant divisions is too much water. The rhizome needs to stay moist, but never soggy. Let the top inch of soil dry out slightly between waterings. It’s better to err on the side of slightly too dry than too wet.
Keeping Them Happy & What to Watch For
Once your divisions are potted up and happily ensconced in their humid homes, keep them in bright, indirect light. Avoid direct sunlight, which can scorch those tender new leaves. Continue to mist every few days or so, and check the soil moisture regularly.
You’ll know your Wrist Fern is happy when you start to see new frond growth emerging. This can take several weeks, so be patient!
If you start to see yellowing leaves that quickly turn mushy or black, that’s a strong sign of rot, usually due to overwatering. If this happens, you might need to un-pot the division, trim away any rotted tissue, and let it air dry for a day before repotting in fresh, drier mix. Sometimes, unfortunately, a rotted division is beyond saving.
Keep Growing!
So there you have it! Propagating Helminthostachys zeylanica is a beautiful process of patience and observation. Watch for those new unfurling fronds, enjoy the journey, and don’t be discouraged if your first attempt isn’t perfect. Every gardener learns by doing, and the satisfaction of nurturing new life is truly unmatched. Happy propagating!
Resource:
https://identify.plantnet.org/k-world-flora/species/Helminthostachys%20zeylanica%20(L.)%20Hook./data