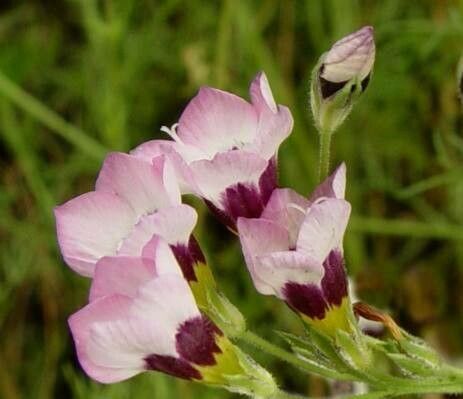
Oh, Gilia tricolor! What a charmer that one is. Its delicate, often bi-colored blooms are like little jewels sprinkled through the garden, and honestly, seeing those seeds transform into happy new plants is one of my favorite moments of the year. It’s the kind of plant that makes you feel like a gardening wizard, and I’m so excited to share how you can bring more of its magic into your own patch.
Now, if you’re new to the plant propagation world, I’d say Gilia tricolor is a wonderfully welcoming plant. It’s not one that will have you tearing your hair out, which is always a good sign to start with, right?
The Best Time to Start
For Gilia tricolor, you’ll have the most success starting from seed. While you might be tempted to try other methods, its natural life cycle makes seed propagation the most straightforward and rewarding. The ideal time to sow your seeds is generally late winter to early spring, about 6-8 weeks before your last expected frost. This gives the seedlings a good head start indoors before you transplant them outside after the danger of frost has passed.
Supplies You’ll Need
Gathering your supplies before you begin makes the whole process so much smoother. Here’s what I always have on hand:
- Seed Starting Mix: A light, well-draining mix is crucial. You can buy a commercial seed starting mix or make your own with equal parts peat moss, perlite, and vermiculite.
- Seed Trays or Small Pots: Clean trays with drainage holes are perfect. Small peat pots that can be planted directly into the ground are also a great option.
- Watering Can with a Fine Rose: Gentle watering is key to avoid disturbing delicate seeds.
- Labels and a Permanent Marker: Trust me, you’ll forget what you planted where!
- A Sunny Windowsill or Grow Lights: Young seedlings need plenty of light.
- Optional: A Seedling Heat Mat: This can speed up germination, especially if your house is on the cooler side.
Propagation Methods
As I mentioned, for Gilia tricolor, we’re focusing on seed propagation. It’s wonderfully simple and yields fantastic results.
- Prepare Your Containers: Fill your seed trays or pots with your chosen seed starting mix. Gently water the soil until it’s evenly moist but not waterlogged. Let it drain for a bit.
- Sow the Seeds: Gilia tricolor seeds are quite small. You can sow them in a few ways. For smaller trays, sprinkle them thinly over the surface. For individual pots, sow 2-3 seeds per pot.
- Cover Lightly: These little seeds actually need a bit of light to germinate, so you only need to lightly cover them with a thin dusting of your seed starting mix, or even just press them gently into the surface. A good rule of thumb is to cover them no deeper than their own size.
- Water Gently: Mist the surface with your fine rose watering can. You want the soil to stay consistently moist.
- Provide Warmth and Light: Place your trays or pots in a warm spot. If you’re using a heat mat, turn it on. A sunny windowsill is also a good place, but be mindful of direct, harsh sun that might dry out the soil too quickly.
- Watch and Wait: Germination usually takes anywhere from 7 to 21 days, depending on the conditions. Keep the soil moist. You’ll know they’re happy when you see those first tiny green leaves pop up! Once they have their first set of true leaves (the ones that look more like the adult plant, not the initial seed leaves), you can think about thinning them.
The “Secret Sauce” (Pro Tips)
Here are a couple of things I’ve learned over the years that can make a real difference:
- Don’t Over-Water Once They Sprout. It’s tempting to drench everything when you see those first little seedlings, but once they’ve germinated, they’re more susceptible to rot. Keep the soil consistently moist, but allow the very top layer to dry out slightly between waterings. It encourages stronger root growth.
- Think About Air Circulation. Young seedlings can be prone to fungal diseases like “damping off.” Good airflow helps prevent this. If you’re starting them indoors with lights, a small, oscillating fan set on low can be incredibly beneficial. Just make sure it’s not blowing directly on them, creating a strong blast of air.
Aftercare & Troubleshooting
Once your Gilia tricolor seedlings have developed their first true leaves and are looking sturdy, you can transplant them into individual containers if they’re still in a communal tray. This gives their roots more space to grow. Continue to water them gently and keep them in bright, indirect light.
When the danger of frost has passed and your seedlings have a decent amount of growth, it’s time to harden them off. This is a crucial step to acclimate them to outdoor conditions. For about a week, gradually expose them to increasing amounts of time outdoors, starting with an hour or two in a sheltered spot and working up to a full day.
If you see wilting, yellowing leaves, or a mushy stem right at the soil line, that’s usually a sign of overwatering or a fungal issue. It’s a tough lesson, but sometimes it happens. In this case, it’s best to discard the affected seedlings to prevent it from spreading to others.
A Little Patience Goes a Long Way
Gardening is a journey, and propagating plants is a perfect way to witness that journey firsthand. Don’t get discouraged if your first attempt isn’t picture-perfect. Every seed is a tiny miracle, and with a little care and patience, you’ll soon be surrounded by your own beautiful Gilia tricolor plants. Enjoy the process, and happy growing!
Resource:
https://identify.plantnet.org/k-world-flora/species/Gilia%20tricolor%20Benth./data