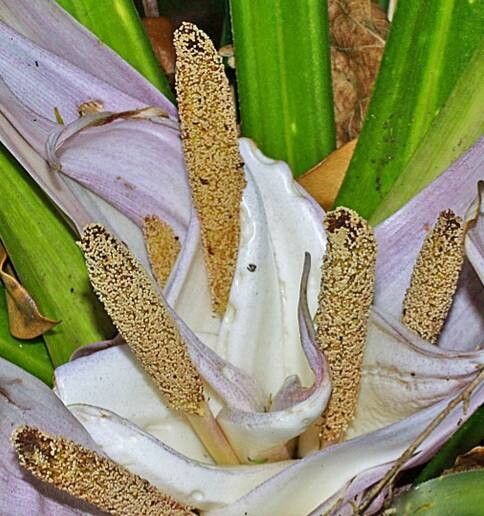
Oh, hello there! So glad you’ve found yourself drawn to the wonderfully wild beauty of Freycinetia banksii, or as many of us affectionately call it, Kiekie. It’s truly a stunner, isn’t it? Those arching, strap-like leaves cascading down, creating a lush jungle feel. And the best part? You can bring that magic to your own garden, or even share it with friends, by propagating your own plants. It’s one of those projects that feels so rewarding, watching a tiny piece of plant life take hold and grow into something magnificent. Now, some of you might be wondering if this is a tricky plant to take cuttings from. I’d say it’s moderately easy. It’s not quite as forgiving as, say, a succulent, but with a little attention, you’ll be celebrating success.
The Best Time to Start
Timing, as in so many things in gardening, is key. For the best luck with Freycinetia banksii, I always aim to take cuttings in the late spring or early summer. This is when the plant is actively growing and has plenty of energy stored up to put into developing new roots. You’ll often see new shoots emerging around this time, and those are perfect candidates. Trying this in the depths of winter is just asking for disappointment, so let’s wait for the warmer days to encourage growth.
Supplies You’ll Need
Before we get our hands dirty, let’s gather our tools. Having everything ready makes the process so much smoother.
- Sharp pruning shears or a clean knife: Essential for making clean cuts without crushing the delicate stems.
- Potting mix: I prefer a well-draining mix, something that doesn’t hold too much moisture. A blend of perlite, peat moss, or coco coir works wonderfully. You can also add a bit of coarse sand.
- Small pots or propagation trays: Clean, small pots are perfect for individual cuttings.
- Rooting hormone (optional but recommended): This can give your cuttings a significant boost in root development. Look for a powder or gel specifically for stem cuttings.
- Clear plastic bags or a mini greenhouse: This will create a humid environment, which is crucial for cuttings.
- Water: For misting and for the water propagation method.
- Labels: Don’t forget to label your cuttings! Trust me, you’ll thank yourself later.
Propagation Methods
Freycinetia banksii is quite obliging when it comes to propagation. Here are a couple of my favorite ways to multiply this gorgeous plant:
Stem Cuttings
This is my go-to method for Freycinetia. It’s reliable and gives you a good chance of success.
- Select your cutting: Look for a healthy, non-flowering stem that is about 4-6 inches long. You want a piece that has some flexibility but isn’t too soft and floppy. Gently bend it – if it snaps cleanly, it’s usually a good candidate.
- Make the cut: Using your sharp pruning shears or knife, make a clean cut just below a leaf node (where a leaf attaches to the stem). This is where the magic happens for root development.
- Prepare the cutting: Carefully remove the lower leaves, leaving only the top 2-3 leaves. This prevents them from rotting in the soil. If the remaining leaves are very large, you can even cut them in half to reduce water loss.
- Apply rooting hormone (if using): Dip the cut end of the stem into your rooting hormone, tapping off any excess.
- Plant the cutting: Fill your small pots with your well-draining potting mix. Make a small hole with your finger or a pencil, and carefully insert the cutting, ensuring the leaf nodes are buried. Gently firm the soil around the base of the stem.
- Water gently: Water the soil thoroughly but avoid waterlogging. You want it moist, not soaking wet.
- Create a humid environment: Pop your potted cuttings into a clear plastic bag or place them in a mini greenhouse. Make sure the bag doesn’t press down directly onto the leaves. You can use small stakes to prop it up if needed.
- Place in bright, indirect light: Find a spot that gets plenty of bright, indirect light, but avoid direct sun, which can scorch the delicate cuttings.
Water Propagation
This method is a bit simpler and gives you a chance to watch the roots form, which is quite fascinating!
- Select and cut the stem: Follow the same steps as above for selecting and cutting your stem.
- Remove lower leaves: Just like with soil propagation, remove the lower leaves.
- Place in water: Fill a clean jar or glass with fresh water. Submerge the cut end of the stem, making sure the leaf nodes are underwater, but keep the leaves themselves out of the water.
- Change water regularly: This is crucial! Change the water every 2-3 days to keep it fresh and prevent bacteria from building up.
- Place in bright, indirect light: Again, bright but indirect light is best.
- Pot up when rooted: Once you see healthy roots forming, about an inch or two long, it’s time to carefully plant your rooted cutting into a pot with your well-draining potting mix. Treat it as you would a freshly planted cutting.
The “Secret Sauce” (Pro Tips)
Now for a couple of little tricks I’ve learned over the years that can really make a difference.
- Bottom heat makes a big difference: If you have a heat mat designed for propagation, using it under your pots or trays can significantly speed up root formation. Freycinetia loves a bit of warmth from below.
- Don’t overcrowd your cuttings: Give each cutting a bit of its own space in its pot. If you’re propagating in a tray, make sure there’s adequate spacing so they aren’t competing too much for light and resources. This also helps prevent the spread of any potential issues.
- A gentle misting is your friend: While you want to create humidity, sometimes the leaves can get a bit thirsty. A light misting of water on the leaves every day or two (especially if you’re not using a fully enclosed propagator) can really help keep them turgid and happy.
Aftercare & Troubleshooting
Once your Freycinetia cuttings have developed a good root system, it’s time to transition them to life as independent plants.
- Gradual acclimatization: If your cuttings have been under a plastic bag, gradually remove the bag over a few days. Start by taking it off for a few hours each day, then longer, to help them get used to normal humidity levels.
- Watering: Continue to water moderately, allowing the top inch of soil to dry out slightly between waterings. Aim for consistently moist, but never soggy, soil.
- Light: Keep them in bright, indirect light for the first few weeks, and then you can slowly introduce them to more direct sunlight if your mature plants thrive in it.
Now, what if things aren’t going as planned? The most common issue I see is rot. If your stem starts to look mushy and dark, or leaves suddenly droop and turn black, it’s likely due to too much moisture. Sadly, this often means the cutting is lost. The best defense is to ensure excellent drainage and avoid overwatering. If you see a cutting going downhill, it’s best to remove it to prevent any potential spread of disease to other cuttings. It’s a tough lesson, but part of the gardening journey!
A Encouraging Closing
Growing new plants from cuttings is such a fulfilling experience. It takes a bit of patience, and not every cutting will make it, but when you see that first tiny root emerge, or the new growth begin to unfurl, there’s a special kind of joy that comes with it. So, go ahead, get your hands dirty, experiment a little, and enjoy the process of bringing more of this beautiful Freycinetia banksii into your life. Happy growing!
Resource:
https://identify.plantnet.org/k-world-flora/species/Freycinetia%20banksii%20A.Cunn./data