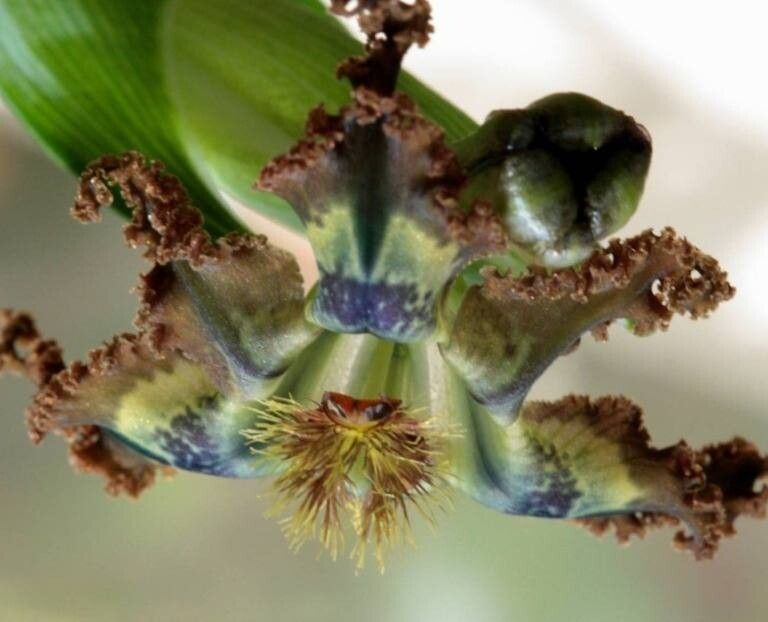
Oh, hello there! Come on in, let’s chat about one of my absolute favorite peculiar plants: Ferraria divaricata. You know, the one with those wonderfully strange, spidery flowers that look like they’ve just stepped out of a fairy tale? They have this incredible charm, a real conversation starter in the garden, and I find their unique beauty so captivating.
Propagating this gem is incredibly rewarding. It’s like unlocking a little bit of botanical magic, creating a whole new plant from just a piece of an existing one. Now, for beginners, I wouldn’t say Ferraria divaricata is the absolute easiest plant to start with. It’s got its own little quirks. But with a bit of patience and following these steps, you’ll be well on your way to success.
The Best Time to Start
For Ferraria divaricata, the absolute sweet spot for propagation is late spring or early summer. This is when the plant is actively growing after its rest period. You want to catch it at a time when it’s full of vigor, ready to put out new energy into creating roots. Trying to propagate when it’s dormant or stressed just won’t give you the best results.
Supplies You’ll Need
Gathering your tools beforehand makes the whole process so much smoother. Here’s what I always have on hand:
- Sharp, clean pruning shears or a sharp knife: For making clean cuts.
- A well-draining potting mix: I like a blend of 50% perlite and 50% a good quality potting soil. You can also add a bit of orchid bark for extra aeration.
- Small pots or seed trays: With drainage holes, of course!
- Rooting hormone (optional but recommended): A powder is easiest for this plant.
- Watering can with a fine rose attachment: For gentle watering.
- Labels and a marker: So you don’t forget what you’ve planted where!
- A warm spot: And possibly a heat mat if your propagation area tends to be cool.
Propagation Methods
Ferraria divaricata is best propagated by division, which involves separating parts of the parent plant that already have some root structure.
Division
This is my go-to method for Ferraria divaricata. It’s straightforward and usually yields good results.
- Gently excavate the parent plant: The best time to do this is when the plant is starting to go dormant, typically in fall. Carefully dig around the plant, trying to disturb the roots as little as possible. You can lift the entire clump out of its pot or the ground.
- Identify the divisions: Look for natural breaks in the root system. You’ll want to separate sections that have at least a few healthy roots and a visible shoot or growing point.
- Make the separation: You can often gently pull the divisions apart with your hands. If they are more stubborn, use your clean pruning shears or knife to make a clean cut, ensuring each division has roots and a top.
- Prepare the divisions: If you’re using rooting hormone, now’s the time. Dip the cut end of each division into the rooting hormone powder, tap off any excess.
- Pot them up: Plant each division in its own small pot filled with your well-draining potting mix. Make sure the top of the division is at or slightly above soil level.
- Water gently: Give them a good drink after planting, but don’t soak them.
The “Secret Sauce” (Pro Tips)
Here are a couple of things I’ve learned over the years that make a real difference.
- Don’t overwater initially: This is crucial! New divisions have tender roots and are highly susceptible to rot. Water them in well after planting, then hold off until the soil feels just dry to the touch a couple of inches down. It’s better to err on the side of too dry than too wet at this stage.
- Provide a touch of bottom heat: If you have a propagation mat or can place the pots on a shelf above a warm appliance, that gentle warmth really encourages root development. It mimics the natural conditions they’d find underground and can speed things up significantly.
Aftercare & Troubleshooting
Once your divisions are potted, place them in a bright spot that doesn’t get direct, harsh sunlight. Keep them consistently moist, but not soggy. You’re looking for new growth to appear, which is the clearest sign they’ve settled in and are starting to establish.
The biggest issue you’ll encounter is rot. If you see your division turning mushy or blackening, it’s usually a sign of too much moisture. Sadly, these often can’t be saved. Another sign of distress is wilting, which can be due to lack of water or, conversely, overwatering. Stay observant!
A Encouraging Closing
Propagating Ferraria divaricata takes a little practice, and some tries might not succeed. Don’t be discouraged! Each attempt teaches you something new about your plant and your environment. Enjoy the process of nurturing these little hopefuls, and before you know it, you’ll have a whole collection of these fascinating blooms. Happy gardening!
Resource:
https://identify.plantnet.org/k-world-flora/species/Ferraria%20divaricata%20Sweet/data