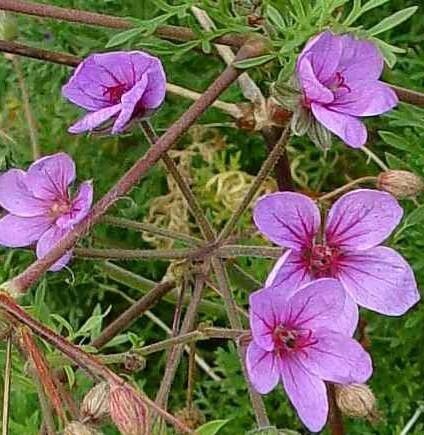
Hello, fellow garden enthusiasts! It’s always a joy to connect and share my passion for all things green. Today, we’re diving into the delightful world of Erodium foetidum, often known as Stork’s-bill or California’s own native stork’s-bill. This plant, with its delicate, often pinkish-purple flowers and attractive, sometimes silvery foliage, brings a touch of wild beauty to any garden. I find its resilience and charming blooms incredibly rewarding, and propagating it yourself is a fantastic way to multiply that joy. For beginners, I’d say it’s moderately easy – a little patience goes a long way!
The Best Time to Start
The sweet spot for propagating Erodium foetidum is definitely late spring to early summer. This is when the plant is actively growing and has plenty of fresh, healthy stems to work with. Starting during this period gives your new cuttings the best chance to establish themselves before the cooler months arrive.
Supplies You’ll Need
Before we get our hands dirty, let’s gather our tools. You won’t need anything too fancy, but having the right bits and bobs makes all the difference:
- Sharp, clean pruning shears or scissors: Essential for making clean cuts to avoid damaging the plant.
- Small pots or seed trays: For your new cuttings to root in.
- Well-draining potting mix: I like to use a blend of equal parts peat moss, perlite, and coarse sand. This ensures excellent drainage, which is crucial for preventing rot.
- Rooting hormone (optional, but recommended for stem cuttings): This powder or gel can give your cuttings a helpful boost.
- Watering can or spray bottle: For gentle watering.
- Labels and a waterproof marker: To keep track of what you’ve planted and when.
Propagation Methods
Erodium foetidum is quite amenable to propagation by stem cuttings. It’s straightforward and usually yields great results.
Stem Cuttings:
- Take Healthy Cuttings: In late spring or early summer, select healthy, non-flowering stems. Look for stems that are a few inches long and have at least two sets of leaves.
- Make the Cut: Using your clean shears, make a cut just below a leaf node (the point where a leaf attaches to the stem). This is where roots are most likely to form.
- Prepare the Cuttings: Gently remove the lower leaves from the cutting, leaving just two or three sets of leaves at the top. If the leaves are very large, you can trim them in half to reduce water loss.
- Apply Rooting Hormone (Optional): Dip the cut end of the stem into rooting hormone, tapping off any excess. This isn’t strictly necessary for Erodium, but it can speed things up.
- Plant the Cuttings: Fill your small pots or trays with your well-draining potting mix. Make a small hole in the soil with your finger or a pencil and insert the prepared cutting. Gently firm the soil around the base of the cutting to ensure good contact.
- Water Gently: Water the soil thoroughly but gently. You want the soil to be moist, not waterlogged. A spray bottle is perfect for this stage.
The “Secret Sauce” (Pro Tips)
Over the years, I’ve learned a few tricks that really help boost success rates:
- The “Air Layer” Trick: Even before taking cuttings, you can sometimes encourage rooting on a mature stem still attached to the parent plant. Make a small cut or scrape on the underside of a stem, dust it with rooting hormone, and wrap it loosely with moist sphagnum moss, then a layer of plastic wrap. Once you see roots forming, you can then cut below the new root ball and plant it. It’s like a head start!
- Bottom Heat Magic: While not essential, placing your pots on a gentle heated propagator mat can significantly speed up root development. This mimics the warm soil feel of summer and encourages roots to form faster. Just ensure the heat isn’t too intense – enough to feel pleasantly warm to the touch.
- Don’t Forget Airflow: Good air circulation is absolutely vital. This is why I avoid covering my cuttings tightly with plastic domes for too long. A bit of fresh air helps prevent fungal diseases. If you do use a propagator lid, lift it daily for a few minutes to let it breathe.
Aftercare & Troubleshooting
Once your cuttings are planted, the patient waiting game begins. Keep the soil consistently moist but never soggy. Place them in a bright spot, but out of direct, harsh sunlight, which can scorch young cuttings.
Signs of Success: You’ll know your cuttings are rooting when you see new leaf growth appearing. You can also give them a gentle tug after a few weeks; if there’s resistance, roots have formed! Once they have a decent root system, you can transplant them into their own individual pots.
Troubleshooting: The most common issue you might encounter is rot. This is usually a sign of overwatering or poor drainage. If you see stems turning mushy or black at the soil line, sadly, that cutting is likely lost. Ensure your soil mix is airy and let the very top layer of soil dry out slightly between waterings. Another sign of distress is wilting, which could be due to insufficient moisture or too much direct sun.
Happy Gardens Ahead!
Propagating Erodium foetidum is a wonderfully rewarding exercise. It connects you more deeply with your plants and allows you to share their beauty with others. Remember, gardening is a journey of learning and a little bit of trial and error is perfectly normal. Be patient, observe your cuttings closely, and enjoy the magic of new life unfurling in your hands. Happy propagating!
Resource:
https://identify.plantnet.org/k-world-flora/species/Erodium%20foetidum%20(L.)%20L’Hér./data