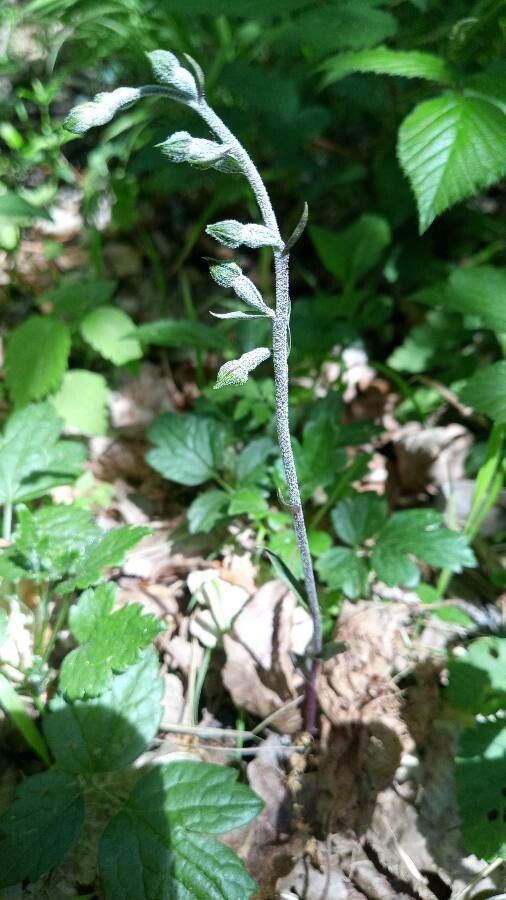
Oh, hello there, fellow plant enthusiast! Pull up a chair and let’s chat about something truly special: Epiprætis microphylla. If you haven’t met this little charmer yet, imagine delicate, woodland beauty gracing your garden. Epiprætis, often called the Small-leaved Helleborine, brings this subtle elegance with its dainty arching stems and often subtly colored flowers. Propagating it, while not quite as straightforward as your average petunia, is an incredibly rewarding journey. It’s a project for the patient gardener, yes, but one that I assure you is well within reach, even if you’re just stepping into the world of more specialized propagation. Don’t let the whispered tales of difficulty deter you; with the right approach, you can absolutely succeed.
When the Magic Happens: The Best Time to Start
For Epiprætis, timing is everything. The absolute sweet spot for propagation is in the late spring or early summer, just as the plant is actively growing. You’ll see new shoots emerging from the soil, and the plant is full of vigor. This surge of energy is what we’re trying to harness to encourage new root development. Trying to do this when the plant is dormant, or even just beginning to wake up, is far less likely to yield the results you’re hoping for.
Your Propagation Toolkit: Supplies You’ll Need
Gathering your supplies before you begin makes the whole process smoother. Here’s what I always have on hand:
- Sharp, clean pruning shears or a razor blade. Sterilize them with rubbing alcohol between cuts to prevent disease spread.
- A well-draining potting mix. I often use a blend of peat moss, perlite, and a little horticultural sand. For Epiprætis, something that mimics their natural, airy woodland habitat is ideal. Avoid heavy, water-retentive soils.
- Small pots or propagation trays. Clean ones are a must!
- A plastic bag or propagation dome. This will help maintain humidity.
- Optional: Rooting hormone. While not strictly necessary for Epiprætis, a gentle rooting hormone can sometimes give cuttings an extra boost.
- Labels and a permanent marker. Always label what you’ve done and when!
Bringing New Life: Propagation Methods
For Epiprætis microphylla, division is generally the most reliable and successful method for home gardeners. While stem cuttings can be attempted, they’re trickier and require very specific conditions.
The Art of Division
This is how we’ll be splitting a mature plant to create new ones.
- Wait for the right moment. As mentioned, late spring to early summer, when the plant is actively growing, is perfect.
- Gently unpot the parent plant. Carefully ease it out of its current container or delineate a section in the garden bed.
- Inspect the root ball. Look for distinct sections where new growth is emerging from established roots. You’ll often see several distinct crowns.
- Gently divide. Using your clean hands or a sterilized trowel, carefully tease apart the root ball into manageable sections. Each section should have at least one healthy root system and a growing point (a new shoot). Avoid being too aggressive; sometimes, a clean cut with your shears is necessary.
- Pot up the divisions. Plant each division into its own small pot filled with your prepared, well-draining mix. Make sure the
growing pointis just at or slightly above the soil surface. - Water gently. Give them a light watering to settle the soil.
The “Secret Sauce”: My Insider Tips
Here are a few things I’ve learned over the years that make a real difference.
- Don’t overwater newly divided plants. This is probably the most common mistake. While they need moisture, soggy soil is the enemy and can lead to root rot. Let the top inch of soil dry out between waterings.
- Mimic their natural environment. Epiprætis often grow in dappled shade beneath trees. So, place your new divisions in a spot that receives bright, indirect light. Think of a location that gets morning sun but is shaded by midday.
- Humidity is key, but with ventilation. Once you’ve potted up your divisions, place them in a humid environment. I like to put them inside a plastic bag or under a propagation dome. However, it’s crucial to open the bag or dome for a short period each day to allow for air circulation. This prevents fungal diseases from taking hold.
Nurturing New Growth: Aftercare & Troubleshooting
Once your Epiprætis divisions are potted, the real watching game begins.
- Keep them moist, but not wet. As I said, err on the side of slightly drier. Feel the soil regularly. If the pot feels light, it’s time for a gentle watering.
- Watch for new growth. The first sign you’re on the right track is seeing new leaves or shoots emerge from the division. This can take a few weeks, so don’t despair if it’s not immediate.
- Signs of trouble. The most common issue is root rot. You’ll see the leaves wilting and turning yellow or mushy, and the base of the stem might look dark and soft. If this happens, gently unpot the division and check the roots. Trim away any rotted portions with a clean blade and repot into fresh, drier mix. Sometimes, sadly, a severely rotted plant can’t be saved.
- Gradual acclimation. As your new plants become established and show good signs of growth, you can gradually acclimate them to less humid conditions and their eventual garden spot.
Your Patience, Their Reward
There you have it! Propagating Epiprætis microphylla is a journey of observation and gentle guidance. Don’t be discouraged if your first attempt isn’t perfect. Nature has its own pace, and gardening is always a learning experience. Enjoy the process, marvel at the resilience of these beautiful plants, and soon you’ll be rewarded with new life to share. Happy gardening!
Resource:
https://identify.plantnet.org/k-world-flora/species/Epipactis%20microphylla%20(Ehrh.)%20Sw./data