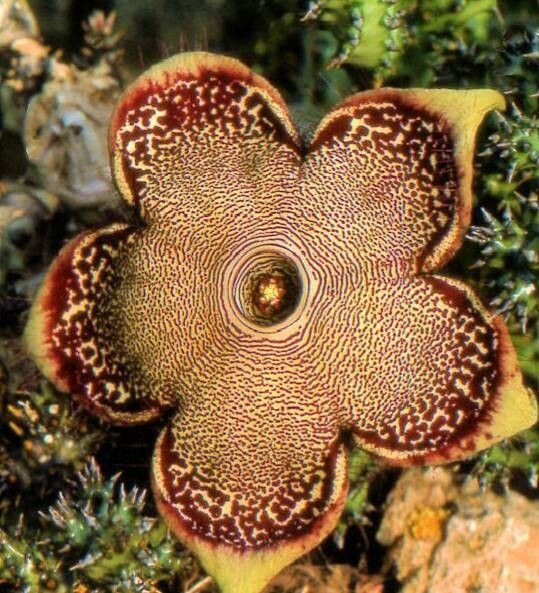
Oh, Edithcolea grandis! What a beauty. You know, when I first saw one of these magnificent succulent stars, with its gorgeous, velvety flowers that look like they belong in a rainforest rather than a desert, I was smitten. They have this incredible, showy bloom that genuinely stops you in your tracks. And the best part? They’re quite forgiving when it comes to propagation, which makes bringing more of these botanical treasures into your life incredibly satisfying. Now, if you’re a brand-new plant parent, I’d say it’s moderately easy. It requires a little bit of attentiveness, but nothing truly daunting.
The Best Time to Start
For Edithcolea grandis, like many succulents, spring is your golden ticket. Think of it as the plant waking up, full of vigor and ready to grow. Starting any propagation efforts then, when the days are getting longer and temperatures are warming up, will give your new cuttings the best chance to establish themselves before summer’s heat or autumn’s lull. You’re looking for a time when there’s active growth.
Supplies You’ll Need
Gathering your tools before you dive in makes the whole process so much smoother. You’ll want:
- A sharp, clean knife or pruning shears: For making precise cuts. A dull tool can crush the plant tissue, which we don’t want.
- Rooting hormone (optional but recommended): This really gives your cuttings a boost and speeds up the rooting process.
- A well-draining potting mix: Think a cactus or succulent mix. You can also make your own by combining equal parts potting soil, perlite, and coarse sand. Good drainage is paramount!
- Small pots or trays: With drainage holes, of course!
- Watering can with a fine rose or a spray bottle: For gentle watering.
- Labels and a marker: So you remember what you planted and when.
Propagation Methods
Edithcolea grandis is wonderfully versatile. Stem cuttings are generally my go-to method because they’re so straightforward.
- Take the Cutting: Find a healthy, mature stem on your plant. Using your clean knife or shears, make a cut about 3-4 inches down from the tip. Try to get a section that has at least one or two growth points.
- Let it Callus: This is a critical step for succulents. Once you’ve taken your cutting, do not plant it immediately. Lay it on a clean surface in a bright spot, away from direct sun, for a few days (or even up to a week). This allows the cut end to dry out and form a protective callus. This prevents rot, which is the biggest enemy of succulent cuttings.
- Apply Rooting Hormone (Optional): Once the callus has formed, dip the cut end of the stem into your rooting hormone powder. Tap off any excess.
- Plant Your Cutting: Fill your small pots with your well-draining mix. Make a small hole in the center, insert the callused end of your cutting, and gently firm the soil around it. Don’t bury it too deep; just enough to keep it upright.
- Water Sparingly: After planting, wait a day or two before giving it its first light watering. You want the soil to be just barely moist. Overwatering at this stage is the quickest way to invite rot.
The “Secret Sauce” (Pro Tips)
Here are a couple of things I’ve learned over the years that seem to make a big difference:
- Embrace the Warmth: Edithcolea grandis loves a little bit of warmth to encourage root development. If you have a propagator with a heat mat, use it! You don’t need it scorching hot, just gently warm the soil from beneath. If you don’t have a heat mat, placing the pots in a warm room, perhaps near a sunny window but not in direct, harsh sun, will also help.
- Air Circulation is Key: This applies to both the parent plant and your cuttings. Make sure your cuttings have good air circulation around them. This further helps to prevent fungal issues and rot. Avoid overcrowding them.
Aftercare & Troubleshooting
Once you see signs of new growth – perhaps a tiny shoot or leaf emerging – it’s a good sign that roots are forming. At this point, you can gradually increase watering, but always let the soil dry out between waterings. Feel the soil: if it still feels moist an inch down, hold off.
The most common issue you’ll face is rot. If your cutting starts to look mushy, discolored (often black or brown and slimy), or collapses, it’s likely rotted. Unfortunately, there’s usually no coming back from severe rot. This is why the callusing and careful watering are so crucial. If you catch rot very early, you might be able to cut away the rotten part and try again, but prevention is always better. Another sign of failure can be a cutting that just sits there for weeks and weeks, showing no signs of life. This can happen due to lack of warmth, too much moisture, or simply a non-viable cutting.
A Encouraging Closing
Propagating Edithcolea grandis is a journey, and like any good journey, it has its quiet moments and its breakthroughs. Be patient, enjoy the process of nurturing these little pieces of life, and celebrate those first signs of roots. The reward of seeing your own little Edithcolea flourish is truly special. Happy propagating!
Resource:
https://identify.plantnet.org/k-world-flora/species/Edithcolea%20grandis%20N.E.Br./data