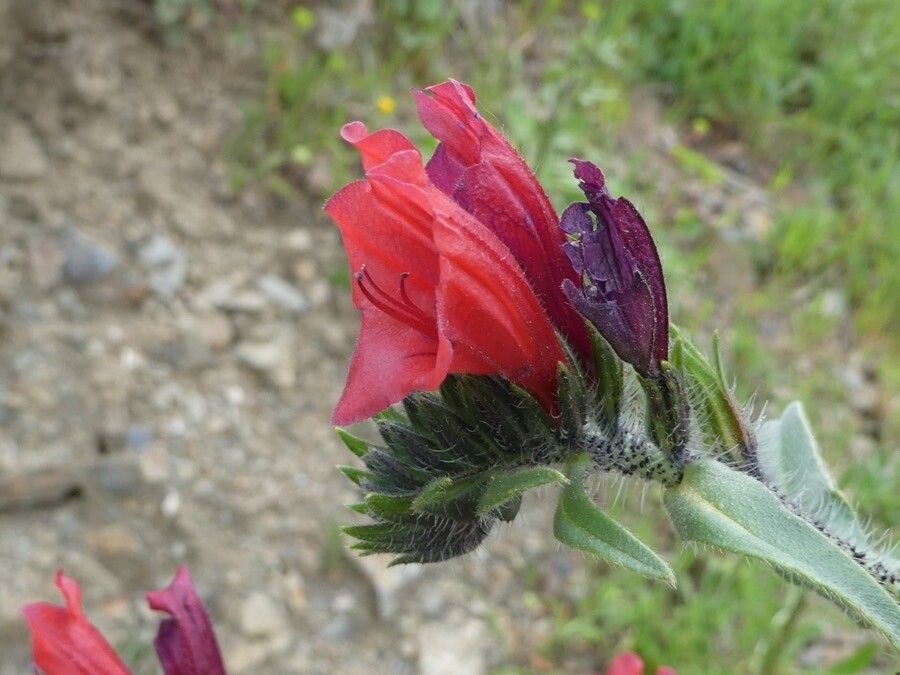
Oh, hello there! Come on in, grab a mug. Let’s chat about one of my absolute favorites: Echium creticum. You know, those stunning spires of cerise pink, or sometimes a lovely lilac, that just command attention in the garden. They have this wonderfully wild, almost Mediterranean feel to them, and seeing them burst into bloom feels like a real accomplishment. If you’re thinking about growing more of these beauties, you’re in for a treat! Propagating them is incredibly rewarding, and while I wouldn’t say they’re a super beginner plant for your very first foray, with a little guidance, you’ll be well on your way.
The Best Time to Start
Generally, the sweet spot for Echium creticum propagation is when the plant is actively growing, but not stressed. For most of us, that means late spring through early summer. You want to catch it after it’s had a chance to wake up from winter dormancy but before the intense heat of midsummer sets in. If you’re taking cuttings, look for stems that are firm but not woody.
Supplies You’ll Need
Here’s what I usually have on hand when I’m propagating these wonderful plants:
- Sharp, clean pruning shears or a sharp knife: For making clean cuts.
- Small pots or seed trays: With drainage holes, of course!
- Well-draining potting mix: I often use a 50/50 blend of seed-starting mix and perlite.
- Rooting hormone (optional but recommended): A powder or gel can give your cuttings a healthy boost.
- A watering can with a fine rose: To water gently without disturbing things.
- A plastic bag or propagator lid: To create a humid environment for cuttings.
- Labels and a marker: Because trust me, you will forget what you planted where!
Propagation Methods
I find two methods work particularly well for Echium creticum:
Stem Cuttings: A Tried and True Method
This is my go-to. It’s reliable and gives you a good chance of success.
- Select your cuttings: Look for healthy, non-flowering stems. You want pieces that are about 4-6 inches long. Cut them just below a leaf node. A leaf node is where a leaf attaches to the stem; roots often form readily from these points.
- Prepare the cuttings: Gently remove the lower leaves, leaving just a few at the top. If your cutting has a flower bud, pinch it off. This tells the plant to focus its energy on growing roots, not flowers.
- Dip in rooting hormone: If you’re using it, dip the cut end of each stem into the rooting hormone powder or gel. Tap off any excess.
- Plant your cuttings: Make a small hole in your prepared potting mix with a pencil or your finger. Insert the cutting into the hole, ensuring the nodes where you removed leaves are below the soil surface.
- Water gently: Water thoroughly so the soil is moist but not waterlogged.
- Create humidity: Cover the pots with a clear plastic bag or place them under a propagator lid. This helps keep the cuttings from drying out. Make sure the leaves don’t touch the plastic. You can use skewers to prop it up if needed.
- Find a good spot: Place the pots in a bright location but out of direct sunlight. A warm spot is ideal.
Water Propagation: The Watchful Eye Method
This can be a fun way to see roots develop, though I find stem cuttings slightly more robust in the long run for this particular plant.
- Take your cutting: Same as step 1 above. Ensure you have at least one or two leaf nodes that will be submerged.
- Remove lower leaves: Just as you would for stem cuttings.
- Place in water: Put the cutting in a clean glass or jar filled with fresh, room-temperature water.
- The crucial water rule: Make sure no leaves are submerged in the water! Any leaves dipping into the water will rot and can take your whole cutting with them.
- Change the water regularly: Every few days, refresh the water.
- Watch and wait: Keep it in bright, indirect light. You should start to see tiny white roots emerging from the nodes within a few weeks. Once the roots are about an inch long, you can carefully transplant them into soil, following the planting instructions for stem cuttings.
The “Secret Sauce” (Pro Tips)
Here are a couple of things I’ve learned over the years that really help boost success rates:
- Bottom Heat is Gold: If you have an old heating mat for reptiles or a specific propagator heat mat, placing your pots on it can dramatically speed up root development. It mimics the warmth of the soil in summer and the plant just loves it.
- Airflow is Your Friend: While humidity helps, stagnant air can encourage fungal diseases. Every day, lift the plastic bag or open the propagator lid for an hour or so to allow for some air circulation. This is crucial for preventing rot.
Aftercare & Troubleshooting
Once you see new growth appearing, or when you gently tug on a cutting and feel resistance (meaning roots have formed!), it’s time to transition.
- Acclimate slowly: If your cuttings were under cover, gradually introduce them to your garden’s humidity levels over a week by opening the cover for longer periods each day.
- Potting up: Once they have a decent root system, carefully transplant them into their own small pots using your well-draining mix. Keep them protected from harsh sun and wind for a little while.
- Signs of Trouble: The most common issue is rot, which often shows up as mushy, blackened stems. This is usually due to overwatering and poor drainage. Sometimes, if a cutting just refuses to root and turns yellow and limp, it’s unfortunately a goner. Don’t get discouraged; just try again!
A Encouraging Closing
Propagating plants is a journey. It’s about patience, observation, and a little bit of gardening magic. Don’t be afraid to experiment, and remember that even seasoned gardeners have their failures. The joy of nurturing a tiny cutting into a magnificent plant that you grew yourself? That’s an experience that never gets old. Happy propagating!
Resource:
https://identify.plantnet.org/k-world-flora/species/Echium%20creticum%20L./data