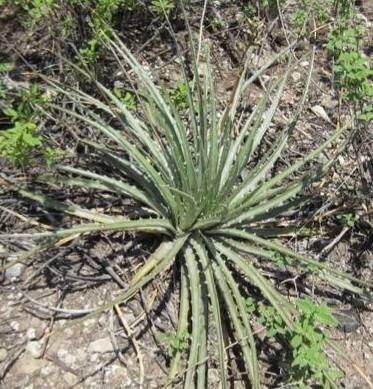
Oh, Dyckia floribunda! You know, it’s one of those plants that just sings when it’s happy. With those spiky, architectural leaves and a bloom that’s a real showstopper – a graceful cascade of lovely flowers – it’s no wonder so many of us are drawn to it. And the best part? Bringing more of these beauties into your life through propagation is incredibly rewarding. Now, I won’t lie, Dyckias can be a little more particular than your average houseplant, but don’t let that deter you! With a little care and attention, you can absolutely be successful.
The Best Time to Start
For Dyckia floribunda, spring and early summer are your golden ticket. This is when the plant is in its active growth phase. You’ll see new pups emerging from the base, and the mother plant is full of vigor, ready to invest that energy into rooting new cuttings. Trying to propagate in the dead of winter is like asking a sleepy bear to run a marathon – it’s just not going to happen!
Supplies You’ll Need
Gathering your supplies before you start makes the whole process smoother. Here’s what I recommend:
- Well-draining potting mix: Think cactus and succulent mix, or a blend of potting soil, perlite, and coarse sand (about a 1:1:1 ratio works wonders).
- Sharp, clean pruning shears or a sharp knife: For making clean cuts. Sterilize them with rubbing alcohol to prevent the spread of diseases.
- Rooting hormone (optional but helpful): A powder or gel designed for cuttings can give them a helpful boost.
- Small pots or seedling trays: With drainage holes, of course!
- Gloves: Those Dyckia leaves can be sharp!
- Spray bottle: For a light misting.
- Heat mat (optional but highly beneficial): This provides gentle bottom heat, encouraging root development.
Propagation Methods
Dyckia floribunda is primarily propagated by division or taking offsets (pups). While you might see some online discussions about stem cuttings for other Dyckia species, floribunda is best handled by separating the babies from the parent.
Propagating by Division (Offsets/Pups):
This is the most straightforward method for Dyckia floribunda. As the mother plant grows, it will naturally produce smaller baby plants, called pups or offsets, around its base.
- Gently remove the mother plant from its pot. Try to loosen the soil around it.
- Examine the base of the plant. Look for where the pups are attached to the main stem. You’ll often see a clear connection point.
- Using your clean pruning shears or knife, carefully cut or twist the pup away from the mother plant. Try to get as much of the base of the pup as possible, ideally with a small bit of root attached. If a pup has no roots yet, don’t worry, it will develop them!
- Allow the cut end to callous over. This is crucial to prevent rot. Place the pup in a dry, airy spot for a few days to a week until the cut surface is dry and hardened.
- Pot up the pup. Fill a small pot with your well-draining mix. Make a small hole in the center and place the calloused pup into the hole. Gently firm the soil around its base. If it has roots, bury them; if not, just ensure the base is stable.
- Water sparingly. Water just enough to moisten the soil, but avoid soaking it. New plants are susceptible to rot.
The “Secret Sauce”
Here are a few things I’ve learned over the years that really make a difference:
- Don’t rush the callousing. This is probably the most important step for preventing rot. Seriously, let it dry. It might look a bit sad sitting there, but it’s building up its defense.
- Bottom heat is your friend. Placing your potted pups on a seedling heat mat set to around 70-75°F (21-24°C) can significantly speed up root formation. It mimics the warmth of the soil in its natural growing season.
- Less water is more, initially. While you want to encourage roots, overwatering a newly potted pup is a fast track to rot. I usually only water heavily once I see signs of active growth – like a new central leaf emerging.
Aftercare & Troubleshooting
Once your pup is potted and settled, give it a bright, indirect light spot. Avoid direct, harsh sun while it’s establishing. Continue to water sparingly, allowing the soil to dry out between waterings. You’ll know roots are forming when you see new growth or feel some resistance when you gently tug on the plant.
The biggest challenge you’ll face is rot. If you see the base of the pup turning mushy or black, or the leaves start to yellow and wilt for no other apparent reason, it’s likely too much moisture. If you catch it early, you can try to pull it out, cut away the rotten parts, and let it callous again before repotting in fresh, dry soil.
A Encouraging Closing
Propagating Dyckia floribunda is a journey of patience and observation. Don’t be discouraged if your first attempt isn’t a roaring success. Each plant, each pup, is a little experiment. Celebrate the small victories – a new leaf unfurling, a slight wobble that tells you roots are forming. Enjoy the process of nurturing these spiky wonders, and soon you’ll have a whole collection to admire! Happy growing!
Resource:
https://identify.plantnet.org/k-world-flora/species/Dyckia%20floribunda%20Griseb./data