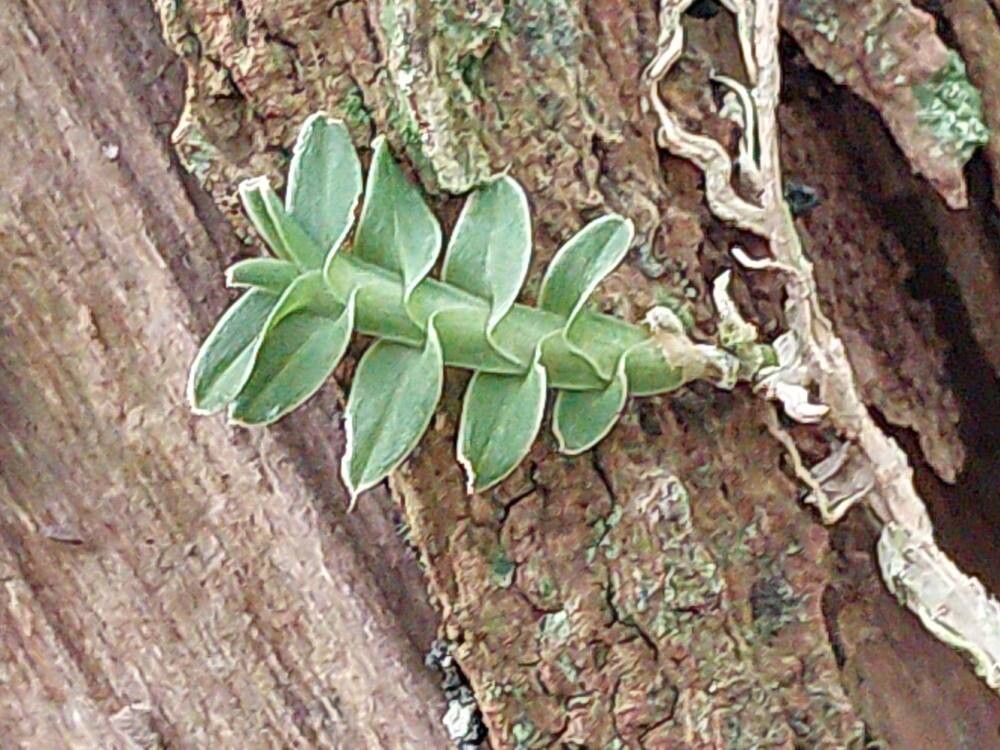
Ah, Dichaea morrisii! If you’ve ever seen this charming orchid, you know why I’m so excited to talk about it. Its trailing stems, adorned with delicate, often bubbly-looking leaves, are just delightful. They bring a touch of the tropics right into your home, and honestly, they’re quite addictive. The real joy, though, comes from coaxing new life from an existing plant. It’s a truly rewarding feeling, like nurturing a little bit of yourself into being. For those of you just starting your orchid journey, Dichaea morrisii can be a bit of a gentle challenge, but I promise, with a little patience, you’ll get there.
The Best Time to Start
My favorite time to get propagating with Dichaea morrisii is during its active growing season. Think spring and early summer. The plant is full of vigor then, and those cuttings have a much better shot at rooting quickly. Trying to do it when the plant is dormant just makes things harder on everyone, you and your little plant babies included!
Supplies You’ll Need
Gathering your tools beforehand makes the whole process so much smoother. Here’s what I always have on hand:
- Sharp, sterilized pruning shears or a clean knife: Essential for clean cuts.
- Sphagnum moss or a well-draining orchid mix: I often use a blend of fine orchid bark, perlite, and a bit of coco coir.
- Small pots or propagation trays: Even old yogurt cups with drainage holes work!
- Rooting hormone (optional but helpful): Dip your cuttings into this for an extra boost.
- Plastic bags or a propagation dome: To create a humid environment.
- Spray bottle filled with clean water: For gentle misting.
Propagation Methods
The most reliable way I’ve found to multiply Dichaea morrisii is by taking stem cuttings. It’s straightforward and gives you a great success rate.
- Find a healthy stem: Look for a mature stem that has at least two or three nodes. Nodes are those little swellings where leaves emerge.
- Make a clean cut: Using your sterilized shears, carefully cut the stem just below a node. You want to include at least one node above and one below your cut, ideally.
- Prepare the cutting: Gently remove any leaves that would be below the surface of your growing medium. This prevents rot. If you’re using a rooting hormone, now’s the time to dip the cut end into it.
- Plant your cutting: Moisten your sphagnum moss or orchid mix. You can either lay the cutting on top of the moist medium, or gently insert the cut end into it, making sure a node is in contact with the damp material.
- Create humidity: Cover the pot or tray with a plastic bag, ziptop bag, or use a propagation dome. This traps moisture and mimics the humid environment these orchids love. Make sure the leaves aren’t directly touching the plastic if possible.
- Provide bright, indirect light: Place your propagation in a warm spot with plenty of light, but avoid direct sunlight, which can scorch the new cuttings.
The “Secret Sauce” (Pro Tips)
I’ve learned a few tricks over the years that make a real difference.
- Don’t overwater the medium initially. It should be moist, not soggy. Too much water is the quickest way to invite rot. You’re aiming for high humidity, not a swamp.
- A touch of bottom heat can speed things up dramatically. If you have a seedling heat mat, placing your propagation tray on it can really encourage those roots to form faster.
- Be patient with the nodes. Sometimes a stem cutting might not root from the cut end. Instead, a new growth will emerge directly from a node on the stem itself. Keep it humid and warm, and you might be surprised!
Aftercare & Troubleshooting
Once you start seeing signs of new root growth (you might see tiny white nubs emerging from the nodes or the cut end), it’s time to gradually acclimate your new plant.
- Reduce humidity slowly: Start by opening the plastic bag a little bit each day, allowing the plant to get used to less humid air.
- Water when the medium feels dry: Continue to keep the medium consistently moist but not waterlogged. Misting the leaves gently can also be beneficial.
- Watch for rot: The most common problem is rot, which usually shows up as a mushy, black stem. If you see this, you might have to discard the cutting. It’s often a sign of too much moisture or poor air circulation. Stunted growth or yellowing leaves can also indicate insufficient light or overly dry conditions.
A Encouraging Closing
Propagating Dichaea morrisii is a journey, and like any good journey, it requires a little patience and a lot of love. Don’t get discouraged if your first attempt isn’t a runaway success. Every cutting you try is a learning experience. Celebrate the small wins, like those first tiny roots, and enjoy the process of bringing more of these botanical treasures into your life. Happy growing!
Resource:
https://identify.plantnet.org/k-world-flora/species/Dichaea%20morrisii%20Fawc.%20&%20Rendle/data