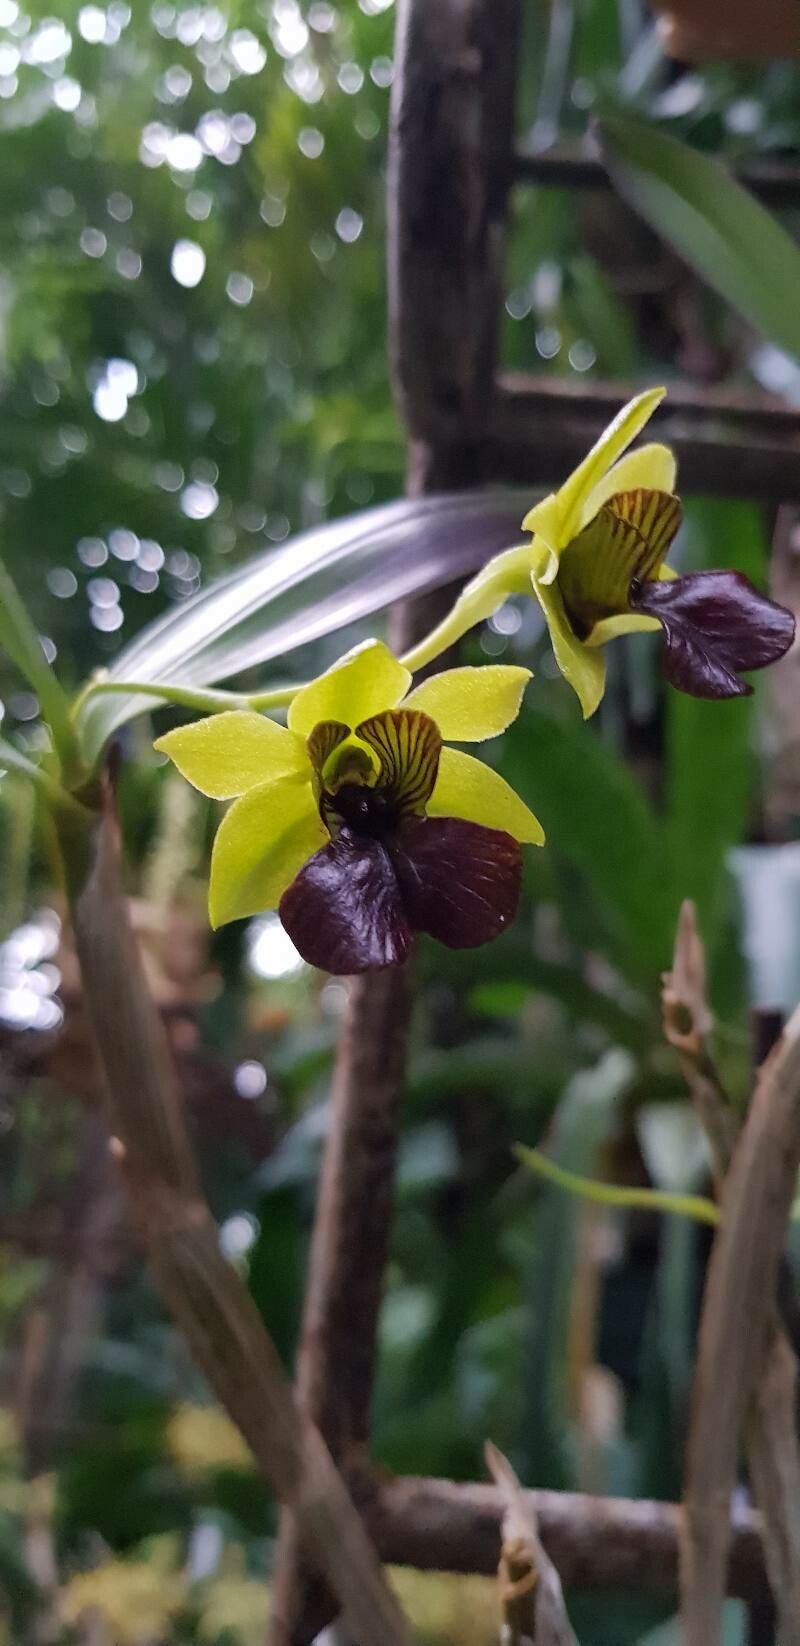
Oh, hello there! Pull up a chair, I’ve got a fresh pot of coffee brewing. Today, we’re diving into the delightful world of propagating Dendrobium convolutum. If you’ve ever admired those vibrant, waxy blooms cascading from this orchid, you know just how special it is. There’s a special kind of magic in taking a piece of a healthy plant and coaxing it into a new life. It’s a wonderfully rewarding journey, letting you share the beauty of your orchids or simply expand your own collection without breaking the bank. Now, while Dendrobium convolutum isn’t as fussy as some of its orchid cousins, it’s not entirely hands-off either. I’d say it’s a great project for the enthusiast who’s tackled a few easier plants already and is ready for a little more hands-on affection.
The Best Time to Start
For Dendrobium convolutum, the sweetest spot for propagation is when the plant is actively growing. Think spring and early summer. You’ll see new shoots emerging, and the plant has all the energy it needs to rally and establish itself. Trying to propagate when the plant is dormant or stressed is like asking someone to run a marathon on an empty stomach – it’s just not going to go well. So, keep an eye on your orchids, and when you see that flush of new growth, that’s your golden ticket.
Supplies You’ll Need
Gathering your tools beforehand makes the whole process smoother. Here’s what I usually have on hand:
- Sharp, sterile pruning shears or a clean orchid knife: Essential for clean cuts to prevent disease. I always give mine a quick wipe with rubbing alcohol.
- Potting mix: A coarse orchid mix is best. You want excellent drainage. A blend of bark chips, perlite, and sphagnum moss works wonders.
- Small pots or community trays: Choose ones with good drainage holes. Depending on your method, terracotta or plastic pots are fine.
- Rooting hormone (optional but recommended): For stem cuttings, a dab of rooting powder or gel can give your new plant a little encouragement.
- Humidity tray or a misting bottle: Orchids love a moist environment, especially when they’re trying to root.
- Clear plastic bags or a mini greenhouse (optional): To create a humid microclimate.
- Watering can with a fine rose: For gentle watering.
- Labels and a waterproof marker: So you don’t forget what you propagated and when!
Propagation Methods
Let’s get our hands dirty! For Dendrobium convolutum, I find two methods work particularly well.
Method 1: Stem Cuttings (Keikis)
This is my favorite way to create new Dendrobium plants. You’re essentially propagating “keikis” – which is Hawaiian for “baby” – those little plantlets that sometimes form along the stems.
- Identify a healthy keiki: Look for a keiki that has at least two or three small pseudobulbs and some developing roots. It should look happy and plump, not withered or underdeveloped.
- Make the cut: Using your sterile pruning shears, carefully cut the stem connecting the keiki to the mother plant. Make the cut about an inch away from the keiki itself. If the keiki has roots, try to get a bit of attached stem with them.
- Prepare the keiki: Gently remove any old, decaying leaves from the base of the keiki. If you’re using it, dip the cut end into rooting hormone powder.
- Potting up: Fill a small pot with your coarse orchid mix. Make a small hole in the center and gently place the keiki into the mix, ensuring its roots are spread out. Firm the mix gently around the base so it stands upright.
- Watering: Water lightly after potting. You want the mix to be moist, not soggy.
Method 2: Division
If you have a mature Dendrobium convolutum that’s getting a bit crowded in its pot, division is a great option. This is best done when the plant is actively growing.
- Remove from the pot: Gently ease the entire orchid plant out of its container. If it’s stuck, a little tap around the pot rim usually does the trick.
- Inspect the roots and pseudobulbs: Get a good look at how your plant is structured. You’re looking for sections that have at least two or three healthy pseudobulbs and a good root system.
- Make the cut: Using your sterile knife or pruning shears, carefully separate the plant into sections. Try to disturb the roots as little as possible. Each division should have its own healthy roots and leaf-bearing pseudobulbs.
- Potting the divisions: Pot each division individually in a fresh, well-draining orchid mix, similar to how you potted the keiki. Ensure the roots are spread out and the pseudobulbs are at or slightly above the surface.
The “Secret Sauce” (Pro Tips)
Here are a few things I’ve learned that make a world of difference:
- Don’t drown your new babies! Overwatering is the quickest way to kill a delicate new orchid. Water only when the potting mix is starting to feel dry. A moisture meter can be your best friend here if you’re unsure.
- Mimic the tropics with humidity: After potting, I like to place the new cuttings or divisions in a small greenhouse or cover them loosely with a clear plastic bag. This creates a wonderfully humid environment that helps the roots form. Just remember to open it for a few hours each day to allow for air circulation and prevent fungal issues.
- A little warmth goes a long way: Orchids love warmth, and so do those developing roots. Placing your pots on a heat mat (designed for seed starting or propagation) can significantly speed up root development. Just make sure it’s not too hot – a gentle warmth is all they need.
Aftercare & Troubleshooting
Once your Dendrobium convolutum has roots, it’s time to treat it like a precious seedling.
- Continue with gentle watering: Keep the potting mix consistently moist but never waterlogged.
- Provide bright, indirect light: Mimic the dappled sunlight of its natural habitat.
- Gradually increase airflow: As the plant matures and its roots get stronger, you can slowly reduce the humidity cover.
- Watch for rot: The most common enemy of a new orchid is rot. If you see mushy, black stems or roots, or wilting leaves that aren’t recovering, it’s a sign of too much moisture. If this happens, you might need to repot into drier medium, remove any rotted parts, and let it air out for a bit. Sometimes, it’s a battle, but clean cuts and good drainage are your best defenses.
A Encouraging Closing
Propagating orchids can feel a bit like alchemy, but with a little patience and the right touch, you’ll be rewarded with beautiful new plants. Don’t get discouraged if your first attempt isn’t perfect – every gardener has had their share of wilting leaves and stubborn cuttings. Just keep observing, keep learning, and most importantly, enjoy the incredible process of nurturing new life. Happy growing!
Resource:
https://identify.plantnet.org/k-world-flora/species/Dendrobium%20convolutum%20Rolfe/data