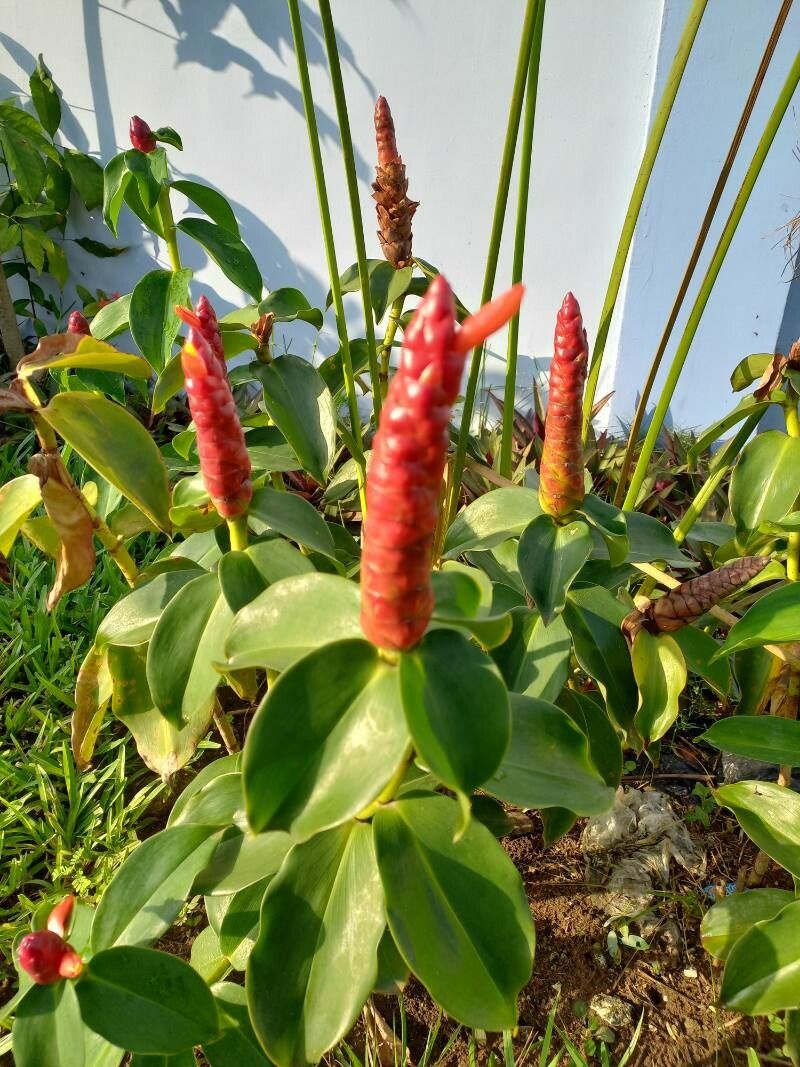
Hello fellow garden enthusiasts! Today, we’re diving into the wonderful world of Costus spicatus, often called Indian Head Ginger or Spiked Ginger Lily. If you’re looking for a plant that brings a touch of the tropics with its bold, architectural foliage and stunning, cone-shaped flower spikes, then this one’s for you. The vibrant red flowers are simply breathtaking! And the best part? Propagating Costus spicatus is a truly rewarding experience, letting you multiply that tropical beauty for your own garden or to share with friends. For beginners, I’d say this plant is moderately easy to propagate. It’s not difficult, but it does appreciate a little bit of attention to detail.
The Best Time to Start
For Costus spicatus, the absolute best time to get your propagation party started is during its active growing season, which typically spans from late spring through summer. This is when the plant is full of vigor and has the energy reserves to put into developing new roots. You’ll want to take cuttings from healthy, vigorous stems that are at least a few inches long. Waiting until the plant has really hit its stride is key for success.
Supplies You’ll Need
Gathering your supplies beforehand makes the whole process smoother, much like getting your apron on before baking! Here’s what you’ll want to have on hand:
- Sharp Pruning Shears or a Clean Knife: For making clean cuts.
- Potting Mix: A well-draining mix is crucial. I love using a blend of 50% peat moss or coco coir and 50% perlite. You can also add a bit of compost.
- Small Pots or Trays: With drainage holes, of course!
- Rooting Hormone (Optional but Recommended): A powder or gel to give your cuttings a little boost.
- Watering Can or Spray Bottle: For gentle watering.
- Clear Plastic Bags or Domes: To create a humid environment for your cuttings.
- Labels/Markers: So you don’t forget what you’ve planted!
Propagation Methods
Costus spicatus is a rhizomatous plant, meaning it grows underground stems (rhizomes) that produce new shoots. This makes division our most straightforward and reliable method.
1. Division: This is truly the friendliest approach for this plant.
- Gently dig up the entire plant from its pot or the ground. Be careful not to damage the rhizomes or roots too much. You want to see those knobby underground stems.
- Inspect the rhizomes. Look for places where the rhizome naturally divides or where a new shoot is emerging with its own sets of roots.
- Using your hands or a clean knife, carefully separate a section of the rhizome that has at least one healthy shoot and some attached roots. Don’t be afraid to get your hands dirty here!
- Pot up the divided sections into their own pots filled with your well-draining potting mix. Make sure the top of the rhizome is just at or slightly below the soil surface.
- Water thoroughly and place the pots in a warm, bright spot, but out of direct, harsh sunlight.
2. Stem Cuttings (a little more patient approach): While division is easier, you can also try stem cuttings.
- Select a healthy, mature stem and make a clean cut just below a node (where a leaf attaches to the stem). You want a cutting that’s about 4-6 inches long and has at least two to three nodes.
- Remove the lower leaves from the cutting, leaving just a couple of leaves at the top. This helps prevent rot and directs the plant’s energy towards root development.
- Dip the cut end into your rooting hormone, tapping off any excess.
- Make a small hole in your prepared potting mix and insert the cutting, ensuring at least one node is buried beneath the soil.
- Gently firm the soil around the cutting.
- Water lightly and cover the pot with a clear plastic bag or a propagator lid to maintain humidity. Place in a warm spot with bright, indirect light.
The “Secret Sauce” (Pro Tips)
Here are a few little tricks I’ve learned over the years that can really give your cuttings the edge:
- Rhizome Hug: When dividing rhizomes, try to select sections that already have roots attached. It significantly speeds up the process. If a section of rhizome has a healthy shoot but no visible roots, it will still root, but it’s like starting from scratch!
- Bottom Heat is Your Friend: For stem cuttings, placing your pots on a heating mat designed for plants can make a world of difference. It encourages root development from below, mimicking the warmth of the soil in its natural environment.
- Don’t Drown Me! This is vital for both methods. While propagated plants need consistent moisture, they absolutely detest sitting in soggy soil. Ensure your pots have excellent drainage and that you’re watering when the top inch of soil feels dry, not on a strict schedule. Overwatering is the quickest way to invite rot.
Aftercare & Troubleshooting
Once you see new growth appearing – a sign of root development – you’re in the clear for the most part!
- Gradually Acclimate: If you used a plastic bag or dome, start by opening it for a few hours each day before removing it completely. This helps the new plant adjust to lower humidity.
- Consistent Watering: Continue to keep the soil moist but not wet. As the plant grows larger, you can water more deeply and less frequently.
- Bright, Indirect Light: Keep your new plants in a spot that receives plenty of light but is shielded from intense, direct sun, which can scorch their delicate new leaves.
- Common Problems: The biggest enemy here is root rot, which usually shows up as mushy, dark stems, yellowing leaves, and a general wilting even when the soil is moist. This is almost always a sign of overwatering or poor drainage. If you suspect rot, carefully remove the plant, trim away any affected parts, and repot in fresh, dry, well-draining soil, adjusting your watering habits. A cutting that just refuses to root, or turns yellow and dies, might not have been healthy to start with, or perhaps conditions weren’t quite right. Don’t be discouraged if a few don’t make it; it happens to all of us!
A Little Patience, A Lot of Joy
Propagating plants is like watching a tiny miracle unfold. It’s a process that requires a bit of patience and observation, but the reward of nurturing a new life from an existing one is unparalleled. So, gather your supplies, get your hands in the soil, and enjoy the journey of bringing more of these stunning Costus spicatus beauties into your world. Happy gardening!
Resource:
https://identify.plantnet.org/k-world-flora/species/Costus%20spicatus%20(Jacq.)%20Sw./data