Oh, hello there, fellow plant lover! It’s so good to have you join me today. We’re going to dive into the wonderful world of Chorizanthe procumbens, a pretty little native that can really add a touch of unique charm to your garden.
Why Grow Chorizanthe procumbens?
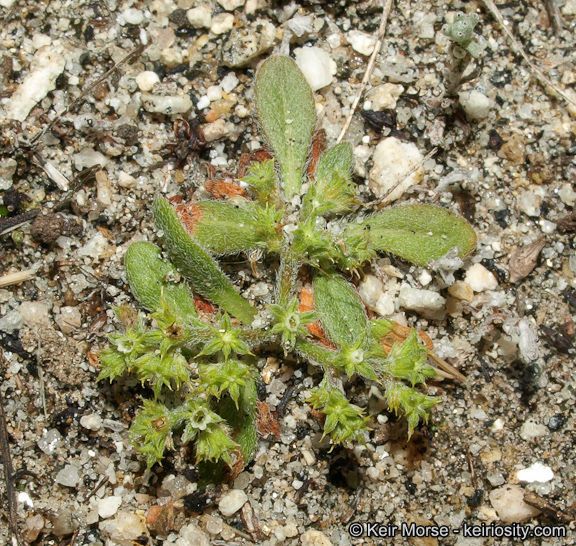
If you’ve ever seen this California native, you know it’s a winner. It’s got these delightful, papery bracts that often look like tiny inverted umbrellas, popping up on its sprawling stems. It’s low-growing, drought-tolerant once established, and just has this elegant, wild beauty about it. And the best part? Creating more of these beauties from cuttings or seeds is incredibly rewarding. It’s a fantastic way to fill in those tricky spots, share with friends, or simply expand your collection. Now, is it an absolute beginner’s plant to propagate? Honestly, it can be a tad fiddly, but with a little attention, you’ll be celebrating success in no time.
The Best Time to Start
For the highest chance of success, I find that late spring to early summer is your sweet spot for propagating Chorizanthe procumbens. This is when the plant is actively growing, and your cuttings will have plenty of energy to put into developing roots. You want to take cuttings from healthy, non-flowering stems.
Supplies You’ll Need
Here’s a little rundown of what you’ll want to have on hand for this project:
- Sharp Pruning Shears or a Craft Knife: Clean cuts are super important!
- Rooting Hormone (Optional but Recommended): This really gives your cuttings a helpful boost. Look for one designed for herbaceous cuttings.
- Seed Starting Mix or a Well-Draining Potting Mix: You want something airy that won’t hold too much moisture. A mix of perlite and peat moss works well, or a commercial seed starting blend.
- Small Pots or Seed Starting Trays: Small is good – we don’t need much space for these little guys initially. Make sure they have drainage holes!
- Plastic Bags or a Clear Cloche: This will create a humid environment for your cuttings.
- Watering Can with a Fine Rose or a Spray Bottle: Gentle watering is key.
- Labels: Don’t forget to label what you’ve planted!
Propagation Methods
Let’s get our hands dirty!
Stem Cuttings
This is my go-to method for Chorizanthe.
- Choose Your Stems: Find healthy, relatively new growth on your established plant. Look for stems that are about 3-4 inches long and haven’t started to flower.
- Make the Cut: Using your clean shears or knife, make a clean cut just below a leaf node (the point where leaves attach to the stem). This is where roots are most likely to form.
- Prepare the Cutting: Gently remove the lower leaves from the stem, leaving just a few at the top. This prevents them from rotting when planted.
- Apply Rooting Hormone: Dip the cut end of the stem into your rooting hormone powder or gel. Tap off any excess.
- Plant Your Cuttings: Fill your small pots or trays with your prepared potting mix. Make little holes with your finger or a pencil. Gently insert the cuttings, ensuring the nodes where you removed leaves are buried in the soil. Firm the soil gently around the base.
- Water Gently: Water the soil thoroughly but gently. You want it nicely moist, but not waterlogged.
- Create Humidity: Cover the pots with a plastic bag (make sure the leaves don’t touch the sides!) or place them under a cloche. This is crucial for preventing the cuttings from drying out.
The “Secret Sauce” (Pro Tips)
Here are a couple of things I’ve learned over the years that really make a difference:
- Don’t Judge Too Quickly: Chorizanthe can be a bit slow to root, especially compared to some other plants. Be patient! It can take anywhere from 3 to 6 weeks, sometimes even longer, to see significant root development. Resist the urge to pull them up and check too often.
- Bottom Heat is Your Friend: If you have a heat mat designed for seedlings, placing your pots on top of it can dramatically speed up root formation. It mimics the warmth of spring soil and gives those root initials a real kickstart.
Aftercare & Troubleshooting
Once you start to see signs of new growth – tiny leaves emerging or a gentle tug offering resistance – you know your cuttings are rooting!
- Acclimate Gradually: Once roots have formed, start to gradually acclimate your new plants. First, poke some holes in your plastic bag or lift the cloche for a few hours a day. Over a week or so, increase the time they are exposed to open air until you can remove the cover permanently.
- Continue Gentle Watering: Keep the soil consistently moist but not soggy. You’ll want to water them a bit more regularly than your established plants.
- Signs of Trouble: The most common issue you’ll face is rot. If a cutting looks mushy, turns black, or just completely wilts and doesn’t perk up after watering, it’s likely succumbed to rot. This is usually due to too much moisture and not enough air circulation. Ensure your soil is well-draining and don’t let those leaves sit in water. If you see a bit of mold on the soil surface, try to gently skim it off and improve air flow.
Happy Growing!
See? It’s a process, but a truly rewarding one. Experiment with a few cuttings, pay attention to their needs, and enjoy the journey of creating new life. Before you know it, you’ll be surrounded by the unique charm of Chorizanthe procumbens! Happy propagating!
Resource:
https://identify.plantnet.org/k-world-flora/species/Chorizanthe%20procumbens%20Nutt./data