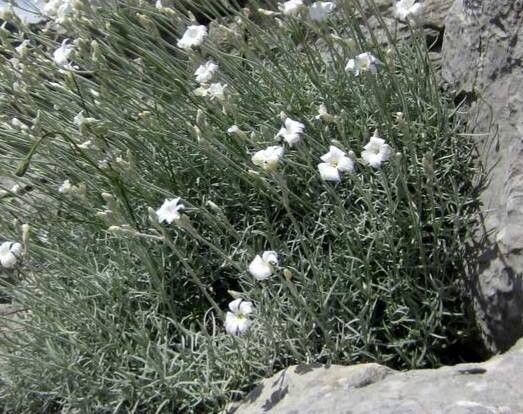
Oh, it’s so lovely to connect with you fellow plant enthusiasts! Today, we’re diving into something truly special: Cerastium grandiflorum, or as I like to call it, “Snow-in-Summer’s showy cousin.” If you’re captivated by its delicate, starry white flowers that blanket the garden in late spring and early summer, you’re in for a treat. There’s a particular joy in coaxing new life from an existing plant, and with Cerastium grandiflorum, it’s a process that can feel incredibly rewarding. Don’t be intimidated; this lovely perennial is actually quite forgiving, even for those just starting their propagation journey.
The Best Time to Start
For the most successful cuttings and divisions, I’ve found early spring, just as the plant is waking up and showing fresh, vigorous growth, is absolutely prime time. You want to catch it before it gets too leggy and before it puts all its energy into blooming. If you miss that window, late spring or early summer, after it has finished its main flowering flush, can also work. Just make sure to select healthy, non-flowering shoots for cuttings.
Supplies You’ll Need
- Sharp pruning shears or a clean knife: For precise cuts that minimize damage.
- Rooting hormone (optional, but helpful): A powder or gel to encourage root development.
- Well-draining potting mix: A good blend of coarse potting soil, perlite, and a bit of sand works wonderfully. You want to avoid anything that holds too much moisture.
- Small pots or seed trays: Clean containers with drainage holes are essential.
- Plastic bags or a propagation dome: To create a humid environment for cuttings.
- Watering can or mister: For gentle watering.
- A trowel or small shovel: For dividing plants.
Propagation Methods
There are a couple of trusty ways to multiply your Cerastium grandiflorum. I usually lean towards stem cuttings and division, as they’re both quite effective.
Stem Cuttings
This is my go-to for creating lots of new plants from a single specimen.
- Select your shoots: Look for soft, non-flowering stems about 3-4 inches long. Gently snap or cut them from the parent plant.
- Prepare the cuttings: Remove the lower leaves. This is crucial to prevent them from rotting when buried or submerged. You can leave the top few leaves intact. If you’re using rooting hormone, dip the cut end of each stem into it now, tapping off any excess.
- Plant your cuttings: Make a hole in your prepared potting mix with a pencil or your finger. Gently insert the bottom inch or so of the cutting. Firm the soil gently around the stem to ensure good contact.
- Create the humidity: Water the soil lightly. Then, cover the pots with a plastic bag or a propagation dome. This traps moisture and creates the mini-greenhouse effect the cuttings need. Ensure the leaves aren’t touching the sides of the bag if possible.
- Find a good spot: Place the pots in a bright location, but out of direct sunlight. Too much sun can scorch your tender cuttings. Keep the soil consistently moist but not soggy.
Division
This is perfect for plants that have become a bit too large or are starting to get woody in the center.
- Dig it up: In early spring or fall, carefully dig up the entire Cerastium grandiflorum clump. It’s best to do this when the soil is slightly moist.
- Gently separate: Loosen the soil with your hands or a trowel. You should be able to gently pull apart sections of the root ball. If it’s a very dense clump, you might need to use your trowel or even two forks inserted back-to-back to divide it.
- Look for healthy sections: Each division should have a good amount of roots and some leafy top growth.
- Replant immediately: Plant your new divisions in the prepared garden bed or in pots with fresh, well-draining soil, just as you would a regular potted plant. Water them in well after planting.
The “Secret Sauce” (Pro Tips)
- Bottom Heat is Your Friend: For stem cuttings, a little warmth from below can make a huge difference. Propagating mats or even placing your pots on top of a warm refrigerator can speed up root formation considerably. You’ll see roots develop much faster, and fewer cuttings will be lost.
- Don’t Overwater those Cuttings! It’s a common mistake. While humidity is key, waterlogged soil will absolutely lead to rot. Feel the soil daily, and only water when the top inch feels dry. The plastic bag will help retain moisture, so you often won’t need to water as much as you think.
- Rinse your pots! Before using any pots or trays, give them a good scrub and rinse. This helps prevent the spread of any fungal diseases or pests from previous plants. Starting with a clean slate is always a good idea.
Aftercare & Troubleshooting
Once you see new growth emerging from your cuttings or a division starts to look established, it’s a great sign! Once roots have developed (you can gently test this by giving a cutting a very slight tug; if it resists, it has roots), it’s time to carefully acclimate them to drier air. Gradually remove the plastic bag or dome for longer periods over a week or so. Water them regularly, allowing the soil to dry slightly between waterings.
The main issue to watch out for is rot. If your cuttings turn black or mushy, or if your divisions seem to be wilting and dying instead of perking up, it’s likely due to too much moisture. Ensure excellent drainage, and if rot is persistent, you might need to try again with a drier soil mix and a more careful watering schedule. Yellowing leaves can sometimes indicate they’re getting too much direct sun, so move them to a shadier spot.
A Encouraging Closing
Propagating plants is a journey, and like any good journey, it requires a little patience. Not every cutting will root, and that’s perfectly okay. Learn from each attempt, celebrate the successes, and don’t be discouraged by the misses. The satisfaction of seeing your own little Cerastium grandiflorum babies take off is truly unparalleled. So, grab your shears, get your hands in the soil, and enjoy the magic of creation! Happy gardening!
Resource: