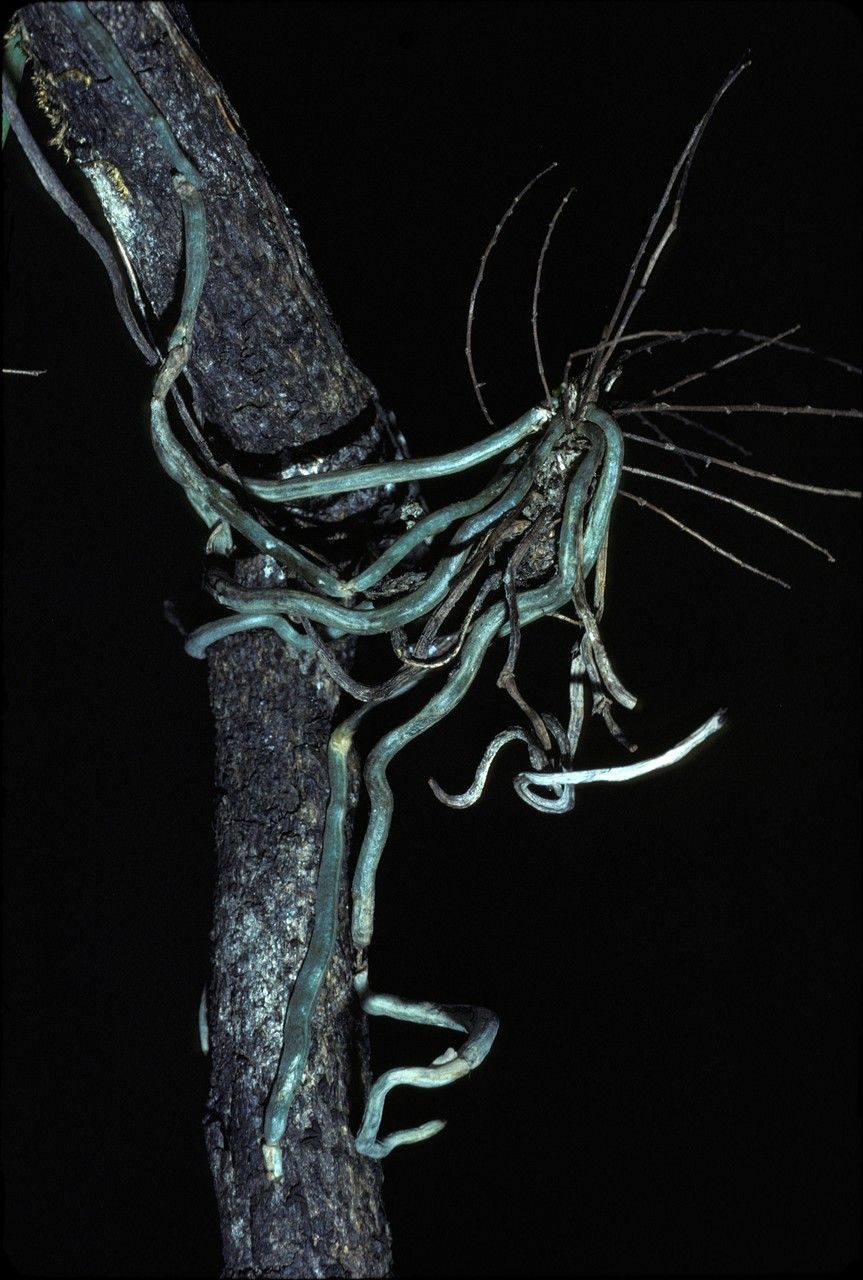
Hello there, fellow plant lovers! Today, I want to chat about a truly captivating orchid: Campylocentrum fasciola. If you’ve ever admired its delicate, almost ethereal beauty, you’re not alone. This tiny, leafless orchid with its flattened, green roots that photosynthesize and cling to surfaces is a true marvel. Propagating it might sound a bit daunting, and I’ll be honest, it’s not the absolute easiest plant for a complete beginner. But with a little care and patience, it’s incredibly rewarding. Watching a new little fasciola unfurl its beginnings from a cutting is a special kind of joy.
The Best Time to Start
For Campylocentrum fasciola, the sweet spot for propagation is typically late spring through early summer. This is when the plant is in its most active growth phase, meaning it has the energy to put into developing new roots and shoots. You want to see clear signs of new root growth or a developing keiki (a baby plant) before you attempt to divide or take cuttings. Rushing the process when the plant is dormant is like trying to start a car with a dead battery – it just won’t go!
Supplies You’ll Need
Gathering your tools beforehand makes the whole process smoother. Here’s what I’ve found most helpful:
- Sharp, sterile pruning shears or a razor blade: Cleanliness is paramount to prevent the spread of disease. I usually give mine a quick wipe with rubbing alcohol.
- Orchid bark mix (fine grade): Something that drains exceptionally well is key. Many growers use an airy, sphagnum moss-heavy mix for increased humidity.
- Perlite or charcoal (optional): Can be added to your bark mix for even better drainage and aeration.
- Rooting hormone powder (optional but recommended): This can give your cuttings a helpful boost.
- Small pots or net pots: Big enough to comfortably hold your cutting but not so large that they retain too much moisture.
- Watering can with a fine spray nozzle: Gentle watering is essential.
- Clear plastic bags or a small propagation box/dome: To maintain humidity.
- Identifying tags: Don’t forget to label your precious babies!
Propagation Methods
There are a couple of ways we can encourage new Campylocentrum fasciola plants.
Division
If your fasciola has grown into a substantial clump with multiple growths, division is a great option.
- Gently unpot the orchid. Be very careful with those specialized roots; they are delicate! If it’s mounted, you might need to carefully loosen it.
- Examine the root structure. Look for natural breaks where you can separate healthy sections. You want each division to have at least one healthy root and a growth point (where new leaves or roots emerge).
- Using your sterile shears or blade, carefully cut between the sections, ensuring you don’t damage too many roots on each part.
- Allow the cut surfaces to air dry for a few hours, or even overnight. This helps to callus over the wound and prevent rot.
- Pot up each division in fresh, well-draining orchid mix or mount them securely if that’s your growing style.
Stem Cuttings (More Advanced)
This is where it gets a little more adventurous, but absolutely doable! We’re essentially taking a piece of the stem with a root or two attached.
- Identify a healthy stem section on your mature plant. You’re looking for a section that has at least one, ideally two or more, healthy, green roots and a visible growth tip.
- Using your sterile pruning shears or razor blade, carefully cut the stem section, making sure to include some of the attached roots. Try to get a piece that’s a few inches long.
- Let the cut end callus over for a few hours.
- Dip the cut end in rooting hormone powder if you’re using it.
- Place the cutting in its new pot. I prefer to use a fine orchid bark mix or even just sphagnum moss here for high humidity. Gently tuck the roots into the medium, ensuring they have good contact.
- Mist the cutting gently. You want the medium to be moist but not waterlogged.
- Cover the pot with a clear plastic bag or place it in a propagation dome. This is crucial for maintaining high humidity, which these orchids absolutely love. Place it in bright, indirect light.
The “Secret Sauce” (Pro Tips)
Now, for a couple of little tricks I’ve picked up over the years that can really make a difference:
- Mimic the Tropics: These orchids hail from humid environments. If your home is naturally dry, especially in winter, building a little humidity tent around your cuttings is your best friend. Don’t let the leaves (or in this case, the roots!) touch the sides of the plastic if possible, as this can promote rot. If you have a propagation tray with bottom heat, use it! A gentle warmth from below can significantly speed up root development.
- Patience is a Virtue… and a Requirement: Campylocentrum fasciola are not the fastest growers. Don’t despair if you don’t see results immediately. It can take weeks, even months, for new roots or shoots to appear. Resist the urge to keep digging them up to check – this just stresses the plant. Trust the process and the environment you’ve created.
Aftercare & Troubleshooting
Once you see signs of new root growth or a tiny new shoot on your propagation, it’s time for a slightly adjusted care routine.
- Gradually Acclimate: Begin to open the humidity dome or plastic bag a little each day over a week or two. This helps your new plant adjust to the ambient humidity.
- Watering: Continue to keep the potting medium consistently moist but not soggy. Water when the top layer of your mix starts to feel dry.
- Light: Keep it in bright, indirect light. Avoid direct sun, which can scorch those tender new roots.
The most common issue you’ll encounter is rot. This usually happens if the medium stays too wet, or if the wound from propagating didn’t callus properly. Signs of rot include mushy, black roots or a wilting, yellowing appearance of the whole plant. If you see rot, try to act quickly: remove the affected parts with sterile tools, let the healthy parts dry out thoroughly, and repot in fresh, drier medium. Sometimes, sadly, it’s too late, but that’s part of learning!
A Little Encouragement
So there you have it! Propagating Campylocentrum fasciola is a journey that requires observation, a gentle hand, and a healthy dose of optimism. Don’t be discouraged if your first attempt isn’t a roaring success. Every plant parent has had their share of triumphs and learning experiences. Enjoy the process, celebrate the small victories, and soon you’ll be marveling at your own little fasciola babies blooming! Happy growing!
Resource: