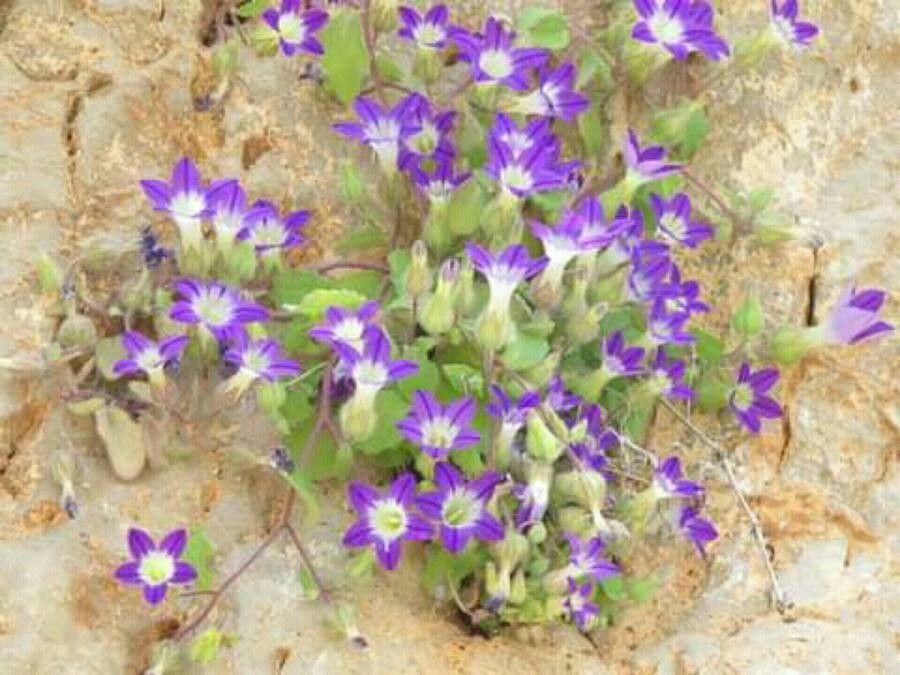
Oh, hello there! Come on in, grab a mug. Let’s chat about Campanula camptoclada. You know, those gorgeous, cascading bells that just spill over the edge of a pot or a wall? They’re such a delight in the garden, aren’t they? Their delicate blooms add such a soft, whimsical touch. And the best part? They’re surprisingly rewarding to propagate! While they’re not entirely foolproof for a brand-new gardener, with a little guidance, you’ll find it’s far from a daunting task. Think of it as nurturing little baby plants – it’s incredibly satisfying.
The Best Time to Start
For Campanula camptoclada, spring is your golden ticket. Once the plant has woken up after winter and is showing good, healthy new growth, that’s your cue. You’re looking for soft, flexible shoots that are easy to bend, not woody, mature stems. This is when they have the most vigor and the best chance of forming roots quickly.
Supplies You’ll Need
Before we dive in, let’s gather our tools. It’s always good to be prepared!
- Sharp, clean pruning shears or a sharp knife: For making clean cuts, which is crucial for preventing disease.
- Rooting hormone (optional but recommended): This helps stimulate root development.
- Seed-starting mix or a custom blend: I like a mix of peat moss or coir, perlite, and a little bit of coarse sand. It needs to be well-draining – Campanula hates soggy feet, even when rooting.
- Small pots or seed trays: With drainage holes, of course!
- Plastic bags or a propagator lid: To create a humid environment for your cuttings.
- A spray bottle: For misting.
- Labels: Trust me, you’ll thank yourself later.
Propagation Methods
We’ll focus on stem cuttings, as this is generally the most successful and straightforward method for Campanula camptoclada.
Stem Cuttings:
- Take Your Cuttings: On a bright spring morning, select healthy, non-flowering stems. Look for shoots that are about 4-6 inches long. Using your clean pruning shears, make a cut just below a leaf node (where a leaf attaches to the stem). This is where the magic really begins, as root hormones are concentrated there.
- Prepare the Cuttings: Gently remove the lower leaves from the cutting, leaving just a few leaves at the top. If the top leaves are very large, you can carefully cut them in half horizontally. This reduces water loss through transpiration.
- Apply Rooting Hormone: If you’re using it, dip the cut end of the stem into the rooting hormone powder, tapping off any excess.
- Pot Them Up: Fill your small pots or trays with your prepared, moistened potting mix. Make a small hole for each cutting with a pencil or your finger. Gently insert the cuttings, ensuring the leaf nodes you removed are below the soil surface.
- Create Humidity: Water the soil lightly to settle it around the cuttings. Then, cover the pots with a clear plastic bag or place them in a propagator with a lid. This traps moisture, creating the humid environment they crave.
- Provide Gentle Light: Place them in a bright spot, but out of direct sunlight. Too much sun will scorch those delicate new cuttings.
The “Secret Sauce”
Here are a couple of things I’ve learned over the years that can really give your Campanula camptoclada cuttings a boost.
- Bottom Heat is Your Friend: If you have a heat mat designed for seedlings, placing your propagator on it can significantly speed up root formation. It mimics the warmth of spring soil and encourages those roots to get going. Don’t make it too hot, though – just a gentle warmth.
- Don’t Forget to Ventilate: While humidity is key, you don’t want your cuttings to rot. Open the plastic bag or propagator lid for a few minutes each day to allow for some air circulation. This helps prevent fungal issues.
Aftercare & Troubleshooting
Once your cuttings are potted, check them regularly. You want the soil to remain consistently moist, but not waterlogged. Mist them gently if the humidity seems to be dropping.
You’ll know your cuttings have rooted when you see new leaf growth! It can take anywhere from 3-6 weeks, so be patient.
What if things go wrong? The most common culprit is rot. If you see your cuttings turning black or mushy, it’s usually a sign of too much moisture and not enough air circulation. In this case, you might need to discard them and try again with a less soggy mix and better ventilation. Another sign of stress can be wilting, which could mean they need more humidity or less light.
A Word of Encouragement
Don’t be discouraged if your first few attempts aren’t perfect. Gardening is a learning process, and Campanula camptoclada is a rewarding plant to grow, from seed to cutting. Keep at it, observe your plants, and most importantly, enjoy the journey of bringing new life into your garden. Happy propagating!
Resource:
https://identify.plantnet.org/k-world-flora/species/Campanula%20camptoclada%20Boiss./data