Oh, hello there! Come on in, pull up a chair. I’ve got a fresh pot of coffee brewing, and I hear you’re curious about propagating Bonamia ovalifolia. What a wonderful choice!
Why We Love Bonamia ovalifolia
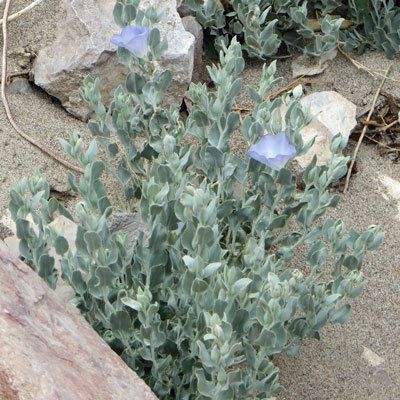
You know, Bonamia ovalifolia is just one of those plants that brings a smile to my face. Its delicate, bell-shaped flowers, often in soft purples or blues, are simply enchanting. And the way it drapes and spills, adding such an ethereal touch to a hanging basket or a garden edge… it’s pure magic. Plus, there’s something incredibly satisfying about taking a piece of a plant you already love and coaxing it to grow into a brand new one. It feels like unlocking nature’s secrets, and honestly, it’s more achievable than you might think. For those new to plant parenthood, this one is a good one to start with, though a touch of patience never hurts with any new endeavor!
The Best Time to Start
When it comes to giving your Bonamia ovalifolia cuttings the best fighting chance, spring is truly king. This is when the plant is bursting with energy, and new growth is readily available. Think of it as the plant’s natural reawakening period. Aim for a time when the plant has produced some tender, new shoots, but they’ve started to firm up a little – not so soft they flop over, but not so woody that they’re rigid.
Supplies You’ll Need
Gathering your tools before you start makes the whole process so much smoother. Here’s what I always have on hand:
- Sharp Pruning Shears or a Clean Knife: For taking precise cuttings. We want a clean cut, not a tear.
- Rooting Hormone (Optional but Recommended): This really gives your cuttings a boost. I like the powder form, but gels work too.
- Potting Mix: A light, well-draining mix is crucial. I often use a blend of perlite and peat moss, or a good quality seedling starter mix.
- Small Pots or Seedling Trays: Clean containers are a must!
- Clear Plastic Bag or Dome: To create a humid environment.
- Watering Can with a Fine Rose: Gentle watering is key.
- Labels and a Pen: So you don’t forget what’s what!
Propagation Methods: Stem Cuttings
This is my go-to method for Bonamia ovalifolia. It’s reliable and gives you plenty of opportunities to multiply your plant.
- Take Your Cuttings: On a lovely spring morning, select a healthy stem on your Bonamia plant. Look for a section that has grown recently and has at least two or three sets of leaves. Using your sharp shears or knife, make a clean cut just below a leaf node (that little bump on the stem where a leaf grows out). You want cuttings that are about 3-4 inches long. Remove the lower leaves, leaving just the top couple to help with photosynthesis.
- Dip in Rooting Hormone: If you’re using rooting hormone, lightly dip the cut end of the stem into the powder, tapping off any excess. This step can really encourage faster and stronger root development.
- Plant Your Cuttings: Fill your small pots or seedling trays with your prepared, moistened potting mix. Make a small hole in the center of the mix with your finger or a pencil. Gently insert the cut end of your Bonamia cutting into the hole, making sure the leaf nodes you removed are below the soil line. Firm the soil gently around the cutting.
- Water and Cover: Water the soil gently but thoroughly. You want the soil to be moist, not waterlogged. Now, create a mini-greenhouse effect. You can cover the pots with a clear plastic bag, securing it around the rim with a rubber band, or use a clear plastic dome. This will trap humidity, which is vital for cuttings to root.
The “Secret Sauce” (Pro Tips)
Here are a few things I’ve learned over the years that seem to make all the difference:
- Don’t Let the Leaves Touch the Water (if water propagating): While I’m focusing on soil cuttings here, if you happen to try water propagation, absolutely make sure that no leaves are submerged. They’ll rot in a heartbeat. Only the stem should be in the water.
- Bottom Heat is Your Friend: Bonamia roots respond wonderfully to warmth. Placing your pots on a heating mat designed for seedlings can significantly speed up root formation. It mimics the warm soil temperatures the plant loves.
- Mist Occasionally, But Don’t Overdo It: While humidity is key, you don’t want the leaves to stay constantly drenched, as this can encourage fungal issues. A light misting every few days, or just ensuring the humidity inside the bag stays consistent, is usually enough.
Aftercare & Troubleshooting
Be patient! It can take anywhere from a few weeks to a couple of months for your Bonamia ovalifolia cuttings to develop a good root system. You can test for roots by giving a very gentle tug on the cutting. If you feel resistance, you’ve got roots!
Once roots have formed, it’s time to let them breathe a little. Gradually acclimate your new plants to normal room humidity by opening the plastic bag or dome for increasing periods each day over a week. After that, you can remove the cover entirely. Continue to water when the top inch of soil feels dry.
Now, about troubleshooting: The most common issue you’ll encounter is rot. If your cutting looks limp, mushy, or turns black, it’s likely suffering from too much moisture and not enough air circulation. This is why a well-draining soil and proper watering are so important. If you see signs of rot, unpot the cutting to see if you can salvage any healthy stem or root. Sometimes, you just have to start again, and that’s okay too!
Keep Growing, Keep Loving
Propagating Bonamia ovalifolia is a journey, and like any good journey, there will be moments of excitement and perhaps a few little bumps. Don’t be discouraged if not every cutting takes. That’s part of the learning process! The joy of nurturing these new little plants is immense. Get your hands dirty, enjoy the quiet satisfaction, and soon you’ll have even more of these beauties to share. Happy propagating!
Resource: