Oh, hello there! Come on in, pull up a chair. I’ve got a fresh pot of coffee brewing, and I’m just itching to chat about one of my favorite little treasures: Bellevalia trifoliata.
The Joy of Tripling Your Treasures: Propagating Bellevalia trifoliata
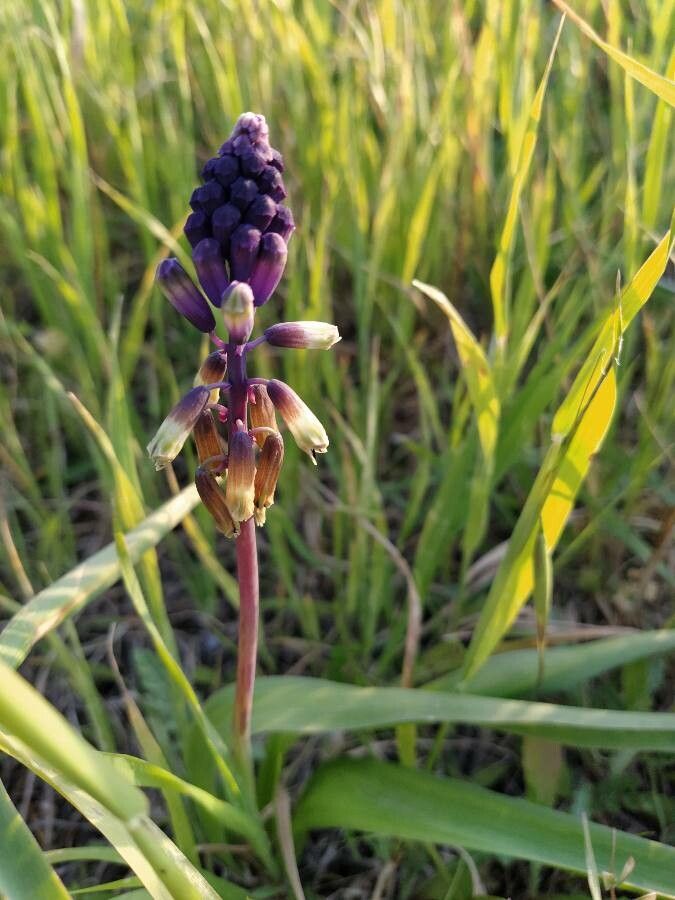
You know, Bellevalia trifoliata just has this certain magic about it. Those delicate, bell-shaped flowers in shades of blue and purple are pure springtime joy, and they have a lovely, subtle fragrance too. But what I really love about them is how they naturalize and spread, creating these delightful drifts of color. Propagating them yourself is incredibly rewarding. Honestly, it’s not the most straightforward plant for absolute beginners, but with a little patience and this guide, I promise you’ll be well on your way to a whole patch of these beauties.
The Best Time to Start Your Propagation Journey
For Bellevalia trifoliata, the absolute sweet spot for propagation is during their dormant period. Think late summer through early autumn. This is when the energy of the plant is stored in its bulbs, making it less stressed and more ready to divide and regrow. Don’t try to do this when they’re actively flowering or putting out new leaves; you’ll just end up frustrating yourself and the plant.
Supplies You’ll Need for Your Propagation Adventure
Here’s what you’ll want to have on hand before you get started:
- Sharp, clean trowel or small spade: For gently lifting and separating bulbs.
- Gardening gloves: To keep your hands clean and protect them.
- Well-draining potting mix: A good blend for bulbs or a general-purpose mix amended with perlite or horticultural grit is perfect.
- Small pots or trays: To house your new divisions.
- Watering can or spray bottle: For gentle watering.
- Labels and a marker: To keep track of what you’ve potted.
- Optional: Rooting hormone: While not strictly necessary for Bellevalia bulbs, it can give them a little boost.
Propagation Methods: Bringing New Life
The primary and most successful way to propagate Bellevalia trifoliata is through bulb division. This plant produces offset bulbs, much like its more famous cousin, the hyacinth.
Step-by-Step Bulb Division:
- Harvesting the Bulbs: Wait until the foliage of your Bellevalia has completely died back. This is crucial! If you dig them up too early, you risk damaging the bulb and reducing its energy reserves. Gently dig around the parent bulb with your trowel, being careful not to nick any bulbs. Lift the entire clump out of the soil.
- Cleaning and Inspection: Gently brush away as much of the old soil as you can. You’ll likely see the main bulb surrounded by smaller offset bulbs, or “bulblets.” Inspect each bulb for any signs of rot or disease. Discard any that look questionable.
- Separation is Key: Here’s where you’ll get your hands a bit dirty. Gently wiggle and twist the offset bulbs away from the parent bulb. If they are stubborn, you can use your fingers or a clean knife to carefully separate them. The goal is to get each bulblet with a small portion of the basal plate (where the roots emerge).
- Planting Your New Treasures: Prepare your pots with the well-draining soil mix. Plant each separated bulblet so that the top of the bulb is just barely covered by soil. If you’re planting multiple bulblets in a larger tray, space them about 2-3 inches apart.
- Initial Watering: Water the pots gently but thoroughly. You want the soil to be moist, but not waterlogged.
The “Secret Sauce”: Insider Tips for Success
I’ve learned a few things over the years that make a real difference. Here are my personal favorites for Bellevalia:
- Embrace the Dry Dormancy: After you’ve separated and potted your bulblets, resist the urge to water them constantly. Let the soil dry out slightly between waterings during their dormant/establishment phase. This mimics their natural Mediterranean habitat and helps prevent rot, which is the number one enemy of bulbs.
- A Touch of Bottom Heat (Optional but Effective): If you have a heated propagator or can place your pots on a heat mat, this can really encourage root development. A gentle warmth of around 65-70°F (18-21°C) can speed things along, especially if your ambient temperatures are cooler. Just make sure the soil doesn’t dry out too quickly if you’re using heat.
- Don’t Expect Blooms Immediately: Be patient! Those tiny bulblets will need time to mature. They might not flower the first year after propagation. Think of it as building strength. They’ll be worth the wait when they finally burst into bloom!
Aftercare & Troubleshooting: Nurturing New Growth
Once your bulblets have established and you start to see new shoots emerging (this might take a few weeks or even months, depending on when you potted them), you can treat them like established Bellevalias.
- Watering: Water them when the top inch of soil feels dry. During active growth and flowering, they’ll appreciate more consistent moisture, but still, ensure good drainage.
- Light: Once they’re actively growing, they’ll need plenty of sunlight.
- Fertilizing: You can give them a gentle feed with a balanced liquid fertilizer once they start showing significant growth.
Common Signs of Failure:
- Rot: If a bulb becomes soft, mushy, and smells unpleasant, it’s likely rotted. This is usually due to overwatering or poor drainage. If you catch it early, you might be able to salvage a firm part of the bulb, but often it’s best to discard it to prevent spread.
- No Growth: Sometimes, a bulblet just doesn’t take. This can happen if it was underdeveloped or damaged during separation. Don’t be discouraged; it’s a natural part of the process.
Keep the Green Thumbs Greener!
Propagating Bellevalia trifoliata is such a satisfying way to expand your garden. It takes a little care and attention, but the joy of seeing those delicate bells appear year after year, grown from your own efforts, is truly special. Be patient, trust your instincts, and enjoy the magic of growing! You’ve got this.
Resource:
https://identify.plantnet.org/k-world-flora/species/Bellevalia%20trifoliata%20(Ten.)%20Kunth/data