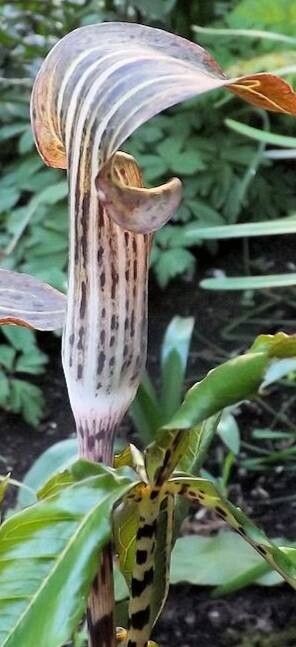
Hello fellow plant enthusiasts! Today, I want to chat about a truly captivating plant that’s been a joy in my garden for years: Arisaema nepenthoides. You know those striking, hooded flowers that look like something out of a fairy tale? That’s Arisaema for you, and nepenthoides boasts particularly beautiful, deep purple blooms. Propagating these beauties is a fantastic way to share their magic or simply expand your own collection. Now, I won’t sugarcoat it, they can be a little fussy, but with a bit of care, it’s absolutely achievable. It’s more of an intermediate level, I’d say, but don’t let that deter you!
The Best Time to Start
For Arisaema nepenthoides, the absolute sweet spot for propagation is spring, just as the plant is waking up from dormancy. You’re looking for those lush, healthy leaves to be fully unfurled. This is when the plant has a good store of energy and is eager to grow. Trying to propagate too early, while it’s still emerging, or too late in the season when it’s preparing for rest, can make things trickier.
Supplies You’ll Need
Here’s a handy list of what you’ll want to have on hand:
- Sharp, clean pruning shears or a sharp knife: Make sure they’re disinfected to prevent disease.
- A well-draining potting mix: I like a blend of equal parts peat moss, perlite, and a bit of compost. Or, a good quality seed starting mix works wonders.
- Small pots or seed trays: Make sure they have drainage holes.
- Rooting hormone (optional but recommended): A powder or gel can give cuttings a helpful boost.
- A watering can with a fine rose: Gentle watering is key.
- A plastic bag or propagation dome: This helps create a humid environment.
- Perlite or grit (optional): For adding to your potting mix for extra aeration.
Propagation Methods
The most reliable way to propagate Arisaema nepenthoides is through division. This involves separating the mature plant into smaller pieces, each with its own roots and a growth point.
- Unearth Gently: In early spring, carefully dig up your Arisaema nepenthoides plant. I usually do this after the soil has been moistened a bit, making it easier to work with.
- Locate Divisions: Look for offsets or smaller corms that have formed around the base of the main corm. These are your potential new plants. They’ll look like little bumps or smaller bulbs attached to the parent.
- Separate with Care: Using your clean knife or shears, carefully cut or twist the divisions away from the main corm. Ensure each division has at least one attached root and a visible bud or growth point. If there are no visible roots, don’t despair! Sometimes they’ll root just fine without.
- Pot Them Up: Plant each division in its own small pot filled with your well-draining potting mix. The top of the corm should be just at or slightly below the surface of the soil.
- Water Lightly: Give them a gentle watering to settle the soil.
The “Secret Sauce” (Pro Tips)
Here are a few things I’ve learned over the years that can make a big difference:
- Don’t Overwater the Divisions: This is crucial! While they need some moisture, soggy conditions are the fastest way to invite rot. Let the top inch of soil dry out between waterings.
- Give Them a Cozy Home: After potting, I like to place the pots in a bright, indirect light location and cover them with a clear plastic bag or propagation dome. This will trap humidity and encourage root development. I’ll often open it for a few minutes each day to let in fresh air.
- Patience is a Virtue: Arisaema can be slow to show signs of life, especially when newly divided. Don’t panic if you don’t see growth immediately. Keep them consistently moist (but not wet) and warm.
Aftercare & Troubleshooting
Once your divisions have established roots and you see new growth emerging from the soil, you can treat them like a mature Arisaema, but with a bit more tenderness. Keep them in bright, indirect light and water when the top of the soil feels dry.
The most common pitfall is rot. If you notice your division turning mushy, turning black, or smelling foul, it’s likely rotted. This is usually a sign of overwatering or poor drainage. If you catch it early, you might be able to cut away the rotting parts and repot in fresh, dry soil. If it’s extensive, unfortunately, it may be too far gone. Fungal issues can also pop up, so good air circulation is your friend!
A Encouraging Closing
Propagating Arisaema nepenthoides is a journey, and like all rewarding gardening endeavors, it requires a little patience. Watching those new little plants emerge and grow is such a fulfilling experience. Don’t be discouraged if your first attempt isn’t perfect. Keep experimenting, keep observing, and most importantly, keep enjoying the magic that these wonderful plants bring to our lives. Happy propagating!
Resource:
https://identify.plantnet.org/k-world-flora/species/Arisaema%20nepenthoides%20(Wall.)%20Mart./data