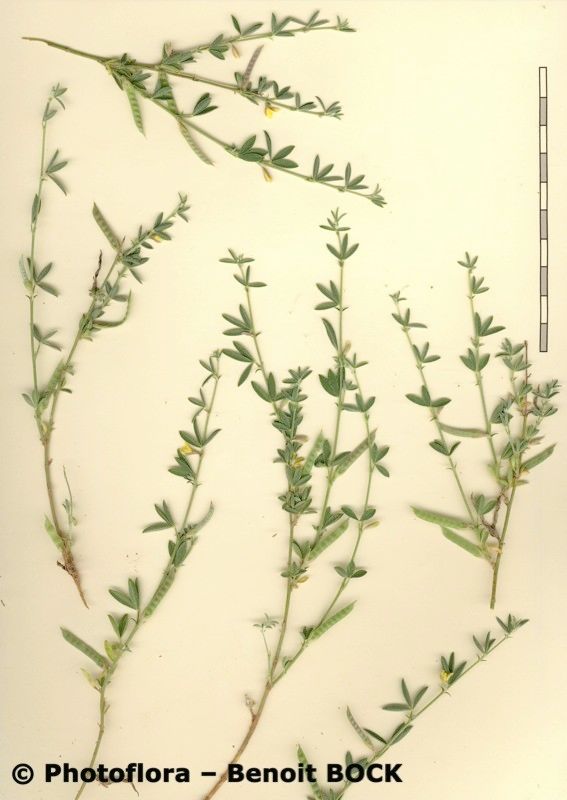
Hello fellow plant enthusiasts! Today, we’re going to talk about a truly charming little shrub: Argyrolobium uniflorum. If you’re not familiar with it, imagine delicate, pea-like yellow flowers with a delightful scent, all bundled together on slender, silvery-green stems. It’s an absolute joy to have in the garden, especially when it bursts into bloom. And the best part? You can easily make more of these beauties for yourself or to share with friends.
Propagating Argyrolobium uniflorum is a incredibly rewarding experience because you’re essentially creating new life from a piece of an existing plant. It’s a fantastic way to expand your collection without spending a fortune. For beginners, I’d say this plant falls into the “moderately easy” category. It’s not as straightforward as some succulents, but with a little patience and the right approach, you’ll be successful.
The Best Time to Start
When it comes to Argyrolobium uniflorum, the sweet spot for propagation is late spring to early summer. This is when the plant is actively growing after its spring flush. You want to take cuttings from stems that are healthy, and ideally, have just finished flowering or are showing signs of new growth. Avoid taking cuttings from old, woody stems or those that are still very soft and new.
Supplies You’ll Need
To get started, you’ll want to gather a few things:
- Sharp pruning shears or a clean knife: For making clean cuts.
- Rooting hormone (optional but recommended): This helps encourage root development.
- A well-draining potting mix: A good blend is equal parts peat moss or coco coir and perlite or coarse sand. You could also use a commercial seed-starting mix.
- Small pots or trays: 3-4 inch pots are usually a good size.
- Plastic bags or a propagator: To create a humid environment.
- Watering can or spray bottle: For gentle watering.
Propagation Methods
For Argyrolobium uniflorum, stem cuttings are my go-to method. It’s reliable and usually yields great results.
- Take Your Cuttings: In late spring or early summer, identify healthy, semi-hardwood stems. You’re looking for stems that are firm but still flexible – not brittle wood, but not brand new, floppy growth either. Aim for cuttings that are about 4-6 inches long. Using your clean shears or knife, make a clean cut just below a leaf node. These nodes are crucial because that’s where the magic happens for root formation.
- Prepare the Cuttings: Gently remove the lower leaves from your cutting, leaving just a few at the top. This reduces water loss and prevents the leaves from rotting when they’re in the soil. If you’re using rooting hormone, dip the cut end of the stem into the powder, tapping off any excess.
- Plant Your Cuttings: Fill your small pots or trays with your moist potting mix. Make a small hole in the center of the soil with a pencil or your finger. Carefully insert the prepared cutting into the hole, ensuring the lower leaf nodes are submerged in the soil. Gently firm the soil around the base of the cutting to ensure good contact.
- Create Humidity: Water the soil gently. Then, place a plastic bag over the pot to create a mini-greenhouse effect. You can secure the bag with a rubber band around the rim of the pot. If you have a propagator with a lid, even better!
The “Secret Sauce” (Pro Tips)
Here are a few things I’ve learned over the years that really make a difference:
- Bottom Warmth is Your Friend: Argyrolobium uniflorum roots much faster when it has a bit of gentle warmth from below. If you have a seedling heat mat, place your pots on it. If not, placing them in a warm spot, away from drafts, can help.
- Don’t Overwater, but Don’t Let Them Dry Out: This is a delicate balance. The soil should always feel slightly moist, like a wrung-out sponge. Check under the plastic frequently and mist the soil if it feels dry. If you see condensation building up excessively on the plastic, you can temporarily remove it to let them air out for a few hours.
- Patience with the Roots: Don’t be tempted to tug on your cuttings to see if they have roots! You’ll damage them. It can take anywhere from 4-8 weeks for new roots to develop. You might see new leaf growth appearing at the top – that’s a good sign the cutting is taking!
Aftercare & Troubleshooting
Once you see clear signs of new growth and you gently feel a little resistance when you give a cutting a very light tug, it’s time for them to graduate. Carefully remove the plastic bag and begin to gradually acclimate them to less humid conditions over a week or two. Water them as needed, but let the top inch of soil dry out between waterings.
What if things go wrong? The most common issue is rot. This usually happens from overwatering or poor drainage. If you see your cutting turning black and mushy, unfortunately, it’s likely a goner. Discard any rotting cuttings immediately to prevent it from spreading. If you notice the leaves wilting and the stem is still firm, it might be a sign of insufficient humidity or the cutting is struggling to root. Ensure that plastic bag is sealed well!
A Little Encouragement
Propagating plants is a journey, and each success, and even the occasional failure, teaches us something new. Don’t be discouraged if every single cutting doesn’t make it. Celebrate the ones that do, and remember that with a little patience and the right care, you’ll soon have a lovely collection of your own Argyrolobium uniflorum to enjoy. Happy growing!
Resource: