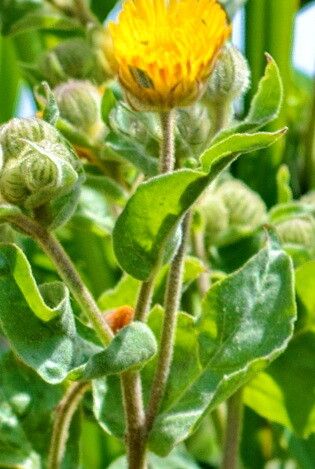
Oh, hello there, fellow garden enthusiast! Grab a cuppa, and let’s talk about a little gem I’ve grown to adore: Andryala rothia. You know, those delightful little plants with their fuzzy, silvery leaves and cheerful yellow daisy-like flowers? They bring such a wonderful texture and sunny disposition to any garden, especially in rockeries or containers where their trailing habit can really shine.
Propagating them is a fantastic way to fill your garden with more of these beauties, and honestly, it’s a journey that’s quite rewarding. For many, Andryala rothia is a pretty straightforward plant to propagate, making it a great choice even if you’re just starting out on your plant parent adventure. Let’s get our hands dirty, shall we?
The Best Time to Start
When it comes to giving your new propagations the best shot, late spring to early summer is typically your sweet spot. This is when the plant is actively growing, meaning it has plenty of energy to put into developing new roots. You’re looking for stems that are hardening off a bit – not brand new, floppy growth, but not old, woody stems either. Think of that stage where a stem has some structure but is still flexible.
Supplies You’ll Need
Gathering your tools first makes everything so much smoother. Here’s what you’ll want to have on hand:
- Sharp, clean pruning shears or a sharp knife: Sanitation is key to preventing disease.
- Rooting hormone (optional, but helpful): This can give your cuttings a little boost.
- Well-draining potting mix: I like a blend of fine potting soil with added perlite or coarse sand. You want something that won’t hold too much moisture.
- Small pots or trays: Clean pots, ideally with drainage holes, are essential.
- Watering can or spray bottle: For gentle watering.
- Labels: So you don’t forget what you’ve planted… I’ve definitely learned that lesson the hard way!
Propagation Methods
Andryala rothia is wonderfully obliging when it comes to propagation, and stem cuttings are my go-to method.
Stem Cuttings
- Take Your Cuttings: In your chosen timeframe, select healthy, non-flowering stems. Using your sharp shears or knife, cut a section about 3-4 inches long. Make the cut just below a leaf node – that’s where roots love to emerge.
- Prepare the Cuttings: Gently remove the lower leaves from the cutting, leaving just the top few leaves to catch the light. This prevents them from rotting when they’re stuck in the soil.
- Apply Rooting Hormone (Optional): If you’re using rooting hormone, dip the cut end of the stem into the powder or gel. Just a light coating is needed.
- Potting Up: Fill your small pots with your well-draining potting mix.
- Plant the Cuttings: Make a small hole in the soil with your finger or a pencil. Gently insert the base of the cutting into the hole, ensuring the leaf nodes that had leaves removed are covered by the soil. Firm the soil around the cutting.
- Water Gently: Lightly water the soil. You want it moist, but not waterlogged. A gentle mist from a spray bottle is often perfect.
- Provide the Right Environment: Place the pots in a bright spot with indirect light. A greenhouse, a bright windowsill, or even a shaded outdoor spot can work.
The “Secret Sauce” (Pro Tips)
After years of dabbling, a few little tricks become second nature:
- Don’t Overcrowd: When you’re planting multiple cuttings in one pot, give them a little breathing room. Too many plants crammed together can lead to poor air circulation and increase the risk of fungal issues.
- Bottom Heat is Your Friend: If you can, placing your pots on a heated propagator or a warm windowsill can really speed up root development. It mimics the natural warmth of the soil when the weather is warmer, encouraging those roots to sprout with enthusiasm.
- Watch for Wilting, Not Overwatering: It’s tempting to drown a struggling cutting, but that’s often the kiss of death. If a cutting starts to droop, check if the soil is dry. If it is, water. If the soil is already moist, it might be another issue (which we’ll touch on next).
Aftercare & Troubleshooting
Once your cuttings have been in their pots for a few weeks, start giving them a gentle tug. If you feel any resistance, congratulations! It means roots have formed. They’ll likely still be a bit delicate, so continue to water them when the top inch of soil feels dry. As they grow stronger, you can gradually transition them to a slightly larger pot or their final garden spot.
Now, if things aren’t going as planned, don’t despair. The most common culprit is rot. This usually happens when there’s too much moisture and not enough drainage or air circulation. You might see the cutting turn mushy or black at the base, or the leaves might yellow and fall off before any rooting occurs. If you spot rot, sadly, that particular cutting is usually a goner. It’s a good sign to reassess your watering and soil drainage for the remaining cuttings. Another sign of failure can be prolonged, severe wilting that doesn’t improve with watering, often indicating the cutting simply hasn’t taken.
A Encouraging Closing
Growing new plants from cuttings is one of the most satisfying parts of gardening. It’s about patience, observation, and a little bit of faith in nature. Don’t be discouraged if some cuttings don’t make it – it’s all part of the learning process. Enjoy the journey of nurturing these little bits of magic, and soon you’ll have a whole collection of your beloved Andryala rothia to brighten your days! Happy propagating!
Resource:
https://identify.plantnet.org/k-world-flora/species/Andryala%20rothia%20Pers./data