Hello, fellow garden lovers! It’s wonderful to connect with you from my little corner of the world, where the scent of damp earth and blooming flowers is my daily perfume. Today, I want to talk about a plant that brings me so much joy, and I’m thrilled you’re considering bringing more of it into your own garden: the lovely Allium anceps.
Introducing the Enchanting Allium anceps
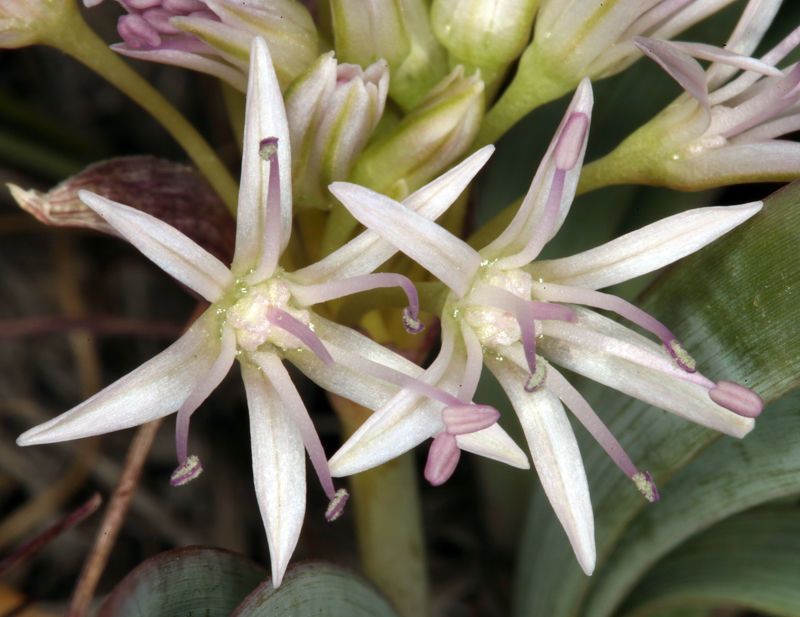
If you’re looking for a plant that offers a delicate, almost ethereal beauty, then Allium anceps is your answer. Its graceful, nodding blooms in shades of soft pink and lavender are a delightful addition to any border or cutting garden. And the best part? Propagating it yourself is a truly rewarding experience. For beginners, I’d say Allium anceps is moderately easy to propagate, especially if you’re willing to pay a little attention to detail. It’s a fantastic plant to start with if you’re looking to expand your propagation skills beyond the very basics.
The Best Time to Start Your Allium Adventure
Timing is everything in the garden, and with Allium anceps, the sweet spot for propagation is early spring, just as the plant is waking up from its winter slumber. You can also have success with propagation in late summer or early fall after the blooms have faded, but I find spring gives the strongest, most vigorous start. Look for healthy, established clumps that are showing new growth.
What You’ll Need for Your Propagation Journey
Gathering your tools before you begin makes the whole process so much smoother. Here’s what I always have on hand:
- Sharp pruning shears or a clean knife. Sterilize them with rubbing alcohol to prevent disease.
- A good quality seed-starting mix or a blend of equal parts peat moss, perlite, and compost. It needs to be well-draining!
- Small pots or trays with drainage holes.
- A watering can with a fine rose or a spray bottle for gentle misting.
- Labels to keep track of what you’ve planted and when.
- (Optional) Rooting hormone powder – this can give a little boost, especially for cuttings.
Propagation Methods for Allium anceps
While there are a few ways to propagate this beauty, my go-to methods are division and stem cuttings.
Method 1: Division (My Favorite!)
This is generally the easiest and most successful method for Allium anceps, as it works with the plant’s natural growth habit.
- Dig carefully: In early spring, gently dig around a well-established Allium anceps clump. I like to use a garden fork for this, as it’s less likely to damage the roots than a spade.
- Separate the bulbs: Once you’ve lifted the clump, you’ll see that it’s made up of several smaller bulbs or offsets clustered together. Gently tease these apart. Sometimes they’ll pull apart easily; other times, you might need to use your fingers or a small, clean knife to make divisions. Aim for divisions that have at least a few roots and a healthy new shoot or two.
- Replant immediately: Plant your divisions directly into prepared garden beds or into pots filled with your well-draining potting mix. Ensure the top of the bulb is just at or slightly below the soil surface.
- Water gently: Give them a good soak to settle the soil around the roots.
Method 2: Stem Cuttings (A Little More Adventurous)
This method takes a bit more patience, but it’s very satisfying when those cuttings take root.
- Take your cuttings: Once your Allium anceps is actively growing and has some good stems, select healthy, non-flowering shoots. Using your sharp shears, cut stems that are about 4-5 inches long. Make your cut just below a leaf node (where a leaf joins the stem). Remove the lower leaves, leaving just a couple at the top.
- Apply rooting hormone (optional): If you’re using rooting hormone, dip the cut end of the stem into the powder, tapping off any excess.
- Plant your cuttings: Fill a pot with your moist seed-starting mix. Make a small hole with a pencil or your finger and insert the cutting, ensuring the leaf nodes are below the soil surface.
- Provide humidity: Gently water the soil. You can then cover the pot with a clear plastic bag or place it in a propagator to create a humid environment. Make sure the leaves aren’t touching the plastic if you’re using a bag.
- Placement: Put the pot in a bright spot with indirect light. Avoid direct sun, which can scorch the delicate cuttings.
The “Secret Sauce” (Insider Tips!)
You know, as a gardener, you pick up a few tricks along the way. Here are a couple that have proved invaluable for me with Allium propagation:
- Know your soil: For both division and cuttings, a well-draining, airy soil mix is paramount. If the soil stays too wet, you’ll invite rot, and that’s the quickest way to disappointment. A little extra perlite can work wonders!
- Bottom heat is your friend: For stem cuttings, placing the pot on a gentle heat mat can significantly speed up root development. It mimics the warmth of spring soil and gives those little roots a much-needed nudge. Just make sure it’s not too hot – you don’t want to cook your cuttings!
Aftercare & Troubleshooting
Once you see signs of new growth, you’re on the right track!
- For divisions: Once planted, keep them consistently moist but not soggy. They’ll establish themselves over the growing season.
- For cuttings: Continue to keep the soil moist and the environment humid. You’ll know they’ve rooted when you see new shoots emerging from the top or feel a slight resistance when you gently tug on the stem. Once rooted, you can gradually acclimatize them to normal humidity by opening the plastic bag or propagator a little each day before transplanting.
The most common problem you’ll encounter is rot, which usually stems from overwatering or poor drainage. If you see your cuttings wilting and turning mushy, or if divided bulbs feel soft and slimy, it’s often a sign of too much moisture. In this case, gently remove the affected plant material, ensure better drainage, and adjust your watering. Sometimes, a little white mold might appear on the soil surface; this isn’t always a disaster, but it’s a good indicator that your humidity might be too high or airflow is lacking.
Happy Propagating!
My dear friends, don’t be discouraged if your first attempt isn’t picture-perfect. Gardening is a journey of learning and observation. Be patient, enjoy the process of coaxing new life from your beloved plants, and before you know it, you’ll have a garden positively brimming with beautiful Allium anceps. Happy cultivating!
Resource:
https://identify.plantnet.org/k-world-flora/species/Allium%20anceps%20Kellogg/data