Oh, Albuca bracteata! If you’ve ever been charmed by those wonderfully curly, bright green leaves that unfurl like little party streamers, then you’re already halfway to falling in love with this delightful plant. And the best part? You can multiply that joy! Propagating Albuca bracteata is truly a rewarding experience, like giving birth to tiny green dreams. For beginners, I’d say it’s moderately easy – a little patience and attention will go a long way.
The Best Time to Start
When it comes to getting your Albucas to sprout, spring is your absolute best friend. The plant is just waking up from its winter rest and is full of energy. This is when it’s most vigorous and receptive to new beginnings. Look for new growth emerging from the base of the plant; that’s your signal that it’s ready to get started.
Supplies You’ll Need
Don’t let the list intimidate you; most of these are common garden staples:
- Sharp pruning shears or a clean knife: For making neat cuts.
- Well-draining potting mix: I like a blend of cactus/succulent mix with a bit of perlite or pumice added for extra aeration.
- Small pots or propagation trays: Enough to house your new little propagations.
- Rooting hormone (optional but recommended): This can give your cuttings a helpful boost.
- Watering can or spray bottle: For gentle watering.
- Patience! This is the most important tool.
Propagation Methods
For Albuca bracteata, the most straightforward way to get more plants is through division of offsets, or bulbils.
1. Division of Offsets (Bulbils)
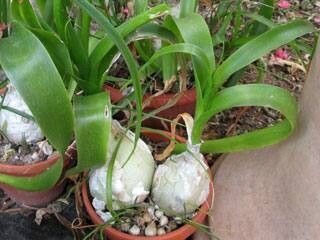
This is my go-to method for Albuca bracteata. Over time, your mature Albuca will produce tiny baby bulbs, called bulbils, around its base.
- Gently unpot your Albuca. Try to do this during its growing season (spring is ideal).
- Loosen the soil around the base of the plant. You want to see where the bulbils are attached.
- Carefully separate the bulbils from the mother plant. Use your fingers or a small, clean tool to gently twist or cut them away. Make sure each bulbil has at least a tiny piece of root attached, if possible. If there are no roots yet, don’t worry, they’ll grow.
- Let the newly separated bulbils “cure” for a day or two. This allows any cut surfaces to dry slightly, which helps prevent rot.
- Pot them up! Plant each bulbil in its own small pot filled with your well-draining soil mix. You can plant them just deep enough so the top of the bulbil is barely covered or at soil level.
- Water lightly. You want the soil to be slightly moist, not soggy.
The “Secret Sauce” (Pro Tips)
Here are a couple of things I’ve learned over the years that really make a difference:
- Don’t overwater, ever! This is crucial. Albucas are bulbs, and they hate sitting in wet soil. It’s far better to underwater a little than to overwater. Let the soil dry out somewhat between waterings, especially once your propagations are established.
- Light is key, but avoid harsh direct sun initially. Once your bulbils are potted up, place them in a bright spot with indirect light. Too much direct sun can scorch their delicate new foliage. As they grow stronger, they can handle more sun.
Aftercare & Troubleshooting
Once your bulbils are happily in their new homes, treat them much like you would a mature Albuca, just with a lighter touch.
- Watering: Water sparingly. Wait until the top inch of soil feels dry before watering again.
- Light: Provide bright, indirect light.
- Patience: It can take several weeks, or even a few months, for new roots and leaves to emerge. Don’t be discouraged if you don’t see immediate growth.
The most common problem you’ll encounter is rot. If you see a bulbil turning mushy or black, it’s likely rot. This is almost always due to overwatering. If this happens, pull out the affected bulbil, discard it, and ensure the soil of any remaining ones is much drier. If you catch it early, you might be able to save a part of a bulbil by cutting away the rotted section and letting the healthy part dry out before repotting.
A Encouraging Closing
Propagating Albuca bracteata is a wonderful way to expand your collection and share the joy of these curly beauties. Be patient with your new little plants, and don’t be afraid to experiment a little. Watching those first tiny leaves unfurl from a bulbil you planted yourself is an incredibly satisfying feeling. Happy gardening!
Resource: