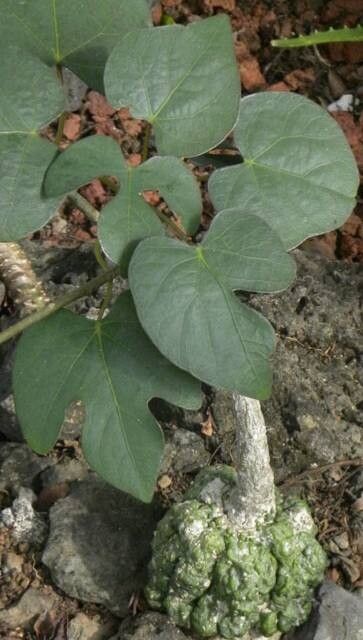
Hello there, fellow plant enthusiasts! It’s so lovely to have you join me today. We’re going to dive into the fascinating world of propagating Adenia epigea, a truly unique and captivating specimen that always sparks conversation in my garden. If you’ve ever admired its bulbous base and intricate vine, and thought, “I wish I had more of those!”, you’re in the right place. Propagating this beauty is incredibly rewarding, giving you the opportunity to share its charm or simply expand your own collection. Now, is it a beginner-friendly plant to propagate? Honestly, it can be a little bit of a journey, but with a little know-how and patience, I promise you’ll find success.
The Best Time to Start
For Adenia epigea, the sweet spot for propagation is during its active growing season. Think late spring through summer. This is when the plant has the most energy to put into developing new roots and shoots. Trying to propagate when it’s dormant or just emerging from dormancy can be a recipe for disappointment. We want to give our cuttings the best possible chance, and a vibrant, growing plant is key.
Supplies You’ll Need
Before we get our hands dirty, let’s gather our tools. Having everything ready makes the process so much smoother.
- Sharp Pruning Shears or a Clean Knife: For making clean cuts.
- Rooting Hormone (Optional but Recommended): A powdered or gel form to encourage root development.
- Well-Draining Potting Mix: I like a blend of cactus/succulent mix with a generous addition of perlite or pumice for aeration.
- Small Pots or Seedling Trays: Clean and with drainage holes.
- Watering Can or Spray Bottle: For gentle watering.
- Plastic Bag or Humidity Dome: To create a mini-greenhouse environment.
- Labels: To keep track of your cuttings!
Propagation Methods
There are a couple of ways we can go about this. I find stem cuttings work wonderfully for Adenia epigea.
Stem Cuttings:
- Select Your Cuttings: Look for healthy, semi-hardwood stems that are at least 4-6 inches long. Avoid anything that’s too soft and green, or overly woody. You want a stem that snaps cleanly when bent.
- Make Your Cuts: Using your clean shears or knife, make a clean cut just below a leaf node. Leaf nodes are those little bumps on the stem where leaves emerge; this is where roots are most likely to form.
- Prepare the Cutting: Gently remove the lower leaves from your cutting, leaving just a few at the top. This reduces water loss and prevents leaves from rotting in the soil.
- Apply Rooting Hormone (if using): Dip the cut end of the stem into your rooting hormone. Tap off any excess.
- Plant Your Cuttings: Fill your small pots with your well-draining soil mix. Make a hole in the center with your finger or a pencil, and insert the cut end of the stem so that at least one leaf node is below the soil surface. Gently firm the soil around the cutting.
- Water Gently: Water thoroughly but avoid waterlogging the soil. You want it moist, not soggy.
- Create a Humid Environment: Cover the pot with a plastic bag or a humidity dome. Make sure the leaves aren’t touching the plastic if possible. Place the pot in a bright spot with indirect light.
The “Secret Sauce” (Pro Tips)
Now, for a few little tricks that have made all the difference for me:
- The Bottom Heat Advantage: This is a game-changer, especially if your home tends to be on the cooler side. Using a seedling propagation mat under your pots provides gentle bottom heat. This encourages root development from below, like a warm embrace for those new roots.
- Don’t Be Afraid to “Wound”: For slightly tougher stems, a very subtle “wound” can sometimes help. After dipping in rooting hormone, you can carefully scrape a very thin sliver of bark off one side of the stem, right at the cut end. This exposes more cambium tissue, which can promote faster rooting. Be gentle, though – we’re not peeling a potato!
- The Patience Game is Real: Adenia epigea can be a bit of a slow starter when it comes to rooting. Don’t panic if you don’t see new growth immediately. Weeks, and sometimes even months, can go by. Resist the urge to constantly dig them up and check for roots. Trust the process!
Aftercare & Troubleshooting
Once you start to see signs of life – like new leaves emerging or a noticeable tug when you gently try to lift the cutting – you know you’re on your way!
- Gradual Acclimation: Slowly remove the humidity dome over a week or two, allowing the new plant to adjust to the regular humidity levels.
- Continue Gentle Watering: Keep the soil consistently moist but not wet. Overwatering is the quickest way to invite rot. It’s better to let it dry out slightly between waterings than to keep it perpetually soggy.
- Bright, Indirect Light: Continue to keep your new Adenia epigea in a spot with bright, indirect light.
- Signs of Rot: The most common sign of failure is mushy, black stems, often near the soil line. This is a clear indicator of overwatering. If you catch it early, you might be able to salvage a healthy section of the stem if it hasn’t completely succumbed.
A Gentle Encouragement
Propagating Adenia epigea is a wonderful way to connect with your plants. It takes a bit of observation and, yes, a good dose of patience. Don’t be discouraged if your first attempt isn’t a roaring success. Each cutting is a learning experience. Embrace the journey, celebrate the small victories, and enjoy nurturing these fascinating new plants into existence. Happy propagating!
Resource:
https://identify.plantnet.org/k-world-flora/species/Adenia%20epigea%20H.Perrier/data