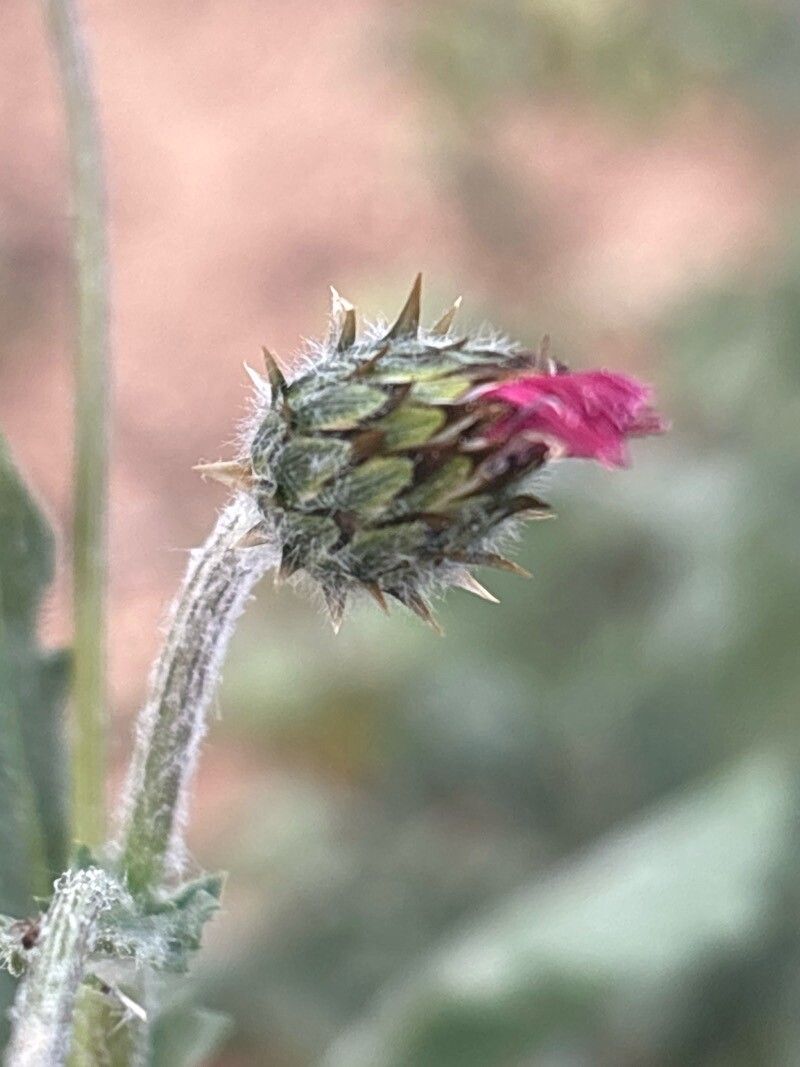
Hello fellow garden enthusiasts! Today, we’re diving into the delightful world of Volutaria tubuliflora, also known as the “Salvia-like Blue Flower” or often just “Volutaria.” If you’re looking for a plant that brings a cascade of vibrant, daisy-like blossoms in shades of brilliant blue and purple to your garden, this is it! Its wispy, airy habit makes it perfect for spilling over containers or softening the edges of flower beds. And the best part? Learning to propagate these beauties yourself is incredibly rewarding. I’d say for most gardeners, Volutaria is a pretty beginner-friendly plant to propagate, which is wonderful news!
The Best Time to Start
The sweet spot for propagating Volutaria is generally in late spring to early summer. This is when the plant is in its active growth phase. You’ll want to look for healthy, non-flowering stems. Think of it as catching the plant at its peak vigor – it’s ready to enthusiastically put out new roots!
Supplies You’ll Need
Gathering your supplies before you start makes the whole process so much smoother. Here’s what I usually have on hand:
- Clean, sharp pruning shears or a sharp knife: Sanitation is key to preventing disease.
- Rooting hormone (optional but recommended): This really gives your cuttings a boost. Look for one formulated for herbaceous cuttings.
- Small pots or seed trays: Clean ones, please!
- Well-draining potting mix: I like a blend of half perlite and half high-quality potting soil. You can also use a special seed-starting mix.
- Plastic bags or a propagator: To create a humid environment.
- Watering can with a fine rose head: For gentle watering.
- Labels and a marker: To keep track of what you’ve planted and when.
Propagation Methods
Volutaria is wonderfully amenable to stem cuttings. It’s my go-to method for these plants.
-
Take Your Cuttings: Head out to your Volutaria plant on a mild day. Select healthy, non-flowering stems. Look for stems about 4-6 inches long. Using your clean shears or knife, make a clean cut just below a leaf node (where a leaf joins the stem). Remove the lower leaves, leaving just a few at the top of the cutting. This helps prevent rot and reduces water loss.
-
Prepare the Cuttings: If you’re using rooting hormone, dip the cut end of each stem into the powder, tapping off any excess. This stickiness helps the hormone adhere.
-
Planting Your Cuttings: Fill your clean pots or trays with your prepared potting mix. Moisten the mix thoroughly but gently. You want it damp, not soggy. Make a small hole in the center of the soil for each cutting, then insert the prepared stem, ensuring the leaf nodes are buried. Gently firm the soil around the base of the cutting.
-
Create Humidity: Water your cuttings gently again. Then, cover the pots with a clear plastic bag, tying it at the base, or place them inside a propagator. This creates the humid environment they need to develop roots without drying out. Make sure the leaves don’t touch the plastic if possible – this can encourage rot.
-
Location, Location, Location: Place your pots in a bright spot, but out of direct, harsh sunlight. A greenhouse, a bright windowsill, or a sheltered spot on a patio are ideal.
The “Secret Sauce” (Pro Tips)
Here are a few things I’ve learned over the years that can really make a difference:
- Bottom Heat is Your Friend: If you have access to a heated propagator or can place your pots on a heat mat, this is a game-changer. Warm soil encourages root development much faster. You’re looking for a soil temperature around 70-75°F (21-24°C).
- The “Slap Test” for Moisture: Instead of just looking at the soil surface, give your pot a gentle tap. If it feels light and sounds hollow, it’s likely time to water. Overwatering is the enemy of cuttings!
- Patience with Air Circulation: While humidity is crucial, a little airflow is also good. You can gently lift the plastic bag for a few minutes each day to allow for some air exchange. This helps prevent fungal issues.
Aftercare & Troubleshooting
Once your cuttings have developed roots – you’ll usually see them peeking out the drainage holes or feel a slight resistance when you gently tug on a cutting – it’s time for a little extra care.
Watering: Continue to water gently, allowing the top inch of soil to dry out between waterings. As they grow larger, you can gradually introduce them to less humid conditions by opening the plastic bag or propagator more each day.
Transplanting: Once the new plants are robust and have a good root system, you can pot them up into slightly larger containers with fresh potting soil.
Troubleshooting: The most common issue you might face is damping off or rot. This happens when cuttings become too wet and a fungal disease attacks the stem at the soil line. If you see a stem suddenly wilting and turning mushy at the base, sadly, that cutting is likely lost. Good drainage, clean tools, and avoiding overwatering are your best defenses against this. Brown, crispy leaves can indicate they’re too dry or getting too much direct sun.
A Little Bud of Encouragement
Propagating plants is such a fulfilling part of gardening. It connects us to the cycle of life and allows us to fill our gardens with more of the plants we love, all while sharing with friends. Be patient with your Volutaria cuttings. Not every one will take, and that’s perfectly okay! Celebrate the successes, learn from any setbacks, and most importantly, enjoy the journey of growing something beautiful from scratch. Happy propagating!
Resource:
https://identify.plantnet.org/k-world-flora/species/Volutaria%20tubuliflora%20(Murb.)%20Sennen/data