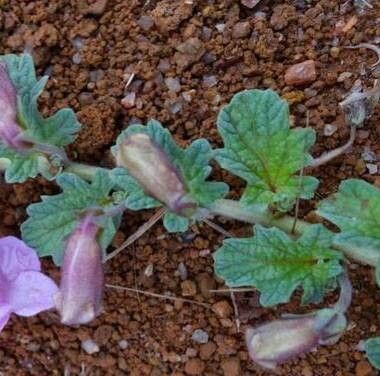
Oh, hello there! I’m so glad you’ve stopped by. Today, we’re diving into the wonderful world of propagating Sesamum eriocarpum, also known as the Velvet Sesame. If you’re drawn to its delicate, almost velvety foliage and the promise of your own little patch of this unique plant, you’re in for a treat. Growing something from a sliver of itself is incredibly satisfying, and the Velvet Sesame is a fantastic plant to try your hand at. While it might have a slight reputation for being a bit particular, I’ve found with a few key steps, it’s quite manageable for most gardeners, even those just starting out. Let’s get your green thumb buzzing!
The Best Time to Start
For the most success with Velvet Sesame, I’ve found that late spring to early summer is your sweet spot. This is when the plant is actively growing and has plenty of energy. You’ll want to take cuttings when the stems are semi-hardwood – not brand new and floppy, but not tough and woody either. Think of a pencil’s thickness, firm but with a little give.
Supplies You’ll Need
Here’s what you’ll want to gather before we get our hands dirty:
- Sharp pruning shears or a clean knife: For making clean cuts.
- Rooting hormone (optional, but recommended): A powder or gel to encourage root development.
- Seed-starting mix or a well-draining potting mix: I often use a mix of equal parts peat moss and perlite for excellent aeration.
- Small pots or trays: With drainage holes, of course!
- Plastic bags or a propagation dome: To maintain humidity.
- Gravel or small stones: For the bottom of pots if water propagating.
- A spray bottle: For misting.
Propagation Methods
We’ll focus on stem cuttings, as this is generally the most successful method for Velvet Sesame.
Stem Cuttings:
- Take Your Cuttings: Select healthy, vigorous stems. Using your clean shears or knife, cut pieces that are about 4-6 inches long. Make sure each cutting has at least two sets of leaves.
- Prepare the Cuttings: Gently remove the lower leaves from the bottom 2 inches of the cutting. If your cutting has very large leaves, you can halve them to reduce water loss.
- Apply Rooting Hormone (Optional): Dip the cut end of the stem into your rooting hormone, tapping off any excess.
- Plant Your Cuttings: Fill your pots or trays with your prepared potting mix. Make a small hole in the center of the soil with your finger or a pencil. Gently insert the cut end of the stem into the hole, ensuring the bottom leaves are above the soil line. Firm the soil gently around the base of the cutting.
- Water Gently: Water the soil thoroughly until it’s evenly moist but not waterlogged.
- Create a Humid Environment: This is crucial! Either cover the pot with a clear plastic bag (propping it up with skewers so it doesn’t touch the leaves) or place it inside a propagation dome.
The “Secret Sauce” (Pro Tips)
Now for a couple of things I’ve learned over the years that really make a difference:
- The ‘Heel’ Trick: When taking your cuttings, try to get a little bit of the older wood attached to your new growth. It’s called taking a cutting with a “heel,” and it can significantly improve your success rate as it carries dormant buds that can sprout roots.
- Bottom Heat is Your Friend: If you have a heat mat designed for seedlings, putting your pots on it can dramatically speed up root formation. The warmth encourages those roots to get going much faster and stronger.
- Don’t Rush the “Pot Up” Moment: Resist the urge to pull out your cuttings to check for roots too soon! It’s tempting, I know. Wait until you see new leaf growth, which is a strong indicator that roots have formed. Tug gently; if there’s resistance, you likely have roots.
Aftercare & Troubleshooting
Once you see those first little roots peeking out (or new growth starting), it’s time for a little more hands-on care.
Gradually acclimate your new plants to the open air by opening the plastic bag or dome for longer periods each day. Continue to keep the soil consistently moist but not soggy. You can eventually move them to slightly larger individual pots as they grow.
The most common problem you might encounter is rot. If your cuttings turn brown and mushy or develop black spots, it’s usually a sign of too much moisture or damping off. Ensure excellent drainage and good air circulation. If a cutting fails, it’s okay! Don’t get discouraged; just clean out the pot and try again.
A Encouraging Closing
Growing new plants is a journey, and with Velvet Sesame, patience is truly a virtue. Don’t be afraid to experiment, learn from any setbacks, and celebrate every success. Enjoy the process, and before you know it, you’ll have a lovely collection of your own Velvet Sesame plants to admire. Happy gardening!
Resource: