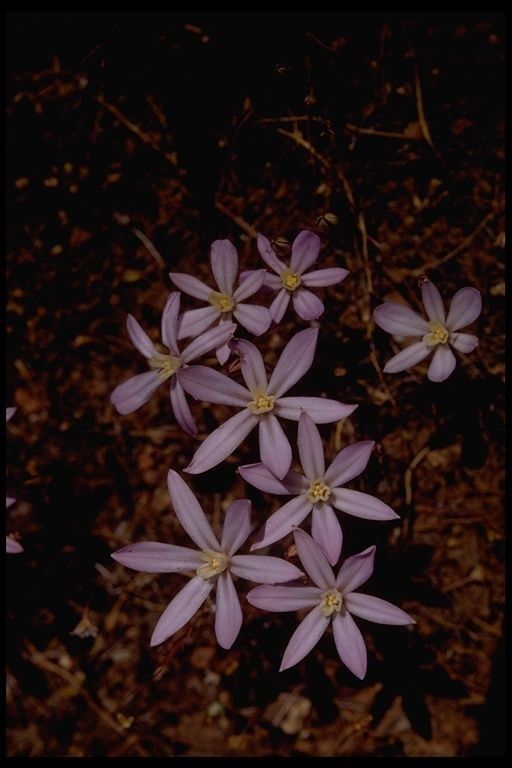
Hey there, fellow plant enthusiasts! It’s wonderful to have you here. Today, we’re diving into the charming world of Brodiaea minor, also known as the minor brodiaea or sometimes even grass nut. If you’ve ever admired its delicate, star-shaped blooms in shades of violet and blue, you know it’s a little gem in the garden. Propagating these beauties is truly a rewarding endeavor, giving you more of that lovely color to enjoy and share. Now, is it a walk in the park for absolute beginners? I’d say it’s moderately easy. It requires a bit of patience and understanding of its natural cycle, but nothing a budding gardener can’t handle with a little guidance.
The Best Time to Start
Timing is everything, right? For Brodiaea minor, the best time to propagate is generally in late summer or early fall, after the plant has finished its blooming cycle and the foliage has started to die back naturally. This is when the corms (which are like little underground bulbs) are dormant and have stored up enough energy for the next growing season. Trying to divide them when they’re actively growing or blooming can stress the plant unnecessarily.
Supplies You’ll Need
Gathering your tools before you begin makes the whole process smoother. Here’s what you’ll want on hand:
- A trowel or small spade for digging.
- Your gardening gloves (always a good idea!).
- A sharp, clean knife or pruning shears for any necessary divisions.
- A well-draining potting mix. I often mix equal parts compost, perlite, and coarse sand. You want it to drain like a sieve!
- Small pots or seed trays for your new divisions or corms.
- A labeling system (waterproof marker and tags) so you remember what you planted where!
Propagation Methods
Brodiaea minor is primarily propagated by dividing its underground corms. It’s pretty straightforward!
Division of Corms
- Gently dig up the clump: In late summer or early fall, carefully insert your trowel around the base of the plant. Aim to dig a generous circle so you don’t disturb the corms too much. Lift the entire clump out of the soil with as much of its root ball as possible.
- Clean off excess soil: Gently brush or rinse away the loose soil from the corms. You’ll usually find a cluster of corms, some larger and some smaller offsets.
- Separate the corms: This is the fun part! You can often gently pull the corms apart by hand. If they’re tightly attached, use your clean knife or shears to carefully slice them apart. Make sure each piece has at least one healthy-looking bud or growing point. If a corm looks dried out, shriveled, or discolored, it’s best to discard it.
- Allow corms to dry slightly (optional): Some gardeners like to let the separated corms sit on a paper towel in a dry, airy spot for a day or two. This can help any minor cuts heal and prevent rot.
- Replant your babies: Fill your pots or the prepared garden bed with your well-draining soil mix. Plant the corms about 2-4 inches deep, with the pointed end facing upwards. Give them a little space, about 4-6 inches apart, especially if you’re starting them in pots.
- Water gently: Water the newly planted corms lightly.
The “Secret Sauce” (Pro Tips)
Here are a couple of things I’ve learned over the years that really make a difference:
- Don’t overwater dormant corms: So many people kill their dormant bulbs and corms by giving them too much love (i.e., water) when they don’t need it. For Brodiaea minor corms in their resting phase, only water if the soil becomes bone dry for an extended period, especially if they are in pots. If they’re in the ground, natural rainfall might be enough.
- Think about drainage in pots: If you’re potting up corms, especially if you live in a region with wet winters, consider adding a layer of gravel or a larger shard of a broken pot at the bottom of your pot before adding soil. This creates an extra buffer against waterlogged roots, which is the quickest way to lose a corm.
Aftercare & Troubleshooting
Once your Brodiaea minor divisions are planted, be patient! You won’t see much happening until the spring when they start their active growth.
- Watering: Water consistently when new growth appears in spring. Keep the soil evenly moist but not soggy.
- Fertilizing: They don’t need much. A light feeding of a balanced, slow-release fertilizer in early spring is usually sufficient.
- Signs of Trouble: The most common issue is rot, usually caused by overwatering or poor drainage. If you dig up a corm and it’s mushy, slimy, and smells foul, it’s gone. This is why that excellent drainage is so crucial. Another sign of stress could be yellowing foliage while the plant is supposed to be actively growing – this often points back to water issues or perhaps an unhealthy division to begin with.
A Encouraging Closing
Propagating Brodiaea minor is a gentle art of patience and observation. Don’t be discouraged if not every corm takes off right away. Nature works on its own schedule, and these little underground treasures have their own rhythm. The joy of seeing those dainty blooms emerge from seedlings you nurtured yourself is truly special. So grab your trowel, get your hands in the dirt, and enjoy the magical process! Happy gardening!
Resource:
https://identify.plantnet.org/k-world-flora/species/Brodiaea%20minor%20(Benth.)%20S.Watson/data