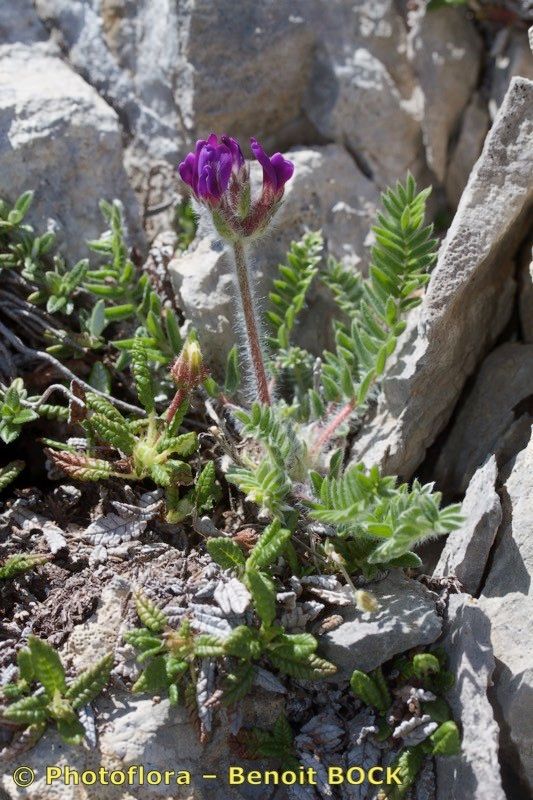
Oh, hello there! It’s so lovely to have you join me for a little chat about one of my absolute favorite plants – Oxytropis foucaudii. If you’re not familiar with it, imagine delicate, almost ethereal pea-like flowers, often in shades of soft purple or pink, atop a rosette of fuzzy, silver-green leaves. It truly is a gem for any alpine garden or sunny rockeries. And the best part? Propagating it yourself is such a rewarding journey. Now, a little upfront honesty: Oxytropis foucaudii can be a tad particular, so I wouldn’t necessarily call it a beginner’s absolute first plant. But with a little patience and these tips, I promise you can absolutely succeed.
The Best Time to Start
For these beauties, I find the sweet spot for propagation is late spring to early summer. This is when the plant is actively growing, and the stems are firm enough to be taken as cuttings but not so woody that they’re difficult to root. Waiting for this period of robust growth gives your cuttings the best chance to establish themselves before the cooler weather sets in.
Supplies You’ll Need
Gathering your supplies beforehand makes the whole process so much smoother. Here’s what I like to have on hand:
- Sharp, clean pruning shears or a razor blade: For making precise cuts.
- Rooting hormone: A powder or gel specifically for cuttings. It really gives them a boost!
- A well-draining potting mix: I usually use a blend of perlite and seed-starting mix, or a specialized cactus and succulent mix. The key is excellent drainage.
- Small pots or trays: With drainage holes, of course!
- A spray bottle: For misting.
- A clear plastic bag or dome: To create a humid environment for cuttings.
- Small stones or gravel: For drainage at the bottom of pots (optional, but helpful).
Propagation Methods
While Oxytropis foucaudii can be a bit shy about setting seed for us, stem cuttings are my go-to method. It’s reliable and gives you a good chance of success.
Stem Cuttings
- Take your cuttings: In late spring or early summer, select healthy, non-flowering stems from a mature plant. Using your clean shears or razor, make a clean cut just below a leaf node. You want cuttings that are about 2-4 inches long. Remove any lower leaves that would be below the soil line.
- Prepare the cuttings: Dip the cut end of each cutting into rooting hormone. Gently tap off any excess. We want just enough to coat the cut surface.
- Pot them up: Fill your small pots with your well-draining mix. Make a small pilot hole in the center of the soil with a pencil or stick. Insert the cutting into the hole, ensuring the leaf nodes are at or just below the surface. Gently firm the soil around the base of the cutting.
- Create humidity: Water the soil gently until it’s moist but not soggy. Then, cover the pots with a clear plastic bag or a propagation dome. This will trap moisture and create the humid environment those cuttings crave. Place them in a bright spot, but out of direct, harsh sunlight.
The “Secret Sauce” (Pro Tips)
Here are a few things I’ve learned over the years that seem to make all the difference:
- Avoid waterlogging at all costs: This is crucial. Oxytropis hate soggy feet. Overwatering is the fastest way to turn a hopeful cutting into a sad, mushy disaster. I always err on the side of slightly too dry rather than too wet.
- Bottom warmth is your friend: If you have a heated propagator or can place your pots on a heat mat, do it! This gentle bottom heat really encourages root development. It’s like giving those roots a cozy little incubator.
Aftercare & Troubleshooting
Once your cuttings are potted, the waiting game begins! Keep the soil consistently moist but never waterlogged. You can mist the leaves occasionally, especially if you’ve removed the plastic cover.
Signs of success? You’ll start to see new growth appearing at the tip of the cutting or even small leaves emerging from the nodes. This is a wonderful sign that roots have formed! Once I see about an inch of new growth, I know they’re ready to be cautiously transplanted into individual, slightly larger pots.
Troubleshooting: The most common issue is rot. If you see the cutting turning black and mushy, it’s usually a sign of too much moisture. There’s not much saving a rotted cutting, so prevention is key. If the leaves begin to wilt drastically and don’t perk up, they might be too dry, or the cutting simply hasn’t taken. Don’t be discouraged if some don’t make it – it’s part of the learning process.
A Encouraging Closing
Remember, gardening is a journey filled with learning and discovery. Don’t get discouraged if your first few attempts aren’t perfect. Be patient with your Oxytropis cuttings. They’re a little special, and they appreciate a bit of tender loving care. Enjoy the process, savor the quiet moments you spend with your plants, and celebrate every tiny bit of new growth! Happy propagating!
Resource:
https://identify.plantnet.org/k-world-flora/species/Oxytropis%20foucaudii%20Gillot/data