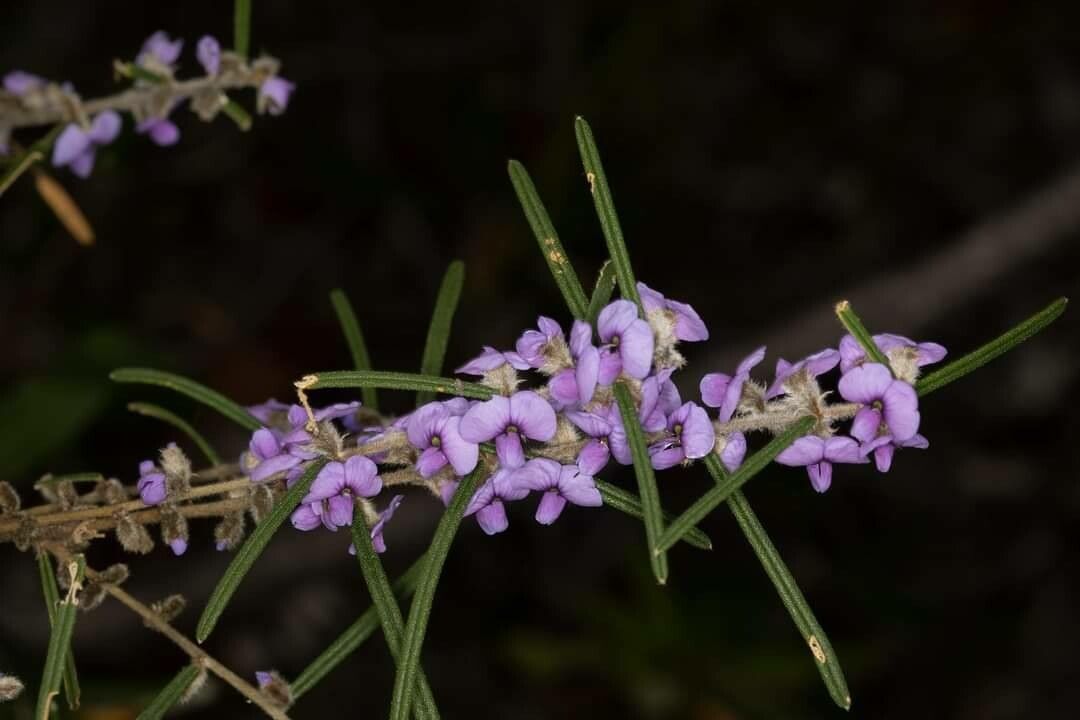
Hello garden friends! I’m so happy you’re here to talk about one of my favorite Australian native shrubs: Hovea longifolia. If you’ve ever seen this beauty with its lovely purple pea-like flowers gracing a garden, you know why it’s so special. It’s tough, generally low-maintenance once established, and those blooms are a real showstopper, especially in late winter and early spring. Propagating it yourself is incredibly satisfying. And the good news? For those of you just dipping your toes into the world of propagation, Hovea longifolia is quite forgiving. You can definitely succeed with this one!
The Best Time to Start
Timing is everything in gardening, and Hovea longifolia is no exception. The best time to take stem cuttings for propagation is usually in late spring or early summer. This is when the plant is actively growing, but the stems have started to firm up a bit. You’re looking for what we call “semi-hardwood” cuttings – they should be flexible enough to bend without snapping, but not so soft that they’re wilting easily. If you miss this window, don’t fret! You can sometimes have success with softwood cuttings taken a little earlier in spring, or even hardwood cuttings in winter, though these can be a bit slower to root.
Supplies You’ll Need
Gathering your supplies before you begin makes the whole process much smoother. Here’s what I like to have on hand:
- Sharp, clean pruning shears or secateurs: For making clean cuts.
- Rooting hormone: A powder or gel can really boost your success rates.
- Potting mix: I prefer a well-draining mix. A good blend is 50% perlite and 50% peat moss or coco coir. You can also buy specific seed-starting or cutting mixes.
- Small pots or trays: Clean, lidded propagation trays are excellent for maintaining humidity.
- A spray bottle: For misting.
- Labels and a permanent marker: Don’t forget to label your cuttings!
- Optional: A heat mat: This can significantly speed up rooting.
Propagation Methods
Let’s dive into how we’ll create new Hovea plants. Stem cuttings are my go-to method for this shrub.
Stem Cuttings:
- Select your parent plant: Choose a healthy, vigorous Hovea longifolia that’s free from pests and diseases.
- Take the cuttings: Using your clean secateurs, cut pieces of stem about 10-15 cm (4-6 inches) long. Make sure each cutting has at least two sets of leaves. Cut just below a leaf node (where a leaf attaches to the stem) – this is where a lot of the rooting hormones are concentrated.
- Prepare the cuttings: Gently remove the lower leaves, leaving just one or two sets at the top. This prevents them from rotting in the soil and reduces water loss. If your leaves are quite large, you can even cut them in half horizontally to further reduce transpiration.
- Apply rooting hormone: Dip the cut end of each stem into your rooting hormone powder or gel. Tap off any excess.
- Pot up your cuttings: Fill your small pots or propagation tray with your well-draining potting mix. Moisten the mix thoroughly but don’t make it soggy.
- Insert the cuttings: Make a small hole in the potting mix with a pencil or skewer. Insert the prepared cutting, ensuring the leaf node that was below the soil line is now buried. Gently firm the soil around the base of the cutting.
- Water and cover: Water gently again to settle the soil. If you’re using a propagation tray, close the lid. If not, you can cover the pots with a clear plastic bag, making sure the leaves don’t touch the plastic.
The “Secret Sauce” (Pro Tips)
Here are a few tricks I’ve learned over the years that can make a big difference:
- Humidity is key: These little cuttings are like delicate babies; they need a consistently humid environment to prevent them from drying out before they can form roots. My favorite trick is to place my pots inside a larger clear plastic bag, sealing it loosely at the top. This creates a mini-greenhouse. Just be sure to open the bag for a few minutes each day to air them out and prevent fungal growth.
- Bottom heat magic: Especially for semi-hardwood cuttings, providing gentle bottom heat can be a game-changer. A dedicated propagation heat mat, set to about 20-24°C (70-75°F), encourages root development much faster and more reliably. You can often find these online or at garden centers.
- Don’t be afraid to experiment: Sometimes, even with the best intentions, things don’t root. Don’t get discouraged! Try adjusting the time of year you take cuttings, the type of stem (softer versus firmer), or the rooting hormone you use. Every plant and every season is a little different.
Aftercare & Troubleshooting
Once your cuttings have been potted up, place them in a bright, indirect light location. Avoid direct sun, as it can scorch the young leaves. Keep the soil consistently moist but not waterlogged.
You’ll know your cuttings are starting to root when you see new leaf growth. This can take anywhere from four weeks to a couple of months, so patience is a virtue here! Once they have a decent amount of new growth and some resistance when gently tugged (if you dare to tug!), they’re ready to be gradually acclimatized to normal conditions before repotting into slightly larger pots.
The most common problem you’ll encounter is rot. This usually happens when the cuttings are kept too wet or have poor air circulation. If you see a cutting turn black and mushy, or the leaves start to wilt and fall off despite being in humid conditions, it’s likely rotting. Remove affected cuttings immediately to prevent spread. Ensure good drainage and air circulation for the remaining ones.
Happy Propagating!
Seeing a new plant emerge from a simple cutting is one of the most rewarding experiences in gardening. It connects you more deeply to the rhythm of nature and allows you to fill your garden, or share with friends, without always having to buy. Don’t be afraid to give it a go with Hovea longifolia. Be patient, keep an eye on your little charges, and enjoy the journey of watching them grow. You’ve got this!
Resource:
https://identify.plantnet.org/k-world-flora/species/Hovea%20longifolia%20R.Br./data