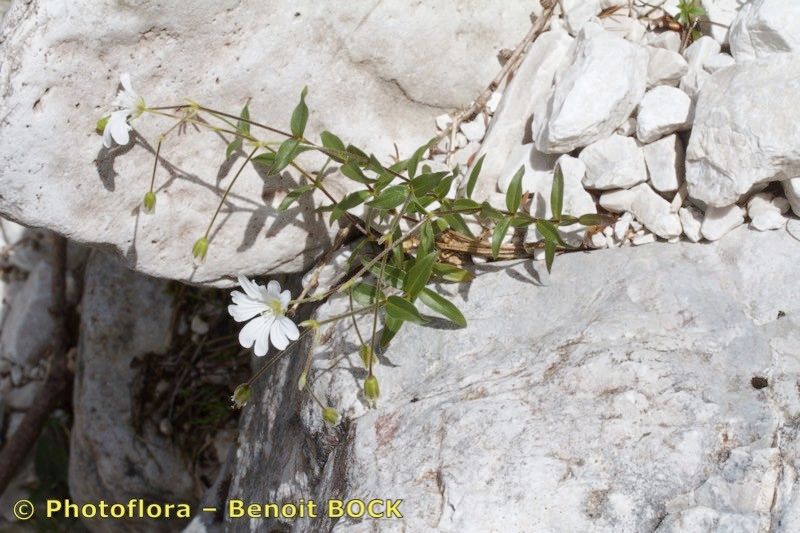
Hello my fellow green thumbs! It’s so lovely to have you here. Today, we’re diving into the wonderful world of Cerastium carinthiacum, or as many of us affectionately call it, Alpine Mouse-ear. If you love those charming carpets of tiny white flowers spilling over walls or rock gardens, you’re in for a treat. Propagating this little beauty is incredibly rewarding, and I’m excited to share my secrets with you.
Why Grow More Alpine Mouse-ear?
Honestly, who wouldn’t want more of that delicate charm? Its fuzzy gray-green foliage is attractive year-round, and those bursts of starry white flowers in late spring and early summer are just delightful. Having more means you can fill out those nooks and crannies, share with friends (the best kind of gardening gift!), or simply enjoy them in more places.
And the good news? For the most part, Cerastium carinthiacum is a very forgiving plant when it comes to propagation. Even if you’re just starting your plant journey, you’ll likely find success with this one. It’s a real confidence booster!
The Best Time to Start
For the highest chance of success, I always recommend late spring to early summer. This is when the plant is actively growing and has plenty of fresh, flexible stems to work with. You want to catch it when it’s putting on its best show, but before things get too woody or leggy.
Supplies You’ll Need
Gathering your tools beforehand makes the whole process smoother. Here’s what I typically have on hand:
- Clean, sharp pruning shears or scissors: A clean cut is crucial for preventing disease.
- A good quality potting mix: I prefer a well-draining mix, often a blend of peat moss, perlite, and a bit of compost. For Cerastium, think gritty and airy.
- Small pots or trays: Small nursery pots or even recycled yogurt cups with drainage holes work perfectly.
- Rooting hormone (optional but recommended): This can really give your cuttings a boost. Look for one specifically for stem cuttings.
- A mister or spray bottle: To keep cuttings hydrated.
- Clear plastic bags or propagation domes: To create a humid environment.
- Small trowel or dibber: For making holes in the soil.
Propagation Methods: Let’s Get Rooting!
The most straightforward and successful method for Cerastium carinthiacum is definitely stem cuttings. It’s quick and efficient!
Step-by-Step Stem Cuttings:
- Select Your Cuttings: Head out to your healthy, established plant. Look for non-flowering, leafy stems that are about 4-6 inches long. Gently bend a stem; if it snaps cleanly, it’s a good candidate. Avoid any woody or old stems.
- Make the Cut: Using your clean pruning shears, make a cut just below a leaf node (where a leaf attaches to the stem). This is where roots are most likely to form.
- Prepare the Cuttings: Gently strip off the lower leaves from the bottom half of the stem. You want to create a bare section that will be buried in the soil. If you’re using larger leaves, you can even pinch off about half of the remaining leaves on the top to reduce water loss.
- Apply Rooting Hormone (Optional): Dip the cut end of each stem into your rooting hormone powder or gel. Tap off any excess.
- Plant Your Cuttings: Fill your pots or trays with your prepared, moist potting mix. Use a trowel or dibber to make small holes in the soil, about 1-2 inches deep. Carefully insert the prepared cuttings into the holes, making sure the leaf nodes are below the soil surface. Gently firm the soil around them.
- Create a Humid Environment: Water the soil gently. Then, cover the pots with a clear plastic bag, a propagation dome, or even a cut-off plastic bottle. This traps humidity, which is vital for cuttings to develop roots before they dry out.
- Place in Bright, Indirect Light: Find a spot that gets plenty of light but no direct, scorching sun. A windowsill that only gets morning sun is often ideal.
The “Secret Sauce” (Pro Tips)
Here are a few little tricks that have served me well over the years:
- Don’t Let Leaves Touch the Water (if using water propagation): While stem cuttings are my go-to, some people try water propagation. If you do, make sure no leaves are submerged. They’ll just rot and contaminate the water, which is the opposite of what you want. I personally find soil propagation on this plant much more reliable.
- Bottom Heat is Your Friend: If you have a heat mat designed for seedlings, placing your pots on it can significantly speed up root development. It mimics the warmth of spring soil and really encourages those roots to take off. Just make sure the heat isn’t too intense.
- Mist, Don’t Drench: When you mist your cuttings, aim for the leaves and the air around them. You want to keep them hydrated, but you don’t want water sitting on the soil surface for too long, which can encourage rot.
Aftercare & Troubleshooting
Once your cuttings have been in their humid little domes for a few weeks, you can start to look for signs of life.
- Rooting: Gently tug on a cutting. If you feel resistance, congratulations, you have roots! You’ll know for sure when you see new leaf growth.
- Acclimation: Once roots have formed, it’s time to gradually introduce them to normal conditions. For the first week, remove the plastic bag or dome for just a few hours each day. Slowly increase the time until they are fully acclimated.
- Watering: Continue to water regularly, but allow the top inch of soil to dry out between waterings. They still need to be kept somewhat moist, but not waterlogged.
- Troubleshooting – Rot: The most common problem is rot. If you see stems turning black and mushy, it’s a sign of too much moisture and not enough air circulation. Unfortunately, rotted cuttings are usually a lost cause. Ensure your soil is well-draining and consider how much you’re misting.
A Little Patience, A Lot of Joy
Propagating plants is one of nature’s most beautiful lessons in patience. Don’t be discouraged if your first few tries aren’t perfect. Each attempt teaches you something new. Just keep a positive attitude, enjoy the process of nurturing these tiny bits of life, and soon you’ll have a little army of Alpine Mouse-ear to share and enjoy. Happy propagating!
Resource:
https://identify.plantnet.org/k-world-flora/species/Cerastium%20carinthiacum%20Vest/data