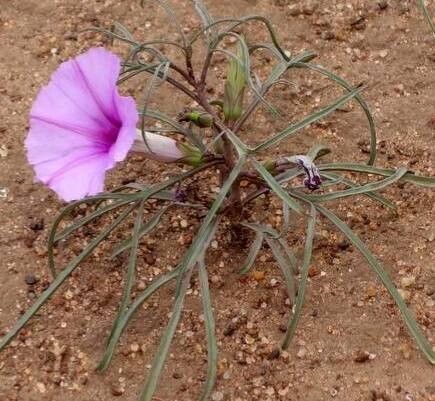
Oh, hello there! Come in, pull up a chair. I’ve got a fresh pot of coffee brewing, and I’m so excited to chat with you about one of my favorite plants: Ipomoea bolusiana. You might know it as a trailing or climbing morning glory, but this one has a special charm all its own with its delicate, almost starry blooms and lovely foliage.
Propagating your own Ipomoea bolusiana is a true delight. There’s something incredibly satisfying about nurturing a tiny cutting into a robust, flowering plant. And guess what? While it might have a fancy name, it’s actually quite a forgiving plant, making it a fantastic choice for beginners wanting to dip their toes into propagation. You’ll be rewarded with more of this beauty to share or simply enjoy in different spots in your garden.
The Best Time to Start
For the absolute best success rate with your Ipomoea bolusiana, I always recommend starting in the late spring or early summer. This is when the plant is in its active growing phase. Younger, vigorous stems, often referred to as softwood or semi-hardwood cuttings, root most readily during this time. You’re essentially tapping into the plant’s natural energy surge.
Supplies You’ll Need
To get started on your propagation adventure, you’ll want to gather a few items. Don’t worry, it’s nothing too complicated!
- Sharp Pruning Shears or a Clean Knife: For making clean cuts.
- Rooting Hormone (Optional but Recommended): This little powder or gel can significantly speed up root formation. I like to use a powdered one.
- Small Pots or Seed Starting Trays: Clean ones, of course! About 3-4 inches in size are perfect.
- Well-Draining Potting Mix: A good mix is key. I often use a blend of equal parts perlite and peat moss, or a light seed-starting mix. Avoid heavy garden soil.
- Plastic Bags or a Clear Dome: To create a humid environment for your cuttings.
- Watering Can or Spray Bottle: For gentle watering.
- Labels: To keep track of your cuttings, especially if you’re trying different methods.
Propagation Methods
Ipomoea bolusiana is wonderfully amenable to a couple of propagation techniques. Let’s explore the easiest ones.
Stem Cuttings: The Most Reliable Way
This is my go-to method for Ipomoea bolusiana. It’s straightforward and yields fantastic results.
- Take Your Cuttings: On a bright, morning day, select healthy, non-flowering stems from a mature plant. You’re looking for stems that are flexible but not woody – think pencil-thickness. Cut a piece that’s about 4-6 inches long. Make your cut just below a leaf node (where a leaf attaches to the stem).
- Prepare the Cuttings: Gently remove the leaves from the lower half of the cutting. You want to expose at least two leaf nodes. If there are any flower buds, pinch them off. This encourages the plant to focus its energy on root development, not flower production.
- Apply Rooting Hormone: Dip the cut end of each stem into your rooting hormone. Tap off any excess. If you’re not using rooting hormone, don’t fret, it will still likely root, just perhaps a little slower.
- Plant Them Up: Fill your pots or trays with your prepared potting mix. Make a small hole in the center of each pot with your finger or a pencil. Insert the cut end of the cutting into the hole, ensuring at least one or two leaf nodes are buried in the soil. Gently firm the soil around the base of the cutting.
- Water and Cover: Water the soil thoroughly but gently. You can use a watering can with a rose attachment or a spray bottle. Now, cover the pot with a clear plastic bag or a propagator lid. This creates a mini-greenhouse, keeping humidity high, which is crucial for cuttings.
Water Propagation: A Satisfying Visual
This method is incredibly rewarding because you can see the roots developing!
- Take Similar Cuttings: Follow steps 1 and 2 for stem cuttings above.
- Place in Water: Select a clean jar or glass. Fill it with fresh, clean water. Place your cuttings in the water, ensuring only the lower leaf nodes are submerged. Remove any leaves that would be below the waterline.
- Find a Bright Spot: Place the jar in a bright location, but out of direct, harsh sunlight.
- Change Water Regularly: This is key! Change the water every 2-3 days to keep it fresh and prevent bacterial growth. You’ll start to see tiny roots emerge from the nodes within a couple of weeks. Once the roots are about an inch long, you can pot them up into soil following step 4 in the stem cutting method.
The “Secret Sauce” (Pro Tips)
Here are a few little tricks I’ve picked up over the years that really make a difference:
- Don’t Let the Leaves Touch the Water: In water propagation, any leaves submerged in the water will rot, potentially sickening the whole cutting. Keep those leaves up and out of the water.
- Bottom Heat is Your Friend: If you have access to a heat mat for seedlings, use it! Placing your pots on a gentle heat source can dramatically speed up root development. It mimics the warmth of spring soil.
- Be Patient with Drainage: When using soil, if you notice water pooling on the surface after watering, your mix might be too dense. Adding more perlite next time will help with aeration and prevent that dreaded soggy bottom.
Aftercare & Troubleshooting
Once you see those first signs of new growth—little leaves unfurling or roots peeking through the drainage holes—it’s time for a slight shift in care.
- Acclimatize: Gradually reduce the humidity by opening the plastic bag or lid a little more each day over a week. This helps your new plant adjust to drier air.
- Watering: Water when the top inch of soil feels dry to the touch. Don’t overwater; consistent moisture is good, but soggy soil is the enemy.
- Light: Move your newly rooted plants to a spot with bright, indirect light. As they grow stronger, you can gradually introduce them to more direct sunlight, but avoid scorching them.
Now, garden friends, what if things don’t go as planned? The most common issue is rot, often caused by overwatering or poor air circulation. If you see your cuttings looking limp, mushy, or dark at the base, it’s likely rot. Unfortunately, once rot sets in, it’s usually game over. The best approach is prevention: use well-draining soil, don’t overwater, and ensure good air circulation. Sometimes, a cutting just doesn’t take, and that’s okay! Don’t get discouraged. It happens to all of us.
A Little Encouragement to Finish
So there you have it! Propagating Ipomoea bolusiana is a wonderfully rewarding and surprisingly simple process. Be patient with your little cuttings. Gardening is a journey of observation and learning. Enjoy the small victories, and even if a few don’t make it, learn from the experience and try again. Happy propagating!
Resource:
https://identify.plantnet.org/k-world-flora/species/Ipomoea%20bolusiana%20Schinz/data