Oh, hello there! Come on in, grab a cuppa. Today, we’re diving into one of my absolute favorite subjects: coaxing new life from our beloved plants. And I’ve got a real treat for you – propagating Conophytum halenbergense.
The Allure of Tiny Treasures
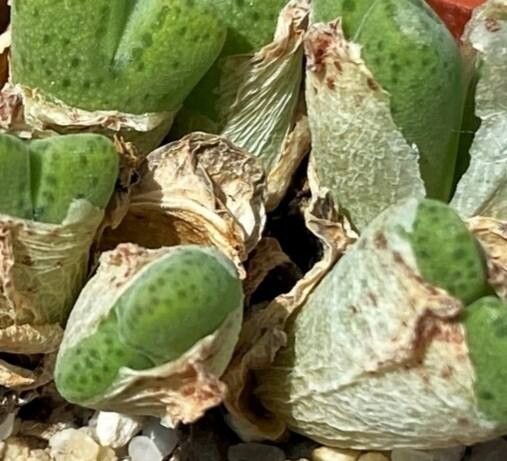
Conophytum halenbergense are just these utterly charming, plump little succulents, often forming clusters that look like tiny, smooth pebbles. They come in an amazing array of colors and patterns, and growing them from scratch is such a thrill. Witnessing those tiny new bodies emerge is deeply rewarding, almost like discovering a secret. Now, for beginners, I’d say Conophytum can be a tad bit challenging to keep perfectly happy, but propagating them? That’s actually quite accessible once you get the hang of it, and it’s a fantastic way to build your confidence and your collection!
When to Get Your Hands Dirty
The sweet spot for propagating Conophytum halenbergense is during their active growing season. For most of us, this means spring and early summer. You’ll see them starting to plump up, putting on new growth, and looking generally vigorous. Trying it when they’re dormant in the heat of summer or the chill of winter is just asking for disappointment.
Your Propagation Toolkit
Here’s what you’ll want to have on hand:
- A very well-draining potting mix. I usually lean towards a gritty cactus mix, often with a good dose of perlite or pumice. Think something that dries out quickly.
- A clean, sharp knife or pruning shears. Sterilize them with rubbing alcohol between cuts!
- A small spray bottle for misting.
- Rooting hormone (optional, but can give a little boost). I don’t always use it with these guys, but it doesn’t hurt.
- Small pots or seed trays with drainage holes.
- A clear plastic bag or a propagation lid to create a humid microclimate.
- And of course, your healthy parent Conophytum plant!
Bringing New Life Forth: Division is Key
For Conophytum halenbergense, the most straightforward and successful method is division. These plants naturally form clumps, and separating them is like gently parting a cluster of friends.
- Wait for the right time: As mentioned, spring is ideal. You’ll see the plant looking robust.
- Gently extract: Carefully slide the parent plant out of its pot. You might need to tap the pot firmly.
- Inspect the roots: Gently tease away some of the old soil. You want to see where the individual bodies (or “heads”) are attached. You’re looking for natural breaks.
- Make the cut: Using your sterilized knife or shears, carefully separate a clump of one or two “heads” with some attached roots. You’re not ripping them apart; you’re looking for a clean break that has some root structure already. If a piece doesn’t have many roots, that’s okay too – we can handle that!
- Let them callous: This is crucial! Place your separated pieces on a clean surface (a paper towel works well) in a dry, shaded spot for 2-3 days. This allows any cuts to callous over, preventing rot when they go into soil.
- Pot them up: Fill your small pots with your gritty mix. Gently press the calloused ends of your divisions into the new soil. They don’t need to be buried deeply, just stable enough to stand.
My Little “Secret Sauce” (Insider Tips)
I’ve learned a few tricks over the years that really can make a difference with these little gems.
- Don’t overwater, ever! This is my cardinal rule for all succulents, but especially for Conophytum. After potting, I typically wait at least a week before giving them their first light misting. You want them to start reaching for moisture, not have it readily available.
- Bottom heat is your friend. If you have a seedling heat mat, popping your pots on it can speed up root development significantly. Just make sure it’s on a low setting. It mimics that cozy, root-sending environment.
- A gentle mist is better than a deluge. When you do start watering, use your spray bottle and mist the soil lightly around the base of the plant. Avoid getting water directly on the bodies of the Conophytum, as this can encourage rot.
Aftercare and What to Watch For
Once your little babies are in their new homes, patience is key.
- Initial Watering: As I mentioned, be very conservative. After the initial week without water, give them a light misting every few days. As they start to root (you might see a slight plumping or even tiny new growth), you can increase the frequency slightly, but always let the soil dry out between waterings. They should show signs of rooting within 2-4 weeks.
- Light: Place them in a bright location, but out of direct, scorching sun. A windowsill that gets morning sun is often perfect.
- Ventilation: Good airflow is important. Don’t seal them up too tightly in their humidity dome permanently. Open it up for a few hours each day to let fresh air circulate.
Now, what about when things go wrong? The biggest culprit is rot. If you see a Conophytum body turning mushy, translucent, or developing dark spots, it’s likely rot. This usually means too much moisture and not enough airflow. Sadly, if rot sets in deeply, it’s often irreversible. The best defense is prevention: excellent drainage, careful watering, and good ventilation. If you catch it very early, you might be able to cut away the affected part and let the healthy bits callous and try again, but this is a long shot.
Go Forth and Grow!
Propagating Conophytum halenbergense is a wonderfully rewarding endeavor. It takes a little attention to detail, a touch of patience, and a watchful eye, but the joy of seeing those tiny treasures establish themselves is truly something special. Don’t be afraid to get your hands (a little) dirty. Enjoy the process, and happy growing!
Resource: