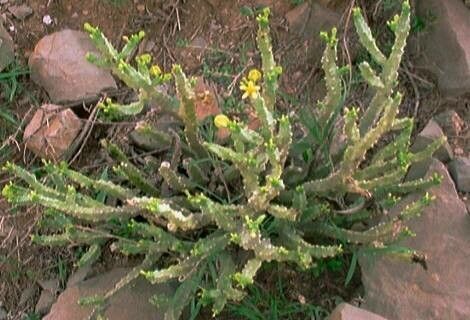
Hello, fellow plant enthusiasts! It’s so good to chat with you today about one of my absolute favorite curiosities: Monolluma quadrangula. If you’re looking for a plant that’s a little bit unusual but incredibly rewarding, you’ve found it. With its architectural, four-sided stems and fascinating, star-shaped flowers that often pop out unexpectedly, this succulent brings a unique charm to any collection.
Propagating Monolluma quadrangula is a fantastic way to share its beauty, save money, or simply expand your own green kingdom. Don’t be intimidated; while it has a few quirks, it’s not an impossible plant to propagate, even for those relatively new to the world of succulents. With a little patience and the right approach, you’ll be well on your way to success!
The Best Time to Start
The absolute sweet spot for propagating Monolluma quadrangula, like most succulents, is during its active growing season. For this plant, that generally means from late spring through summer. You want to start when the plant is vibrant and energized, meaning it will have more reserves to put into developing new roots. Avoid trying to propagate during its dormant period in winter, as it’s less likely to take and more prone to rot.
Supplies You’ll Need
Alright, let’s gather our tools. You won’t need a huge arsenal, but having the right bits and bobs makes a world of difference.
- Sharp, clean pruning shears or a sharp knife: For making clean cuts. Sterilize them with rubbing alcohol to prevent disease.
- A well-draining potting mix: Essential! A cactus and succulent mix is perfect. You can also make your own by mixing potting soil with perlite or pumice (about 50/50).
- Pots or propagation trays: Terracotta pots are my go-to because they breathe well. Small nursery pots or even repurposed containers work too, as long as they have drainage holes.
- Rooting hormone (optional but recommended): This isn’t strictly necessary for Monolluma, but it can give your cuttings a helpful boost. Look for one specifically for succulents.
- Gloves (optional): If you have sensitive skin or just prefer to keep your hands clean.
- A watering can or spray bottle: For providing just the right amount of moisture.
Propagation Methods
Monolluma quadrangula is wonderfully versatile, and the easiest way to get new plants is by taking stem cuttings. It’s straightforward and usually yields great results.
Stem Cuttings:
- Select a healthy stem: Look for a mature, firm stem on your parent plant. You want a piece that’s at least a few inches long.
- Make the cut: Using your sterilized pruning shears or knife, make a clean cut just above a node (where a leaf or branch emerges). Try to make the cut as clean and smooth as possible; a jagged cut is more prone to rot.
- Remove lower leaves: Gently pull off any leaves from the bottom two inches or so of the cutting. This exposes the area where roots will form and prevents leaves from rotting if they touch the soil.
- Allow to callus: This is a critical step! Place your cuttings in a dry, well-ventilated spot out of direct sunlight for 2-7 days. You’re looking for the cut end to dry and form a callus – a protective skin. This prevents rot when you plant them. Don’t rush this!
- Plant your cuttings: Once callused, you can plant the cuttings. Dip the callused end in rooting hormone, if using. Then, gently insert the bottom inch or two of the cutting into your prepared, slightly moist potting mix. You can place several cuttings in one pot, as long as they aren’t touching each other too much.
Water Propagation (Another option but requires more care):
If you’re feeling adventurous and want to watch the roots develop, you can try water propagation.
- Prepare cuttings: Follow steps 1-3 above, making sure the stem is clean.
- Place in water: Put the cuttings in a clean jar or vase of water, ensuring only the callused end touches the water. Crucially, do not let the leaves dip into the water, as this is a sure-fire way to invite rot.
- Change water regularly: Change the water every few days to keep it fresh and prevent bacterial growth.
- Watch for roots: You’ll start to see tiny roots emerging in a few weeks. Once the roots are about an inch long, carefully transplant them into your well-draining soil mix.
The “Secret Sauce” (Pro Tips)
There are a few little tricks I’ve learned over the years that make propagating succulents a bit more foolproof.
- Bottom Heat is Your Friend: For cuttings, especially those you’ve planted in soil, a little warmth from below can work wonders. A gentle heat mat placed under your pots can significantly speed up root development. Keep the temperature around 70-75°F (21-24°C).
- Don’t Overwater, Especially at First: This is probably the most common mistake. Succulents are built to store water. When you’ve just planted a cutting, it doesn’t have roots to absorb much moisture. Water sparingly only when the soil is completely dry. A light misting every few days is often enough initially.
- Airflow, Airflow, Airflow! Good circulation is key to preventing fungal diseases and rot. Make sure your propagation area has plenty of fresh air. If you’ve covered your pots with a plastic dome for humidity (which is less common for Monolluma, but possible), lift it daily for a few hours to let things breathe.
Aftercare & Troubleshooting
Once you see roots forming – congratulations! Now, the real nurturing begins.
- When Roots Appear: If you see roots poking out of the drainage holes or the cutting feels firm and shows new growth, it’s ready for a bit more water. Continue to water only when the soil is dry. Gradually introduce it to brighter, indirect light. Eventually, you can move it to its permanent spot, acclimating it slowly to more direct sun if it’s a sun-loving variety.
- Troubleshooting Rot: The biggest enemy is rot. If your cutting turns mushy, black, or smells foul, it’s likely rotted. Unfortunately, rotted cuttings usually can’t be saved. The best approach is to isolate the affected plant and discard it to prevent it from spreading. Always examine your parent plant and new cuttings for any signs of pests or disease before starting.
- No Roots? Be Patient! Sometimes, it just takes time. If you’ve followed the steps, the cutting is firm, and there’s no sign of rot, give it a few more weeks. Some plants are just slow growers, and that’s okay!
A Gentle Encouragement
Propagating Monolluma quadrangula is a journey, not a race. Enjoy the process of watching these little beauties unfurl their roots and grow into their own unique forms. Be patient with yourself and your new plant babies. Each success, and even each learning experience, adds to your own green-thumb wisdom. Happy propagating!
Resource: