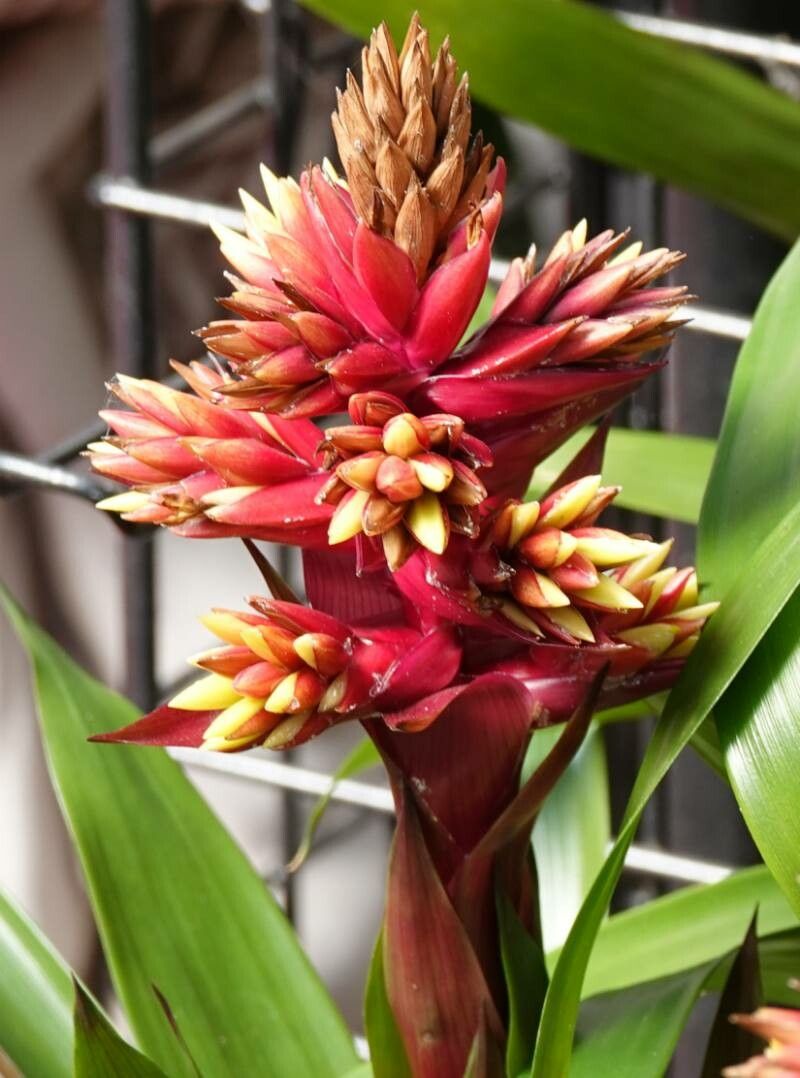
Oh, Guzmania scherzeriana! What a beauty. Those vibrant bracts, often a fiery red or brilliant orange, really add a tropical punch to any space. And the way they sit, almost like little chalices, is just so charming. If you’ve ever admired one at your local nursery or admired a friend’s flourishing specimen, you might be wondering if you can do it yourself. The good news is, yes you can! And propagating these beauties is wonderfully rewarding. For beginners, I’d say it’s moderately easy, but with a little patience and the right approach, you’ll be well on your way to success.
The Best Time to Start
Timing is everything, isn’t it? For Guzmania scherzeriana, the best time to propagate is when the mother plant is actively growing. This typically means spring and early summer. You’ll often find the perfect opportunities arise shortly after the main flowering period has passed. This is when the plant is putting its energy into producing new growth, including those little pups you’ll be looking for.
Supplies You’ll Need
Gathering your tools beforehand makes the whole process much smoother. Here’s what I always have on hand:
- Sharp Pruning Shears or a Clean Knife: For making clean cuts. Sterilize them with rubbing alcohol before you start!
- Well-Draining Potting Mix: A good blend would be equal parts peat moss or coco coir, perlite, and orchid bark. This mimics their natural epiphytic environment.
- Small Pots or Containers: These can be anything from old yogurt cups (with drainage holes poked in!) to small nursery pots.
- Rooting Hormone (Optional but Recommended): This can give your pups a little boost. Look for one formulated for houseplants or bromeliads.
- Spray Bottle: For gently misting.
- Plastic Bag or Propagator: To create a humid environment.
Propagation Methods
Guzmania scherzeriana primarily propagates through offsets, or “pups,” that grow from the base of the parent plant. This is the most reliable and easiest method.
Dividing Offsets:
- Inspect the Mother Plant: Gently look around the base of your mature Guzmania. You’re searching for smaller, baby plants that have started to emerge from the soil or from between the leaves of the parent. These pups will ideally have their own little root system starting to form.
- Gently Loosen the Soil: If the pups are still deeply embedded, carefully loosen the soil around them with your fingers or a small trowel.
- Isolate the Pup: Once you can see the connection point between the parent and the pup, use your sterilized pruning shears or knife to make a clean cut. Try to get as much of the pup’s base, including any nascent roots, as possible.
- Allow to Callus: This is a crucial step! After you’ve separated the pup, let it sit on a dry paper towel or newspaper in a well-ventilated spot for 24-48 hours. This allows the cut end to callus over, which helps prevent rot when you pot it up.
- Potting Up: Fill your small pots with your prepared, well-draining potting mix. Make a small indentation in the center and place the callused pup in it. Gently firm the soil around the base.
- Initial Watering: Water the soil lightly, just enough to settle it. Don’t drench it.
- Create Humidity: Cover the pot with a plastic bag or place it in a propagator. This will help keep the humidity high, which is essential for young plants. Ensure the bag doesn’t touch the leaves too much. You can prop it up with small sticks.
The “Secret Sauce” (Pro Tips)
Here are a few things I’ve learned over the years that can really make a difference:
- Don’t Let Water Sit in the “Cup”: Similar to the mature plant, avoid letting water collect in the little rosette of a new pup, especially in the first few weeks. This can lead to rot very quickly. Mist the leaves if you feel they are drying out, but keep the base of the plant relatively dry.
- Bottom Heat is Your Friend: If you can, place your potted pups on a heat mat set to a gentle warmth (around 70-75°F or 21-24°C). This encourages root development and really speeds things up. It mimics the warm tropical environment they love.
- Patience with Pups: Sometimes, a pup might look a bit sad for a while. Don’t give up too soon! They can take their time to establish. As long as the leaves are still firm and not mushy, there’s hope.
Aftercare & Troubleshooting
Once you see signs of new growth – usually little leaves emerging or a bit more firmness to the existing ones – you know your pup is settling in.
- Gradual Acclimation: Slowly introduce your new plant to brighter light over a week or two. Start by removing the plastic bag for increasing periods each day.
- Watering: Once it’s more established, water when the top inch of soil feels dry. Remember, they don’t like soggy feet!
- Fertilizing: Wait a few months before you even think about fertilizing. Then, use a diluted liquid fertilizer specifically for houseplants or bromeliads, very sparingly.
The most common problem you’ll encounter is rot. This usually happens if the plant is kept too wet, doesn’t have enough air circulation, or if the cut end wasn’t allowed to callus properly. Signs of rot include mushy, brown leaves and a general wilting that doesn’t improve with watering. If you spot rot, sadly, it’s usually too late to save that particular pup.
A Encouraging Closing
Propagating your Guzmania scherzeriana is such a rewarding journey. It’s a chance to multiply the beauty you enjoy and to gain a deeper understanding of how these fascinating plants grow. Be patient with your new little ones. Some might take off immediately, others might be a bit slower to show their true colors. But with this guidance, and a little bit of your gardener’s intuition, you’ll soon have a whole collection of these stunning bromeliads to share and enjoy. Happy propagating!
Resource:
https://identify.plantnet.org/k-world-flora/species/Guzmania%20scherzeriana%20Mez/data