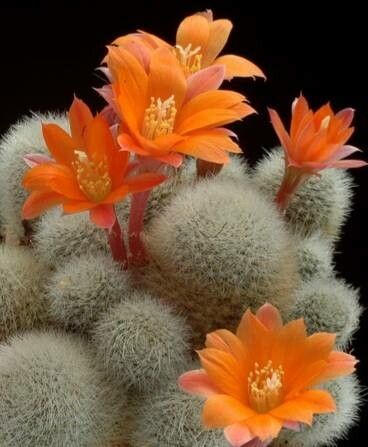
Hello, fellow plant lovers! Today, we’re diving into the delightful world of Aylostera hoffmannii, a miniature marvel that’s been stealing hearts in the succulent community. With its charming offsets and vibrant blooms, it’s like having a tiny, festive bouquet right on your windowsill. If you’ve ever admired a friend’s thriving Aylostera or spotted one at the nursery and thought, “How can I get more of that?”, you’re in the right place. Propagating these little guys is incredibly rewarding, and I’m happy to tell you, they’re quite forgiving. Even if you’re new to the succulent scene, you’ll find this process wonderfully accessible.
The Best Time to Start
For the absolute best results, try to propagate your Aylostera hoffmannii during its active growing season. This typically falls in the spring and summer months. You’ll notice the plant is producing new growth, and any pups or offsets will be plump and readily available. Starting when the plant is energized means quicker root development and a higher chance of success. Avoid propagating in the dead of winter when everything is essentially taking a nap.
Supplies You’ll Need
Before we get our hands dirty, let’s gather our tools. Think of this as preparing your artist’s palette!
- Sharp, clean pruners or a sharpened knife: A clean cut prevents disease.
- Cactus and succulent potting mix: This is key for good drainage. I usually like to mix in a bit of extra perlite or pumice for aeration.
- Small pots or propagation trays: Anything that can hold your new cuttings and some soil will do. Ensure they have drainage holes!
- Rooting hormone (optional, but helpful): A little boost can speed things up.
- Spray bottle: For gentle watering.
- Gloves (optional): Succulents can sometimes be a bit pokey!
Propagation Methods: Growing Your Own Tiny Treasures
Aylostera hoffmannii is a champion at producing offsets, often called ‘pups’, which makes propagation a breeze. This is my favorite method and usually the most successful.
Method 1: Offset (Pup) Removal
- Assess your plant: Gently examine your mature Aylostera. You’ll see smaller plantlets emerging from the base or sides of the mother plant. These are your babies!
- Gently detach: Using your clean pruners or knife, carefully cut or twist off an offset that has at least one root or looks substantial enough on its own. If it has a small root already attached, that’s a wonderful head start! If not, don’t fret, it will grow one.
- Let it callous: This is crucial! Place the removed offset in a dry, well-ventilated spot away from direct sunlight for 2 to 5 days. You want the cut end to dry over and form a protective callus. This prevents rot when it hits the soil.
- Plant it up: Fill your small pots with your well-draining cactus and succulent mix. Make a small hole in the center and gently insert the calloused end of the offset. You can use a bit of rooting hormone at this stage if you choose, dipping the cut end into the powder before planting.
- Water sparingly: Do not water immediately. Wait a few more days after planting, then give it a very light watering. The goal is to encourage roots to seek out moisture, not to drown the new cutting.
Method 2: Stem Cuttings (Less Common for Aylostera, but Possible)
Occasionally, you might have a long stem that you want to shorten. You can use sections of that too!
- Take a cutting: Using your clean pruners, cut a section of stem that is at least 2-3 inches long. Make sure it has a few leaves.
- Repeat steps 2-5 from Offset Removal above: Allow the cutting to callous thoroughly, then plant it in your prepared soil and water sparingly. This method might take a little longer to root compared to offsets.
The “Secret Sauce”: Pro Tips from My Garden
Here are a few little tricks I’ve picked up over the years that really make a difference:
- Don’t rush the watering: It’s so tempting to give your new propagations a good soak right away, but resist the urge! Overwatering at this fragile stage is the fastest way to invite rot. Wait until you see some signs of new growth or feel resistance when you gently tug on the cutting.
- Bottom heat is your friend: If you’re propagating during cooler spring or very early summer days, consider placing your pots on a gentle heat mat. Propagating succulents indoors can sometimes mean cooler soil temperatures. A little warmth from below can significantly speed up root development.
- Buddy up your cuttings: When planting multiple cuttings in one pot or tray, don’t be afraid to plant them close together. They can actually benefit from the slightly increased humidity and protection they offer each other.
Aftercare & Troubleshooting
Once you notice new growth, like tiny leaves unfurling or a slightly firmer feel when you gently tug, you know roots are forming!
- Gradual introduction to light: Move your new plants into brighter light gradually. Direct, intense sun can scorch delicate new growth. A bright, indirect light is perfect.
- Watering schedule: As they establish, you can start watering more regularly, but always let the soil dry out completely between waterings. This is the golden rule for all succulents.
- Watch for rot: The most common sign of trouble is a mushy, black base or leaves that turn translucent and limp. This usually indicates overwatering or a poorly draining soil mix. If you spot rot, you might be able to salvage a healthy part of the cutting by cutting away the rot and re-propagating the healthy section after it callouses.
Keep Growing!
Now you have the roadmap to creating your own little army of Aylostera hoffmannii! Remember, gardening is a journey of patience and observation. Not every cutting will thrive, and that’s okay. Celebrate the successes, learn from the challenges, and most importantly, enjoy the process of watching these tiny wonders grow. Happy propagating!
Resource: