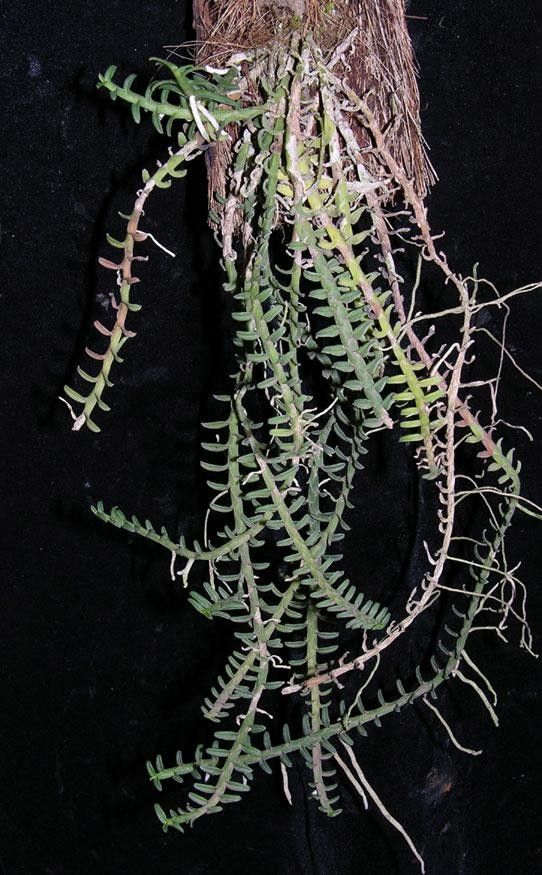
Oh, Dichaea squarrosa! If you’ve ever fallen for those wonderfully arching, almost architectural stems, teeming with those charming, waxy flowers, then you’re in for a treat. Propagating this gem is one of the most satisfying ways to fill your space with its unique beauty. While it might seem a tad intimidating at first glance, trust me, with a little guidance, you’ll be well on your way to multiplying your collection. For a beginner, it’s a moderately challenging but very achievable project.
The Best Time to Start
The sweet spot for propagating Dichaea squarrosa is definitely during its active growing season. Think of late spring or early summer. This is when the plant has the most energy to put into creating new roots. You’ll see vigorous new growth, and that’s exactly what we want to harness.
Supplies You’ll Need
To get your little Dichaea babies started, make sure you have these on hand:
- Sharp, clean pruning shears or a keen knife: A clean cut is crucial to prevent disease.
- Well-draining potting mix: I love a mix of orchid bark, perlite, and a touch of sphagnum moss. This allows for good air circulation and prevents soggy roots.
- Small pots or seedling trays: These don’t need to be large; just enough to house your new cuttings.
- Rooting hormone (optional but helpful): This can give your cuttings an extra boost.
- Watering can or spray bottle: For gentle watering.
- Plastic bags or a propagation dome: To create a humid environment.
Propagation Methods
Let’s get our hands dirty! For Dichaea squarrosa, stem cuttings are my go-to method.
- Select a healthy stem: Look for a stem that is firm, mature, and has at least two or three nodes (the little bumps where leaves emerge). Avoid any that look soft or diseased.
- Make the cut: Using your clean shears or knife, make a clean cut just below a node. You want to aim for cuttings that are about 4-6 inches long.
- Prepare the cutting: Gently remove the lower leaves, exposing at least one or two nodes. If you’re using rooting hormone, dip the cut end into it; just tap off any excess.
- Potting up: Fill your small pots with your well-draining mix. Make a small hole with your finger or a pencil in the center.
- Plant the cutting: Insert the prepared cutting into the hole, making sure the nodes are buried in the mix. Gently firm the mix around the base of the cutting.
- Create humidity: Water the mix gently. Then, cover the pot with a clear plastic bag, or place it in a propagation dome. This traps moisture and mimics the humid environment your cutting craves.
The “Secret Sauce” (Pro Tips)
Here are a few things I’ve learned over the years that really make a difference:
- Keep those nodes submerged: When you pot your cuttings, ensure the nodes that you removed leaves from are buried in the potting mix. This is where the magic happens – roots will emerge from these nodes.
- Don’t let the leaves touch the water: If you happen to be trying water propagation (though I find it less successful for Dichaea), make absolutely sure that no leaves are submerged. Any wet leaf will quickly turn mushy and lead to rot. It’s a surefire way to lose your cutting.
- Bottom heat is your friend: If you have a seedling heat mat, placing your pots on it can significantly speed up the rooting process. It provides that gentle warmth from below that encourages root development.
Aftercare & Troubleshooting
Once your cuttings are potted, place them in a bright spot, but out of direct sunlight. Keep the potting mix consistently moist but not waterlogged. Mist the leaves occasionally, especially if the air is dry.
You’ll start to see new growth appearing from the tip of the cutting after a few weeks. This is a great sign! Roots should also form. Gently tugging on the cutting – if there’s resistance, you have roots!
The most common issue you might encounter is rot. This usually happens if the mix is too wet or the humidity is too high without enough air circulation. If you see yellowing leaves that then turn mushy and black, or the base of the stem becomes soft and dark, it’s a sign of rot. Unfortunately, there’s not much you can do once rot sets in, so prevention with good drainage and airflow is key.
A Encouraging Closing
Propagating plants is a journey, and Dichaea squarrosa is a wonderful companion for that journey. Be patient with your new cuttings; they take their time. Celebrate every little sign of progress, from a tiny new leaf to a bit of resistance when you gently tug. Enjoy the process, and soon you’ll have more of this delightful plant to share, or just to admire yourself! Happy growing!
Resource:
https://identify.plantnet.org/k-world-flora/species/Dichaea%20squarrosa%20Lindl./data