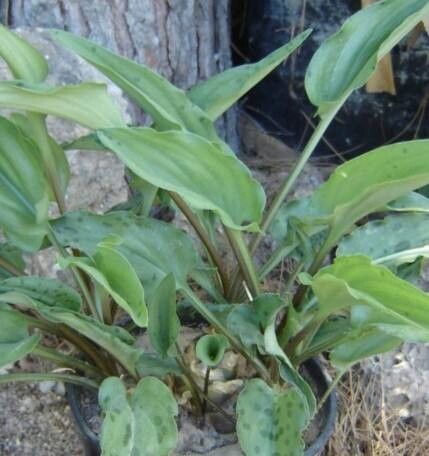
Oh, hello there! Pull up a chair, let’s talk plants. Today, I want to introduce you to a truly delightful little gem: Drimiopsis maculata, often called the polka dot plant or little white soldier. If you’re looking for a houseplant with a little something extra, this is it. Its lovely, dark green leaves are splashed with delicate, translucent white spots, almost like they’ve been artfully splattered with paint. They unfurl from the most charming bulb, and watching them grow is a real joy.
And the best part? You can easily make more of these beauties! Propagating Drimiopsis maculata is a wonderfully rewarding experience, and I’m genuinely thrilled to share my tricks with you. For beginners, this is an excellent plant to start with. It’s quite forgiving, and the satisfaction of seeing a tiny new bulb sprout from your efforts is just… chef’s kiss!
The Best Time to Start
When it comes to coaxing new life from your plants, timing is everything, isn’t it? For Drimiopsis maculata, your happiest propagation moment will be during its active growing season. Think spring and summer. You’ll often find it throwing out new pups or offsets from the main bulb then. This is when the plant has the most energy to put into developing new roots and shoots. Trying to propagate when the plant is resting, say in the dead of winter, can be a bit of an uphill battle.
Supplies You’ll Need
Don’t worry, you don’t need a whole laboratory for this! Just a few simple things will set you up for success:
- Clean, sharp pruning shears or a knife: For making clean cuts.
- A well-draining potting mix: I like a blend of potting soil with added perlite or coarse sand for good aeration. You can even use a cactus/succulent mix, as these bulbs appreciate drying out a bit.
- Small pots or containers: Terracotta pots are lovely because they breathe. Make sure they have drainage holes!
- Rooting hormone (optional but helpful): A powdered or gel form can give your cuttings a little boost.
- Water: For misting or for water propagation.
- Gloves: If you have sensitive skin, it’s always a good idea.
Propagation Methods
Drimiopsis maculata is a trooper, and happily, it’s quite amenable to a few different propagation methods. Let’s dive in!
Division (The Easiest Way!)
This is my absolute favorite method because it’s so straightforward and yields almost immediate results. Your Drimiopsis maculata will naturally produce offsets or “pups” which are essentially miniature versions of the parent plant growing alongside it from the bulb.
- Gently remove the plant from its pot. Try to do this when the soil is slightly dry, as it makes it easier to loosen.
- Carefully brush away excess soil from around the base of the bulb. You’ll see the smaller pups clustered around the main bulb.
- Identify a pup with its own roots. If you can gently wiggle one and feel resistance that suggests it has roots attached, you’re golden.
- Using your clean shears or knife, carefully cut the pup away from the parent bulb. Try to make a clean separation. If a pup doesn’t have obvious roots, don’t fret! It can still root on its own.
- Pot up the new pups. Plant each one in its own small pot filled with your well-draining mix. Plant them so the top of the bulb is just at or slightly above the soil surface.
- Water lightly after potting.
Stem Cuttings (Slightly More Advanced, but Rewarding!)
This method involves taking a piece of the stem and encouraging it to root. It’s a bit more involved but can be incredibly satisfying.
- Select a healthy stem. Look for a vigorous stem that has at least one or two leaves.
- Make a clean cut with your sharp tool, just below a leaf node. You want to take a section of stem that is a few inches long.
- Remove the lower leaves. Gently pull off any leaves that would be below the soil line when you plant it.
- Dip the cut end in rooting hormone (if using). This helps to stimulate root development.
- Plant the cutting. Insert the cut end into your well-draining potting mix. You can plant a few cuttings per pot, spacing them a couple of inches apart.
- Water sparingly. You want the soil to be moist but not waterlogged.
Water Propagation (Watch the Magic Happen!)
This is a fantastic visual method! It’s great for seeing root development, though the resulting roots might be a bit more delicate than those grown in soil.
- Prepare your cutting as you would for stem cuttings. Make sure you have a healthy stem piece with at least one leaf left at the top.
- Place the cutting in a clean glass or jar filled with water. Make sure that only the cut end of the stem touches the water. We don’t want the leaves sitting in there.
- Position the container. Place it in bright, indirect light.
- Change the water regularly. Every few days, swap out the old water for fresh, room-temperature water to prevent rot and keep things healthy.
- Be patient! You’ll start to see tiny white roots emerging from the stem. This can take a few weeks.
The “Secret Sauce” (Pro Tips)
Here are a couple of things I’ve learned over the years that really make a difference:
- Don’t overwater! This is probably the most common mistake with bulb plants and cuttings alike. They hate sitting in soggy soil. Let that potting mix dry out a bit between waterings. For water propagation, the rule about keeping leaves out of the water is crucial – this prevents them from rotting before they even get a chance to root.
- Bottom heat can be your best friend. If you’re trying to speed things along, especially with stem cuttings, placing your pots on a seedling heat mat can significantly encourage root growth. It mimics the warmth of spring soil and really wakes up those dormant cells.
Aftercare & Troubleshooting
Once your little Drimiopsis maculata babies have developed a good set of roots (you’ll see them poking out the bottom of the pot or when you gently tug on a stem cutting), it’s time to treat them like the precious new life they are!
Continue to water them sparingly, allowing the soil to dry out between waterings. Keep them in bright, indirect light. They’ll start to produce new shoots and leaves, showing you they’re happy and settled.
Now, what about when things go wrong? The most common sign of trouble is rot. If you see a cutting turning mushy or black at the base, it’s usually a sign of too much moisture or a lack of air circulation. If you used water propagation, yellowing, translucent leaves that fall off are a red flag. If you’re dividing and a pup seems to be rotting, remove it immediately from the healthy plants and discard it. Clean your tools thoroughly before and after.
A Encouraging Closing
So there you have it! Propagating Drimiopsis maculata is a truly delightful journey, and I encourage you to give it a go. Be patient with your new plants. Gardening is all about observation and learning. There will be successes, and occasionally, a plant that just doesn’t make it – and that’s okay! The joy is in the trying, in the nurturing, and in the ever-growing collection of these cheerful, polka-dotted beauties. Happy propagating!
Resource:
https://identify.plantnet.org/k-world-flora/species/Drimiopsis%20maculata%20Lindl.%20&%20Paxton/data