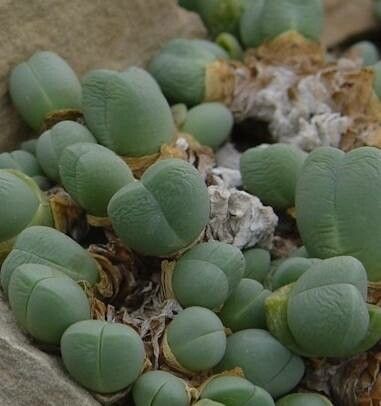
Oh, Gibbaeum heathii! If you’re looking for a little succulent that’s got a truly unique charm, you’ve found a winner. These little guys, often called “living pebbles” or “ice plants,” have these fascinating, fused leaves that almost look like they’re made of glassy stone. Watching them grow and multiply is a special kind of joy, a real testament to nature’s cleverness.
Now, I’m going to be honest with you. While Gibbaeum heathii isn’t the absolute trickiest plant to start from, it’s not quite a “set it and forget it” kind of deal either. It requires a bit of attentive care, especially for beginners. But don’t let that deter you! With a little patience and these tips, you’ll be well on your way to a whole collection of these beauties.
The Best Time to Start
My sweet spot for propagating Gibbaeum heathii is usually in the late spring or early summer. This is when the plant is actively growing and has plenty of energy to put into developing new roots. You’ll see it getting plump and happy, and that’s your cue that it’s ready to share its bounty. Avoid propagating during its dormant periods, which are typically in the heat of summer and the cold of winter.
Supplies You’ll Need
Here’s what you should have on hand before you get started:
- Well-draining soil mix: A cactus and succulent mix is a good start, but I like to amend it further. I mix in about 30% perlite or pumice to ensure fantastic drainage. This is non-negotiable for these little guys!
- Sharp, clean pruning shears or a craft knife: Sterilize your tools before you begin to prevent any nasty infections from spreading. A quick wipe with rubbing alcohol does the trick.
- Rooting hormone (optional but recommended): This can give your cuttings a little boost, especially if you’re new to this. Look for a powder or gel specifically for succulents.
- Small pots or seed trays: Clean ones, of course! Anything that holds soil and has drainage holes will work.
- Spray bottle: For gentle misting.
- Patience: This is the most crucial ingredient!
Propagation Methods
For Gibbaeum heathii, the most successful method is division and, sometimes, stem cuttings (though division is usually easier).
Division
This is my go-to method for Gibbaeum heathii. They tend to grow in clusters over time, and separating these clumps gives you multiple new plants.
- Gently remove the mother plant from its pot. You can do this by loosening the soil around the edges with a trowel.
- Carefully inspect the root ball. You’ll see where the individual rosettes are connected.
- Use your fingers or a clean knife to gently tease apart the clumps. You want to make sure each new division has some roots attached. Don’t rush this step; be gentle!
- Allow the divisions to callus. This is super important! Set them aside in a dry, well-ventilated spot for 2-3 days. The cut surfaces need to dry and form a protective layer to prevent rot.
- Pot them up. Fill your small pots with your well-draining soil mix. Make a small hole in the center and plant your division, ensuring the roots are covered.
- Water sparingly. Don’t drench them. A light misting is enough. You’ll water more thoroughly once you see signs of new growth.
Stem Cuttings (Less Common for this specific plant, but possible)
Sometimes, a rosette might get a bit leggy or you might want to experiment.
- Take a cutting. Carefully snip off a rosette with a bit of stem attached. Again, sterilize your tools.
- Remove any lower leaves that might go below the soil line.
- Let it callus. This is even more crucial for cuttings. Let the cut end dry out and form a callus for at least 3-5 days, or even a week if it’s humid.
- Dip in rooting hormone (optional). Lightly dip the callused end into your rooting hormone powder or gel.
- Plant the cutting. Insert the callused end into your well-draining soil mix. You can use a toothpick to help support it if needed.
- Mist lightly. Keep the soil barely moist by misting.
The “Secret Sauce” (Pro Tips)
Here are a few things I’ve learned over the years that make a difference:
- Don’t let the leaves touch the water. If you’re misting, aim for the soil, not directly onto the leaves of the cutting or division. Standing water on those fleshy leaves is a recipe for rot, and we want happy, healthy roots, not mushy disasters.
- Bottom heat is your friend. If you’ve got a seedling heat mat, placing your pots on it can really speed up root development. It mimics the warmth of spring and summer and gives those roots a comfortable place to start growing. Just a gentle warmth is all they need.
- Observe, observe, observe! Each plant is an individual. Pay attention to how yours is reacting. Is the soil drying out too quickly? Is it staying too wet? Adjust your watering and light accordingly.
Aftercare & Troubleshooting
Once your Gibbaeum heathii starts showing signs of new growth – usually little pups peeking out or the rosette looking plumper – you can gradually increase watering. Let the soil dry out almost completely between waterings. They prefer bright, indirect light. Too much direct sun can scorch them, and too little can cause them to stretch out (etiolate), losing that compact, jewel-like form.
The most common sign of trouble is rot. If you see a rosette turning mushy, translucent, or developing dark spots, it’s a sign of overwatering or poor drainage. If caught early, you might be able to save a cutting by trimming away the rot and letting it re-callus. Otherwise, it’s usually a sign to be more careful with your watering. Another issue is etiolation, where the plant stretches towards the light. This means it needs more light.
A Encouraging Closing
Propagating Gibbaeum heathii is a journey, my friends. It teaches you about patience, about observation, and about the incredible resilience of plants. Don’t be discouraged if your first attempt isn’t perfect. Just learn from it, adjust your approach, and celebrate every tiny new root and every new little pebble you help bring into the world. Happy growing!
Resource:
https://identify.plantnet.org/k-world-flora/species/Gibbaeum%20heathii%20(N.E.Br.)%20L.Bolus/data