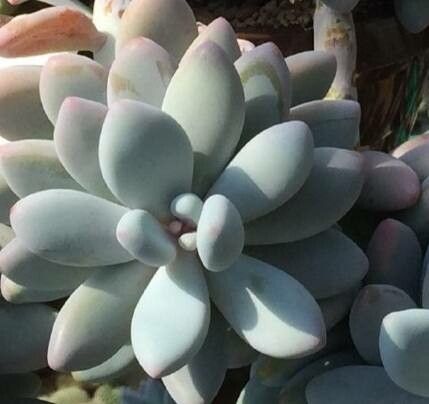
Hello fellow plant lovers! Today, we’re diving into the wonderful world of propagating Pachyphytum brachetii. If you’ve seen these plump, silvery-blue leaves forming charming rosettes, you know how captivating they are. Their muted hues and tidy growth habit make them a real standout in any succulent collection. And the best part? They’re surprisingly easy to multiply! It’s incredibly rewarding to watch a tiny leaf or a snippet of stem transform into a thriving new plant. Don’t worry if you’re new to this; Pachyphytum brachetii is a fantastic plant for beginners to practice propagation on.
The Best Time to Start
For the highest success rate, aim to propagate your Pachyphytum brachetii during its active growing season. Spring and early summer are your golden windows. The plant is full of energy, putting out new growth, and has the best chance of rooting quickly. Waiting until the plant is actively growing, rather than in its dormant period, truly makes a difference.
Supplies You’ll Need
Here’s what you’ll want to have on hand before you get started:
- Well-draining succulent or cactus potting mix: This is non-negotiable! You can buy a pre-made mix or create your own by combining potting soil with perlite and coarse sand.
- Sharp, clean pruning shears or a craft knife: For making clean cuts.
- Small pots or seedling trays: For your new propagations. Make sure they have drainage holes.
- Optional: Rooting hormone powder: While not always necessary for Pachyphytum brachetii, it can sometimes speed things up.
- Optional: Tray for bottom heat: If you have a seedling heat mat, it can be beneficial.
- A spray bottle: For gently misting.
Propagation Methods
Pachyphytum brachetii is famously easy to propagate from leaves and stem cuttings. Let’s explore how.
1. Leaf Propagation
This is my favorite method for Pachyphytum brachetii because it’s so simple and you can get a lot of new plants from just one mature specimen.
- Gently remove leaves: Choose healthy, plump leaves from the lower part of the stem. Wiggle the leaf gently from side to side until it detaches cleanly from the stem. It’s crucial that the entire base of the leaf, where it attached to the stem, comes away. If you tear the leaf, it’s unlikely to root.
- Allow to callus: Lay the removed leaves on a dry paper towel or a clean surface in a bright spot, out of direct sunlight. Let them callus over for 2-3 days. This seals the wound and prevents rot. You’ll see a dry, scab-like layer form at the base of the leaf.
- Place on soil: Once callused, simply lay the leaves on top of your well-draining succulent mix. Don’t bury them. They just need to be in contact with the soil surface.
- Be patient: Place the pot in a bright location with indirect light. Mist the soil very lightly every few days, just enough to keep the soil surface slightly moist. Avoid getting the leaves themselves waterlogged. You’ll start to see tiny roots and eventually a new baby plant emerge from the callused end of the leaf. This can take anywhere from a few weeks to a couple of months.
2. Stem Cuttings
If your plant has gotten a bit leggy, or you want to take cuttings from the top, this is the way to go.
- Take the cutting: Using your clean shears or knife, cut a section of stem that has at least a few leaves attached. You can take cuttings of various lengths, but a few inches is usually a good starting point.
- Remove lower leaves: Gently pull off the lowest leaves from the cutting. These can be propagated separately using the leaf method!
- Allow to callus: Just like with leaf cuttings, let the cut end of the stem dry out and form a callus. This usually takes about 3-5 days, depending on humidity.
- Plant the cutting: Once callused, insert the cut end of the stem about an inch deep into your succulent potting mix. You can use a few cuttings per pot if you like, spacing them out.
- Water sparingly: Water the soil very lightly after planting. Then, allow the soil to dry out almost completely before watering again. Keep in bright, indirect light. Roots should develop from the bottom of the stem.
The “Secret Sauce” (Pro Tips)
Here are a couple of things I’ve learned over the years that really seem to help:
- Listen to your leaves: When you’re removing leaves for propagation, if one breaks or tears, don’t use it for propagation. It’s more likely to rot than root. Save those healthy, clean removals!
- Avoid direct water contact for leaves: This is huge, especially for leaf propagation. If the part of the leaf that’s supposed to root sits directly in water, it will likely just rot. Laying them on moist soil is the key.
- Bottom heat is your friend: If you have a seedling heat mat, placing your pots on it can really encourage faster root development. It mimics the warmth of spring and summer beautifully.
Aftercare & Troubleshooting
Once you see tiny roots emerging from your leaf cuttings, or the stem cuttings feel firm and show signs of new growth, it’s time for slightly more attentive care.
- Gentle watering: Continue to water sparingly. Allow the soil to dry out almost completely between waterings. Overwatering is the quickest way to kill a new succulent.
- Gradual light adjustment: Your new babies will be happy in bright, indirect light. As they get a bit bigger and stronger, you can slowly introduce them to more direct morning sun, but always avoid harsh afternoon sun, which can scorch them.
- When to pot up: Once the new plantlets have developed a good root system and are a decent size, you can gently transplant them into their own small pots with fresh succulent mix.
A common sign of failure is rot. If a leaf or cutting turns black and mushy, it’s usually due to too much moisture. If this happens, remove the affected part immediately and allow any healthy pieces to dry out thoroughly. Another sign of struggle is if the leaf shrivels up without producing roots or a plant. This could mean it’s too dry, or sometimes, the leaf just wasn’t viable to begin with.
A Encouraging Closing
See? Propagating Pachyphytum brachetii is totally achievable! It’s a journey that requires a little bit of patience, a touch of observation, and a whole lot of joy. Enjoy the process of watching life spring from a single leaf or a humble stem. Happy propagating, and may your collections grow!
Resource: