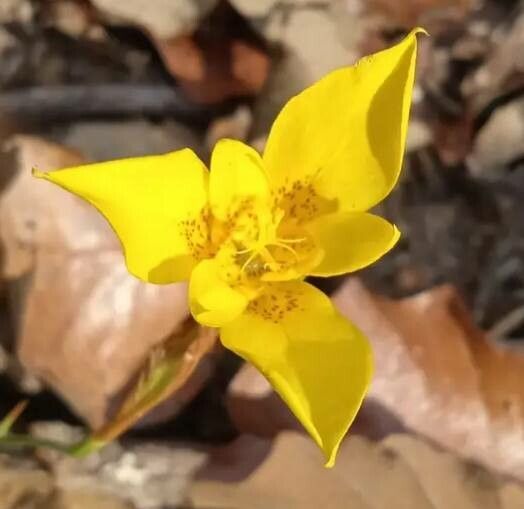
Hello, fellow plant lovers! Today, we’re diving into the enchanting world of Calochortus monophyllus, often called the Mariposa Lily. These California natives are simply stunning, with their delicate, cup-shaped blooms that dance in the breeze. They’re like little jewels in the garden, and if you’ve ever admired their beauty, you might be wondering if you can grow more of them. Good news: you absolutely can! Propagating these beauties is a wonderfully rewarding journey, though I’ll be honest, they can be a tad more finicky than, say, a pothos cutting. But don’t let that deter you! With a little patience and the right approach, you’ll be well on your way to creating your own mini Mariposa meadows.
The Best Time to Start
My top advice? Aim for late summer or early fall. This is typically when the plant is completing its active growing season and beginning its dormancy. The bulbs are robust, and the energy is stored, making them prime candidates for propagation. Think of it like a plant’s ‘going to bed’ phase – they’re settling in and have the resources to handle a little stress.
Supplies You’ll Need
Gathering your tools beforehand makes the whole process smoother. You don’t need much, but the right items really help.
- trowel or small spade: For gently lifting bulbs.
- Sharp, clean pruners or a knife: For separating bulb offsets. Sterilize them with rubbing alcohol between cuts to prevent disease.
- Well-draining potting mix: This is crucial! A good mix for bulbs is essential. I like to use a combination of coarse sand, perlite, and a good quality potting soil. Think gritty, not soggy.
- A shallow tray or pots: For planting your new bulbs.
- Rooting hormone (optional but recommended for a boost): Especially helpful if you’re a bit nervous about root development.
Propagation Methods: Let’s Talk Bulbs!
Calochortus monophyllus primarily propagates through bulb offsets, also known as bulbils or corms. This is the most reliable and straightforward method for home gardeners.
- Gently Excavate: With your trowel, carefully dig around the base of your established Calochortus. You want to lift the parent bulb and any attached offsets without damaging them. Remember, these aren’t your typical garden thugs; they’re delicate!
- Identify the Offsets: Once you have the bulb cluster out of the soil, gently tease apart the clump. You’ll see smaller bulbs attached to the main bulb. These are your baby Mariposa Lilies! They might be small, but they hold the promise of future blooms.
- Separate with Care: Using your sterilized pruners or knife, carefully cut the offsets away from the parent bulb. Try to ensure each offset has a tiny piece of the basal plate, which is where new roots will emerge. If an offset is very small, it might take a year or two longer to mature.
- Plant Your New Treasures: Prepare your shallow tray or pots with your well-draining potting mix. Plant each offset about 1-2 inches deep, depending on its size. Make sure the pointed end (where the shoot will emerge) is facing up.
The “Secret Sauce” (Pro Tips)
Here are a few little tricks that have made a big difference for me over the years:
- Let them Dry Out (Slightly!): After you’ve separated and planted your offsets, resist the urge to water immediately and heavily. I like to let them sit in their pots for a few days in a cool, dry spot. This helps any tiny cuts on the bulbs heal and reduces the risk of rot when you do start watering.
- Mimic Their Natural Habitat: Think about where Calochortus thrives. It’s often in sandy, well-drained soils that dry out between rains. Your potting mix needs to reflect this. If your mix feels heavy or stays wet for too long, add more sand or perlite. Overwatering is the quickest way to lose these precious bulbs.
- Patience is a Virtue (Especially with Corms!): Don’t be discouraged if you don’t see much activity right away. Bulbs can take their sweet time to establish. They might sprout a tiny bit of leaf growth the first season, but forming a substantial bulb for flowering often takes two or even three years.
Aftercare & Troubleshooting
Once your new Calochortus offsets are planted, you’ll want to provide them with the right care.
- Watering: After that initial drying period, water sparingly, but thoroughly. The soil should be moist but never soggy. Allow the soil to dry out somewhat between waterings. This is especially important as they enter their dormancy in warmer months.
- Light: Provide bright, indirect light. Too much intense sun indoors can scorch delicate new growth. Outdoors, they’ll appreciate a spot with good air circulation.
- Dormancy: As spring turns to summer, your Calochortus will naturally start to go dormant. The leaves will yellow and die back. Stop watering at this point and let the soil dry out completely. This rest period is vital for their health and future blooming. Store the pots in a cool, dry place during this time.
- Troubleshooting – The Dreaded Rot: The most common problem you’ll encounter is rot. If you see your offsets turning mushy, brown, or developing soft spots, it’s almost always a sign of too much moisture and poor drainage. There’s often no coming back from this once it starts. This is why that gritty, well-draining soil and careful watering are non-negotiable. If you notice a bit of surface mold, try gently scraping it away and ensuring better airflow.
Breathe Deep and Bloom
Propagating Calochortus monophyllus is a lesson in slowing down and appreciating the subtle rhythms of nature. Don’t get discouraged if not every offset makes it. Each one is a little experiment, and you’ll learn so much with every attempt. The joy of seeing those first tiny shoots emerge and knowing you helped create them is truly immense. Happy planting, and may your Mariposa Lilies bloom beautifully!
Resource:
https://identify.plantnet.org/k-world-flora/species/Calochortus%20monophyllus%20(Lindl.)%20Lem./data