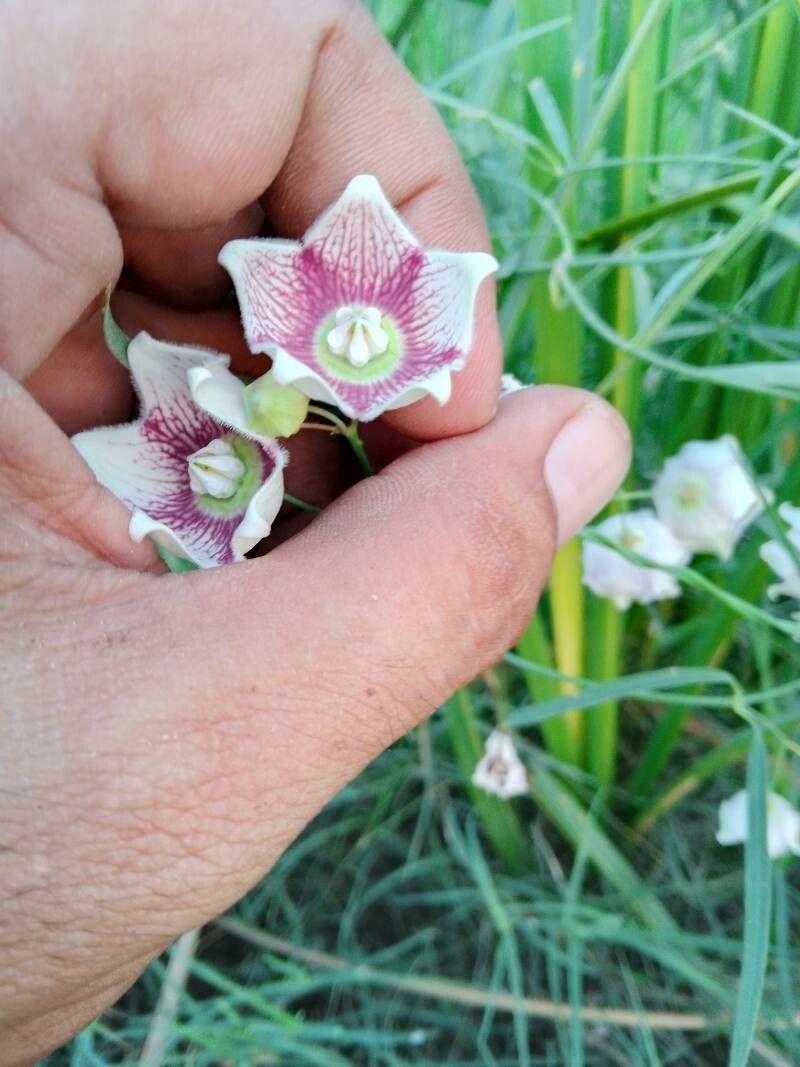
Oh, hello there, fellow garden enthusiast! It’s so lovely to have you join me. Today, we’re diving into the wonderful world of Oxystelma esculentum, often called the “creeping wire vine” or “dhudhi vel” in some parts of the world. This plant is just a gem, isn’t it? Its delicate, star-shaped flowers are a magnet for pollinators, and the unique way it drapes and trails makes it perfect for trellises, hanging baskets, or even just rambling through your garden.
Propagating Oxystelma esculentum is a surprisingly rewarding endeavor. It’s a way to multiply that beauty and share it with friends, or simply ensure you have more of this delightful vine to enjoy. For beginners, I’d say it’s moderately easy – with a little care and attention, you’ll be successful.
The Best Time to Start
Generally, the spring is your sweet spot for propagating Oxystelma esculentum. You want to catch it when it’s actively growing, pushing out new shoots. Think after the last frost, when the days are getting longer and warmer, but before the intense heat of mid-summer. This gives your cuttings plenty of time to establish themselves strong roots before the cooler weather arrives.
Supplies You’ll Need
Gathering your supplies beforehand makes the whole process much smoother. Here’s what I usually have on hand:
- Sharp Pruning Shears or Scissors: Clean cuts are crucial for healthy propagation.
- Rooting Hormone (Optional but Recommended): This can significantly boost your success rate, especially with stem cuttings.
- Potting Mix: A well-draining mix is key. I like to use a blend of coco coir, perlite, and a touch of compost for good aeration and moisture retention.
- Small Pots or Seed Trays: For your cuttings to root in.
- Labeling Stakes: To remember what you planted and when!
- Spray Bottle: For misting.
- Clear Plastic Bag or Dome: To create a humid environment for cuttings.
- Well-Established Parent Plant: Of course, you need a healthy Oxystelma esculentum to take from!
Propagation Methods
There are a couple of reliable ways to get more Oxystelma esculentum from your existing plant. Let’s walk through them.
Method 1: Stem Cuttings
This is my go-to method for many trailing plants, and Oxystelma esculentum responds beautifully.
- Select Your Cuttings: Look for healthy, non-flowering stems that are about 4-6 inches long. You want stems that are somewhat firm, not too woody, but also not completely floppy. A stem that bends without snapping is usually just right.
- Make the Cut: Using your clean pruning shears, make a clean cut just below a leaf node. A leaf node is where a leaf attaches to the stem. This is where roots are most likely to form.
- Prepare the Cutting: Gently remove the leaves from the bottom 2-3 inches of the stem. You can leave a couple of leaves at the top to help with photosynthesis.
- Apply Rooting Hormone (If Using): Dip the cut end of the stem into your rooting hormone, tapping off any excess.
- Plant Your Cuttings: Fill your small pots with your well-draining potting mix. Make a small hole in the center with your finger or a pencil and gently insert the cutting. Gently firm the soil around the stem to ensure good contact.
- Water and Cover: Water the soil thoroughly but gently. Then, place the pot inside a clear plastic bag, creating a mini greenhouse effect. You can secure the bag around the pot with a rubber band. Alternatively, use a clear plastic dome.
Method 2: Water Propagation
This method is wonderfully transparent and satisfying to watch!
- Select and Cut: Similar to stem cuttings, choose healthy, 4-6 inch stems. Make your cut just below a leaf node.
- Remove Lower Leaves: Strip off the leaves from the bottom 2-3 inches of the stem.
- Place in Water: Fill a clean jar or glass with fresh water. Place the prepared cuttings in the water, ensuring that the leaf nodes are submerged.
- Location: Set the jar in a bright spot that receives indirect sunlight. Avoid direct sun, which can scorch the delicate cuttings.
- Change Water Regularly: Change the water every few days to keep it fresh and prevent bacterial growth.
The “Secret Sauce” (Pro Tips)
Here are a few tricks I’ve learned over the years that can really make a difference:
- Don’t Let Leaves Touch the Water: If you’re water propagating, make sure any leaves that are submerged are removed. Leaves in the water tend to rot and can introduce disease to your cuttings.
- Use Bottom Heat (For Cuttings): If you’re using the soil method, especially if your temperatures are a bit cooler, a heating mat placed underneath your pots can work wonders. It encourages root development from the bottom up.
- Patience is Key with Leaf Node Cuts: Remember, that leaf node is where the magic happens. Always aim to have at least one node submerged in soil or water. This is where the roots are programmed to emerge.
Aftercare & Troubleshooting
Once you see those little roots forming – hooray!
- For Water Cuttings: When your cuttings have developed roots that are about an inch long, they’re ready to be planted in soil. Transplant them into pots filled with your well-draining potting mix, just as you would with the stem cuttings. Water them in gently.
- For Soil Cuttings: You’ll know your cuttings have rooted when you begin to see new growth appearing at the top, or if you gently tug on the cutting and feel resistance. This can take anywhere from 3-6 weeks, or even a bit longer. Once rooted, you can remove the plastic bag gradually over a few days to help the plant acclimate to normal humidity. Water as needed, keeping the soil consistently moist but not waterlogged.
- Troubleshooting: The most common issue you might encounter is rot. This usually happens when cuttings are kept too wet or in poor air circulation. If you see a stem turning mushy and black, it’s best to discard it. Ensuring your soil drains well and offering good airflow can prevent this. Yellowing leaves on a cutting can sometimes indicate not enough light, or conversely, if they’re wilting excessively, they might be too dry.
A Sweet Closing
Propagating Oxystelma esculentum is a journey, and like any good journey, it’s about the experience. Don’t be discouraged if your first attempt isn’t perfect. Keep trying, observe your plants, and learn from each step. Soon, you’ll have an abundance of these lovely vines to enjoy. Happy propagating!
Resource:
https://identify.plantnet.org/k-world-flora/species/Oxystelma%20esculentum%20(L.f.)%20Sm./data