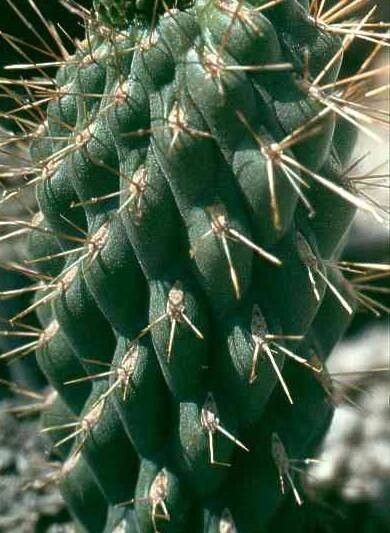
Hello fellow plant lovers! Let’s talk about a really fascinating desert dweller: Cylindropuntia fulgida, commonly known as the jumping cholla. This cactus truly gets its name honest – its segments seem to leap off the parent plant with the slightest touch, which can be both startling and incredibly endearing. Its spiky, chain-like growth is unlike anything else in my garden, and it produces these gorgeous pink-to-lavender flowers in the summer. Growing your own jumping cholla from cuttings is a journey I highly recommend. Honestly, for beginners, I’d say it’s moderately challenging. It’s not as foolproof as a succulent, but with a little attention, you’ll be rewarded with a thriving new plant.
The Best Time to Start
My favorite time to take cuttings from Cylindropuntia fulgida is in the late spring or early summer. This is when the plant is actively growing and has plenty of energy stored up. The warmer temperatures really help those cuttings get established and start rooting. Avoid taking cuttings during the heat of mid-summer or when it’s cold and damp; you want perfect growing conditions.
Supplies You’ll Need
Here’s what you’ll want to have on hand to make the process smooth:
- Thick gloves: Seriously, these spines are no joke!
- Tongs or pliers: For safely handling the segments.
- Clean, sharp pruning shears or a sharp knife: To make clean cuts.
- A well-draining potting mix: I like a cactus or succulent mix, or you can make your own by combining potting soil with perlite or pumice (about a 50/50 ratio).
- Terra cotta pots or nursery containers: These allow for good aeration.
- Rooting hormone (optional but helpful): A powder or liquid can speed things up.
- A small trowel or dibble stick: For making holes in the soil.
- Newspaper or cardboard: For handling the spiky segments.
Propagation Methods: Stem Cuttings are Key!
For Cylindropuntia fulgida, the most reliable and straightforward method is stem cuttings. Forget about water propagation here; it’s just asking for rot with these guys.
- Select Your Cutting: Look for a healthy segment that looks plump and vibrant. A segment that’s about 6-12 inches long is a good place to start. You can carefully twist or cut one off from a mature plant.
- Let it “Callus”: This is a crucial step! After taking your cutting, allow it to sit in a warm, dry, well-ventilated spot for several days to a week. You want the cut end to dry out and form a protective callus. This prevents rot when you plant it.
- Apply Rooting Hormone (Optional): Once the cut end has callused, you can dip it into rooting hormone powder, tapping off any excess.
- Plant Your Cutting: Fill your pot with your well-draining cactus mix. Use your dibble stick or trowel to create a hole about 1-2 inches deep in the center of the soil.
- Insert and Firm: Gently insert the callused end of your cutting into the hole. Firm the soil around the base to help it stand upright. Don’t bury it too deep; you want most of the segment exposed.
- Wait for Roots: This is where patience comes in. Do NOT water immediately. Let the cutting sit in its dry soil for about a week to settle. Then, you can give it a very light watering.
The “Secret Sauce” (Pro Tips)
This is where a little experience really makes a difference!
- Think Spine Safety First: When handling even small cuttings, imagine they have little sticky grenades attached to them. Wrap the cutting in a folded piece of newspaper or a thick piece of cardboard before picking it up with tongs. This gives you a buffer against those surprisingly sharp spines.
- Bottom Heat is Your Friend: While not strictly essential in a warm climate, giving your cuttings a little boost with bottom heat can significantly speed up rooting. A seedling heat mat placed under the pots provides gentle warmth that encourages root development. You can find affordable ones online.
- Don’t Overwater, Ever! Seriously, this is the biggest killer of cactus cuttings. They are desert plants and are built to withstand drought. Water only when the soil is completely dry, and even then, water sparingly. It’s always better to err on the side of too dry than too wet.
Aftercare & Troubleshooting
Once you notice signs of new growth – which usually means a small bud or pup appearing or a slight resistance when you gently tug the cutting – you know roots have formed! Congrats!
- Continue Watering Sparingly: Keep up with your infrequent watering schedule. Allow the soil to dry out completely between waterings.
- Transition to More Light: Gradually introduce your new plant to brighter light. Avoid direct, scorching sun right away; a bright, indirect light is perfect initially.
- Watch for Rot: The most common problem is rot, which usually looks like a mushy, discolored base. If you see this, it’s often too late to save the cutting. Prevention through proper watering and allowing callusing is key.
- Mealybugs: Keep an eye out for tiny white, cottony masses – these are mealybugs. Dab them with a cotton swab dipped in rubbing alcohol.
A Encouraging Closing
Propagating Cylindropuntia fulgida is a rewarding experience that connects you more deeply with the resilience and unique beauty of desert plants. Be patient, trust the process, and don’t be discouraged if you have a few failures along the way. Every gardener learns from their mistakes – I certainly have! Enjoy the journey of growing your own jumping cholla. Happy gardening!
Resource: