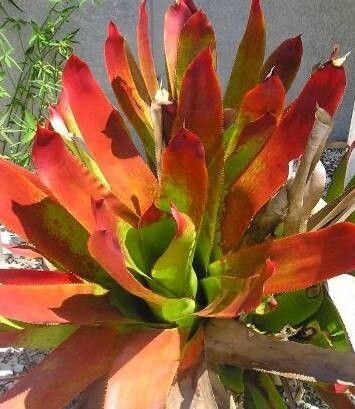
Oh, hello there! Come on in, pull up a chair. Let’s chat about one of my favorite bromeliads: Aechmea ampla. This big, beautiful guy can bring such a tropical flair to any space, with its bold, striking leaves and, if you’re lucky, a show-stopping bloom. And the best part? You can easily expand your collection by propagating it! It’s a wonderfully rewarding process, kind of like watching a little piece of your garden grow into something magnificent all on its own. For beginners? I’d say it’s moderately easy. You won’t be tearing your hair out, but a little bit of attentive care goes a long way.
The Best Time to Start
When it comes to Aechmea ampla, patience is key, and timing is too. The absolute best time to propagate is when the mother plant is actively growing, which typically happens in the late spring through summer months. This is when the plant has the most energy to put into producing new growth, making the process smoother and more successful. You’ll often see little pups (baby plants) emerging at the base of the mature plant during this time. That’s your cue!
Supplies You’ll Need
Gathering your supplies beforehand makes the whole process a breeze. Here’s what you’ll want to have on hand:
- Sharp Pruning Shears or a Clean Knife: Make sure they are sterilized to prevent introducing any nasties to your plant. A quick wipe with rubbing alcohol works wonders.
- Well-Draining Potting Mix: Bromeliads hate soggy feet! A good mix for them is usually equal parts orchid bark, perlite, and a good quality potting soil. You can also find specific bromeliad mixes at your local garden center.
- Small Pots or Containers: These should have drainage holes. Small nursery pots are perfect.
- Rooting Hormone (Optional but Recommended): This little helper can significantly boost your success rate by encouraging faster root development.
- Watering Can or Spray Bottle: For gentle watering and misting.
- Patience! This is the most important tool of all.
Propagation Methods
Aechmea ampla is a champion when it comes to producing pups, so division is definitely your go-to method.
Division of Pups:
This is how most people propagate Aechmea ampla. Once your mature plant has produced a baby plant, or pup, at its base, it’s time to give it its own home.
- Wait for the Pup to Grow: You’re looking for pups that are at least one-third the size of the mother plant. They’ll typically have their own little leaves and sometimes even a small root system starting to form.
- Gently Remove the Pup: Carefully take the mother plant out of its pot. You might need to gently loosen the soil around the base. Look for where the pup connects to the mother plant.
- Make the Cut: Using your sterilized pruning shears or knife, carefully cut the pup away from the mother plant. Try to get a clean cut as close to the mother plant as possible. If the pup already has roots, try to keep them intact.
- Let it Heal (Crucial Step!): This is a big one! After separating the pup, let the cut end air dry for at least 24-48 hours. You want callous to form over the cut. This prevents rot, which is the biggest enemy of newly propagated plants. You can place the pup in a dry, well-ventilated spot, out of direct sunlight.
- Potting Up: Once the cut has calloused, it’s time to plant. Fill your small pot with your well-draining bromeliad mix. Make a small hole in the center and gently place the pup into the soil, making sure the base is covered. Don’t bury it too deep.
- Initial Watering: Water lightly at first. You don’t want to drench it, just moisten the soil.
The “Secret Sauce” (Pro Tips)
Here are a couple of things I’ve learned over the years that can really make a difference:
- Don’t Overwater New Pups: Seriously, this is where most people go wrong. New pups haven’t established a robust root system yet. Keep the soil lightly moist, not wet. A good indicator is when the potting mix feels slightly dry to the touch. Misting the leaves occasionally can also help, but the soil is where the roots will develop.
- A Little Warmth Goes a Long Way: If you’re propagating in a cooler home or during a slightly cooler time of year, consider using a bit of bottom heat. Placing your pots on a heat mat designed for seedlings can really encourage faster root development. Just make sure it’s set to a low to medium temperature.
Aftercare & Troubleshooting
Once your pup is in its own pot, treat it like a miniature version of the adult.
- Light: Place it in bright, indirect light. Avoid harsh, direct sun, which can scorch its young leaves.
- Watering: Continue with light watering. Allow the soil to dry out slightly between waterings. Remember, drainage is key!
- Roots: You’ll know your pup has successfully rooted when you see signs of new leaf growth or if it feels firmly anchored in the soil. It can take anywhere from a few weeks to a couple of months to see significant root development.
The main thing to watch out for is rot. If the base of your pup starts to look mushy, dark, or smells unpleasant, it’s likely rot. This is usually due to overwatering and poor drainage. If you catch it early, you might be able to cut away the rotted part and try to let the healthy part callous over again. But honestly, preventing it by following those light watering and drainage tips is far easier.
So there you have it! Propagating Aechmea ampla is such a satisfying journey. Don’t get discouraged if your first attempt isn’t perfect. Gardening is all about learning and adapting, and every plant is a new adventure. Just be patient, give them a little care, and soon you’ll have a whole little army of beautiful Aechmea ampla plants to enjoy! Happy growing!
Resource:
https://identify.plantnet.org/k-world-flora/species/Aechmea%20ampla%20L.B.Sm./data