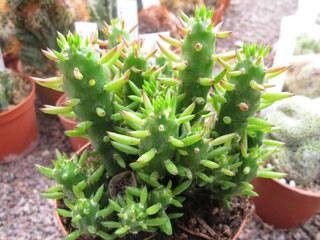
Oh, the Austrocylindropuntia subulata! If you’ve ever seen one of these striking beauties, you know exactly what I mean. Their long, spiny segments, often with leaves that look like tiny needles, give them such a unique, almost architectural presence in a garden or home. And the best part? They’re surprisingly rewarding to propagate. I’ve had so much joy watching these little segments take root and grow into their own thriving plants. If you’re new to plant propagation, I think you’ll find this one to be a friendly introduction; it’s quite forgiving!
The Best Time to Start
For Austrocylindropuntia subulata, the warm embrace of spring and early summer is your best bet. This is when the plant is actively growing, meaning it has the energy reserves to develop those crucial new roots. Trying to propagate during a plant’s dormant period is like asking someone to run a marathon when they’re feeling under the weather – it’s just not going to go as well! Aim for a time when your plant is looking robust and isn’t stressed.
Supplies You’ll Need
Here’s what I always keep on hand when I’m propagating these prickly pear relatives:
- Well-draining potting mix: A cactus and succulent blend is perfect. You can also mix your own with equal parts potting soil, perlite, and coarse sand.
- Sharp, clean pruning shears or a sharp knife: Sterilize these with rubbing alcohol before and after use to prevent disease.
- Rooting hormone (optional but recommended): A powder or liquid form will give your cuttings a nice boost.
- Small pots or a tray with drainage holes: Whatever you choose, make sure water can escape easily.
- Gravel or perlite: For added drainage and aeration at the bottom of pots.
- Gloves: Those spines can be sneaky!
- A spray bottle: For gentle watering.
- A watering can with a fine rose: For more direct watering once established.
Propagation Methods
There are a couple of tried-and-true ways to get more Austrocylindropuntia subulata plants. I’ve had great success with stem cuttings.
Stem Cuttings (The Most Common Method)
- Choose your cutting: Look for a healthy segment, ideally at least 4-6 inches long. Gently twist or carefully cut it from the parent plant. Don’t be afraid to get a clean slice right at the joint.
- Allow it to callus: This is crucial for cacti and succulents. Place the cut end upwards in a dry, well-ventilated spot away from direct sunlight for 3-7 days. You want the cut surface to dry out and form a hardened, callous layer. This prevents rot when you plant it.
- Prepare for planting: Once calloused, you can dip the cut end in rooting hormone if you’re using it.
- Planting: Fill your small pots with your well-draining soil mix. Make a small hole in the center and insert the calloused end of your cutting about an inch deep. Gently firm the soil around it. You can even add a layer of gravel or perlite on top of the soil for extra support and drainage.
- Wait to water: Don’t water immediately! Wait at least a week after planting. This reduces the risk of rot even further. When you do water, do so sparingly.
Water Propagation (Less Common for this Type, but Possible)
While more typical for leafy plants, you can try water propagation.
- Prepare your cutting: Follow steps 1 and 2 above for obtaining and callousing your cutting.
- Place in water: Fill a clean jar or glass with distilled water (tap water can sometimes have too many minerals). Suspend the calloused end of the cutting so that only the very tip touches the water. You don’t want any of the fleshy part submerged.
- Light and patience: Place the jar in bright, indirect light. Change the water every few days to keep it fresh. You should start to see tiny pinkish roots forming within a few weeks.
- Planting: Once the roots are about an inch long, carefully transfer the cutting to a pot filled with your well-draining soil mix, just as you would with the stem cutting method.
The “Secret Sauce” (Pro Tips)
- Don’t let the leaves touch the water (if water propagating): I learned this the hard way! Any part of the stem submerged for too long in water will eventually rot. Keep that cutting elevated so only the roots are in contact with the water.
- Bottom heat is your friend: If you’re propagating in a cooler environment, consider using a seedling heat mat under your pots. This gentle warmth encourages root development much faster.
- Patience is key with soil propagation: I know it’s tempting to poke around and see if there are roots, but resist the urge! You might damage tender new growth. I usually wait a good 4-6 weeks before gently tugging to test for resistance. If it holds firm, you’ve got roots!
Aftercare & Troubleshooting
Once you see those first signs of rooting – perhaps a tiny bit of new growth at the tip or a gentle tug showing resistance – your little Austrocylindropuntia is ready for a bit more attention.
- Watering: Start watering more regularly, but always allow the soil to dry out completely between waterings. A good rule of thumb is to water when the soil feels dry to the touch about an inch down. Use your spray bottle for gentle mists initially, then move to a watering can.
- Light: Gradually introduce your new plant to brighter light, but avoid intense, direct sun for the first few weeks as it acclivates.
- Troubleshooting – The dreaded rot: The biggest enemy of succulent propagation is rot. If your cutting turns mushy, black, or smells foul, it’s likely rotted. Unfortunately, there’s no coming back from that. This usually happens because of too much moisture, not allowing the cutting to callus properly, or using unsterilized tools. If you catch it early, you might be able to cut away the rotted part and let the healthy section callus again, but it’s often a lost cause.
A Warm Closing
Propagating plants, especially these fascinating cacti, is a journey of patience and observation. There’s a genuine thrill in watching a tiny segment transform into a new, thriving life. Don’t get discouraged if your first attempt isn’t perfect. Each plant, and each cutting, has its own personality and pace. Enjoy the process, celebrate your successes, and remember, your garden awaits more of these beautiful Austrocylindropuntias thanks to your efforts! Happy propagating!
Resource: