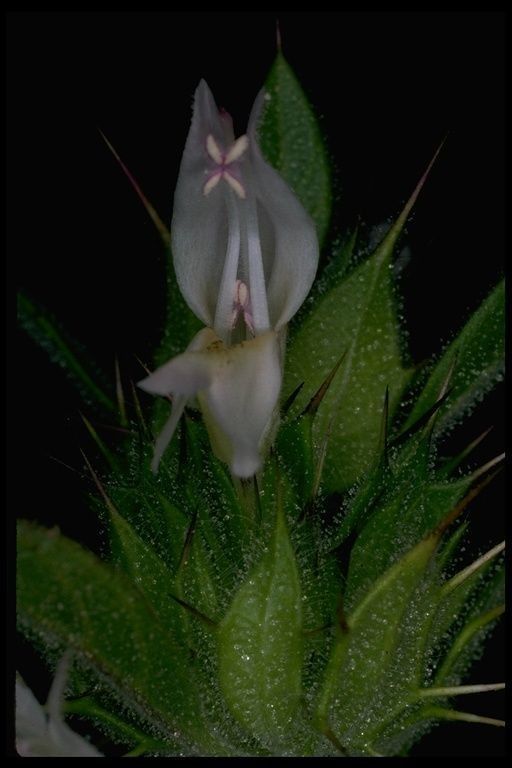
Hey there, fellow plant lovers! I’m so delighted to have you join me today for a deep dive into the world of Acanthomintha lanceolata, or as I affectionately call it, our delightful San Ysidro Mint. If you’ve ever seen this beauty gracing a garden, you’ll know why I’m so smitten. Its delicate, fragrant foliage and charming little flowers are simply irresistible.
Propagating it, you ask? Well, I find it to be a truly rewarding endeavor. It’s a wonderful way to share the joy of this native gem with friends or simply expand your own collection without breaking the bank. While it might not be the easiest plant for a complete novice, with a little guidance and patience, you’ll be well on your way to success. Don’t be intimidated; we’ll go through it together!
The Best Time to Start
For Acanthomintha lanceolata, the sweet spot for propagation is undeniably late spring to early summer. This is when the plant is in its active growth phase, meaning it has the energy and resources to readily produce new roots. You’ll want to take cuttings from stems that are actively growing but not yet flowering.
Supplies You’ll Need
Ready to get your hands dirty? Here’s what you’ll want to have on hand:
- Sharp Pruning Shears or a Clean Knife: For making clean cuts.
- Rooting Hormone (Optional but Recommended): A powder or gel that helps encourage root development.
- Well-Draining Potting Mix: A good blend of perlite, vermiculite, and peat moss or coco coir is ideal. You can also use a cactus/succulent mix.
- Small Pots or Seed Starting Trays: Clean ones, of course! Sterilization is key to preventing disease.
- Watering Can with a Fine Rose: For gentle watering.
- Plastic Bags or a Propagation Dome: To create a humid environment.
- Labeling Stakes and a Marker: To keep track of your propagated plants.
Propagation Methods
We’ll focus on the most reliable methods for San Ysidro Mint.
1. Stem Cuttings:
This is my go-to method for Acanthomintha lanceolata. It’s efficient and yields great results.
- Step 1: Take Your Cuttings: In late spring or early summer, select healthy, non-flowering stems. Using your sharp shears, make a clean cut just below a leaf node (where a leaf attaches to the stem). Aim for cuttings that are about 4-6 inches long.
- Step 2: Prepare the Cuttings: Gently remove the lower leaves, leaving just a few at the top. This prevents them from rotting in the soil. If you’re using rooting hormone, dip the cut end into it, tapping off any excess.
- Step 3: Plant Your Cuttings: Fill your small pots or trays with your prepared, moistened potting mix. Make a small hole in the center of the soil with a pencil or your finger. Insert the cut end of the stem into the hole, pushing it down about 1-2 inches. Gently firm the soil around the base.
- Step 4: Create Humidity: Water the soil very gently. Then, cover the pots with a clear plastic bag or place them under a propagation dome. This creates a mini-greenhouse effect, crucial for preventing the cuttings from drying out. Prop the bag up with stakes so it doesn’t touch the leaves.
2. Division (for established plants):
If you have a larger, established clump of San Ysidro Mint, division is a fantastic way to multiply it.
- Step 1: Dig Up the Plant: In the same late spring/early summer window, gently dig up the entire plant, being careful not to damage the roots.
- Step 2: Separate the Roots: Gently tease apart the root ball into smaller sections. Each section should have healthy roots and at least a few stems. If the roots are really tangled, you can use a clean knife to carefully slice through them.
- Step 3: Replant Your Divisions: Pot up each division into its own container with fresh potting mix. Water thoroughly.
The “Secret Sauce” (Pro Tips)
Here are a couple of tricks that have helped me achieve consistent success:
- Bottom Heat is Your Friend: If you’re serious about propagation, consider using a heat mat under your cuttings. Consistent warmth from below encourages root development much faster. It really makes a difference, especially if your room temperature fluctuates.
- Don’t Overwater, but Don’t Let Them Dry Out: This is a delicate balance! The soil should always feel lightly moist, never soggy. Overwatering is the fastest way to invite rot. I like to check the soil moisture by feeling it with my finger. If the top inch is dry, it’s time for a gentle watering.
Aftercare & Troubleshooting
Once your cuttings have started to root (you might see new growth or feel a gentle tug when you lightly pull on a stem), it’s time for a bit of a transition. Gradually remove the plastic bag or dome over a few days to acclimate them to lower humidity. Keep them in bright, indirect light and continue to water as needed.
Now, let’s talk about what to watch out for. The most common issue is root rot, which shows up as mushy, dark stems or leaves that turn yellow and fall off. This is almost always due to overwatering or poor drainage. If you suspect rot, gently remove the affected cutting from the soil. If there’s any healthy tissue left, you might be able to salvage it by trimming away the rotted parts and repotting in fresh, dry soil, but honestly, it’s usually a goner at that point. Yellowing leaves without mushiness can sometimes just mean it needs a bit more light or a touch less water.
A Little Encouragement
Propagating plants is a journey, not a race. There will be times when some cuttings don’t make it, and that’s perfectly okay. Every gardener, no matter how experienced, has their share of failures. The key is to learn from each attempt and keep trying. Celebrate the successes, and remember the joy of nurturing a tiny cutting into a vibrant, new plant. Be patient, be observant, and most importantly, enjoy the process! Happy propagating!
Resource:
https://identify.plantnet.org/k-world-flora/species/Acanthomintha%20lanceolata%20Curran/data