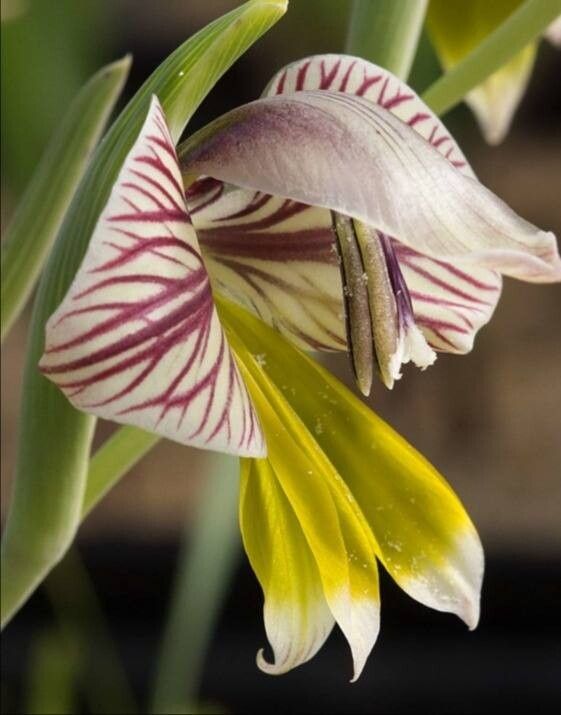
Oh, hello there! I’m so glad you’ve decided to dive into the wonderful world of Gladiolus watermeyeri. This African native, with its elegant, wispy spires of delicate blooms, is a true treasure. It’s a bit of a departure from its more common, showier cousins, offering a subtle beauty that’s utterly captivating. And the reward? Watching a tiny bit of plant life truly grow from your own efforts is just about the most satisfying thing a gardener can experience. Now, is Gladiolus watermeyeri a beginner’s dream or a bit of a challenge? Honestly, it leans a little towards the patient side. It’s not impossible by any means, but it does require a touch more attentiveness than, say, a pothos. Don’t let that deter you, though! With a little know-how, you’ll be well on your way.
The Best Time to Start
For Gladiolus watermeyeri, the sweet spot for propagation is late spring to early summer. You want to catch it when it’s actively growing but before the heat of midsummer really sets in. The corms (which look like bulbs but are technically modified stems) will have finished their blooming cycle and will have stored up plenty of energy to put into new growth. Waiting until after the foliage has started to yellow slightly but is still green is also a great sign. This tells me the plant is drawing all its remaining reserves down into the corm for its dormant period, and that corm is brimming with potential.
Supplies You’ll Need
Gathering your tools beforehand makes the whole process so much smoother. Here’s what I always have on hand:
- Sharp, clean pruning shears or a sharp knife: Crucial for making clean cuts to prevent disease.
- Well-draining potting mix: I like a blend of equal parts peat moss or coco coir, perlite, and coarse sand. You want good aeration.
- Small pots or seed trays: Clean ones are essential! Anything small, from yogurt cups with drainage holes to specialized propagation trays, will do.
- Rooting hormone (optional but recommended): A powdery or gel formula can give your cuttings a significant boost.
- Watering can or spray bottle: For gentle watering.
- Labels and a permanent marker: Trust me, you’ll thank yourself later for labeling everything!
- A warm, bright location: A windowsill that gets bright, indirect light is perfect.
Propagation Methods
While Gladiolus watermeyeri can be grown from seed, the most reliable and rewarding method for us home gardeners is division of corms. It’s straightforward and gives you the best chance of success.
Division of Corms:
- Wait for Dormancy: The absolute key here is to wait until the foliage has completely died back and the plant is dormant. This usually happens in late summer or early fall after the growing season. Gently dig up the corms. You’ll usually find the main corm from the current year with smaller offsets or cormels attached to its base.
- Clean and Inspect: Gently brush off as much soil as you can. Look for any signs of rot or disease. If you see any mushy spots, carefully trim them away with your clean shears.
- Separate the Cormels: This is the exciting part! Gently twist or cut the smaller cormels away from the parent corm. You want to ensure each cormel has at least a tiny nub or potential growth point. Don’t worry if they look small; these little guys are packed with life.
- Prepare for Planting: Let the separated cormels sit for a day or two in a dry, airy place. This helps any cut surfaces heal over, reducing the risk of rot.
- Planting: Fill your small pots with your well-draining potting mix. Make a small indentation in the soil. Place each cormel pointed end up (if you can discern it; if not, just plant it horizontally). Cover them with about an inch of soil.
- Water Gently: Water lightly, just enough to moisten the soil.
The “Secret Sauce” (Pro Tips)
Here are a couple of things I’ve learned over the years that really make a difference:
- Don’t overwater after planting: This is probably the most common mistake people make. Cormels are prone to rot, especially when they don’t have established roots yet. Keep the soil barely moist. A light misting from a spray bottle is often better than a thorough drenching.
- Bottom heat is your friend: While not strictly necessary, placing your pots on a gentle seedling heat mat can significantly speed up root development and germination. It mimics the warmth of the soil from the parent plant. Just keep the temperature around 70-75°F (21-24°C).
Aftercare & Troubleshooting
Once your cormels are planted, it’s a waiting game. They might take several weeks, or even a few months, to show signs of life. You’re looking for tiny shoots poking through the soil.
- First signs of life: When you see a shoot, it’s time to ensure they get bright, indirect light. Continue to water very sparingly, only when the top half-inch of soil feels dry.
- Signs of failure: The biggest culprit is rot. If you see a cormel turn mushy and black, or if the soil stays constantly soggy and develops a sour smell, it’s likely succumbing to rot. This is usually due to too much moisture and poor air circulation. Discard any affected cormels immediately to prevent it from spreading. Another sign of trouble is simply… nothing. If after a good few months you see no activity, the cormel may have been too small, too old, or simply not viable. Don’t be discouraged!
A Encouraging Closing
Growing new plants is such a journey, and Gladiolus watermeyeri is a beautiful one to undertake. Be patient with these little corms. They have their own rhythm, and you’re just helping them along. Celebrate the tiny victories – that first green shoot is a moment of pure magic! Enjoy the process of nurturing your own garden, one new plant at a time. Happy gardening!
Resource:
https://identify.plantnet.org/k-world-flora/species/Gladiolus%20watermeyeri%20L.Bolus/data